Routed Box Joint

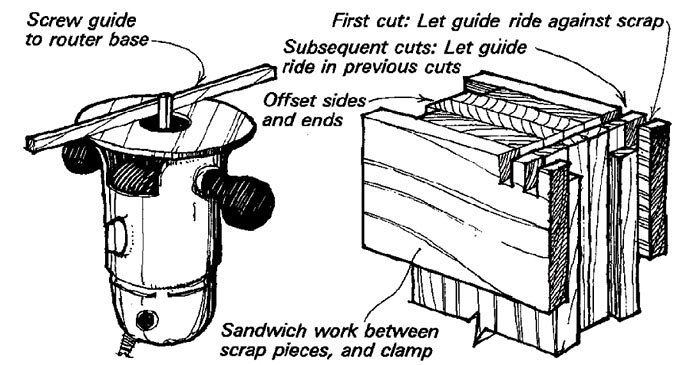
I enjoyed Patrick Warner’s article on the box joint (Fine Woodworking #14, Jan. ’79). I like the visual results, strength and ease of assembly the joint allows. Like Warner, I use a router to cut box joints, but my technique is different. I have installed a guide block on the base of my router that acts as a jig for accurately spacing the finger cuts. The setup does not limit me in width, angle or length of project. I have made jigs to fit several common-size router bits but I usually prefer the 1/2-in. setup for most work. The sketch shows how to mount the guide block for 1/2-in. cuts. The accuracy of the joint depends on how carefully you position the guide in relation to the bit. Drill the screw holes in the router base a little large to give yourself some adjustment room.
To use the guide, sandwich the box sides and ends between two pieces of scrap, offsetting the sides from the ends 1/2 in. and the ends from the scrap 1/2 in., as shown. Now chuck a carbide bit in the router and make the first cut with the guide sliding against the scrap pieces. For the second cut, just slide the guide in the newly cut groove. Continue the process across the ends of the boards for the rest of the cuts. It’s like climbing a ladder. Wax the guide to slide easily in the grooves.
George Persson, Star Lake, N.Y.
Fine Woodworking Magazine, October 1981 No. 30

Fine Woodworking Recommended Products

Veritas Precision Square

Leigh Super 18 Jig

MicroJig Matchfit dovetail clamps


Comments
I tried this and LIKED it a lot.
So I bought 3 bases made 3 guide rails of different sizes and attached them to the bases. Now I just grab a base plate of the size I want. AWESOME!
Thank you!
Log in or create an account to post a comment.
Sign up Log in