Improved Miter-Slot Runners
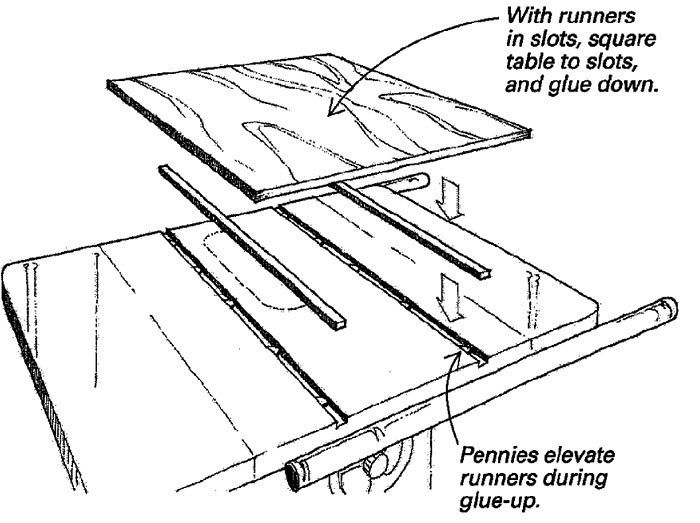
As anyone who has ever tried to make a sliding table for a tablesaw knows, aligning the runners to the sliding table correctly can be frustrating. The trick is to do it in place. This drastically simplifies the process and virtually ensures a perfect fit and smooth sliding action.
First cut and fit runners for the miter-gauge slots. Make the runners a little shorter than the total length of the slot and slightly thinner than the depth of the slot. The runners should be hardwood (red oak or hard maple is a good choice). Sand or plane the runners until they move freely but snugly. The runner size typically will be 3/4 in. wide by a little less than 3/8 in. thick. The runners should not touch the bottom of the slots when the table is finished.
Attach the sliding table to the runners. The runners should be elevated until they are just proud of the table surface. I use pennies. I evenly distribute four or five stacks of two pennies along the bottom of each slot to raise the runners.
Align the ends of the runners with the front ends of the slots, and shim or wedge the runners to force them to the edge of the miter slot closest to the blade. This removes any remaining slop. Apply glue to the top of the runners, and carefully set the sliding table on top, aligning the front edge of the table at 90¡ to the miter slots. Finally, add weight to the top of the table over the runners for a good glue bond. I generally use a good stack of bricks.
After the glue has cured, remove the sliding table, pennies and shims from the saw. For insurance, screw the runners to the table from below, countersinking the heads. Apply a coat or two of paste wax to the table bottom and runners, and you’ll be in sliding heaven.
Mike Smith, Smyrna, Ga.
Fine Woodworking Magazine, August 1996 No. 119

Fine Woodworking Recommended Products
Double Sided Tape
Veritas Standard Wheel Marking Gauge
Incra Miter 1000HD




Log in or create an account to post a comment.
Sign up Log in