Hole-Boring Jig for Angled Spindle Mortises
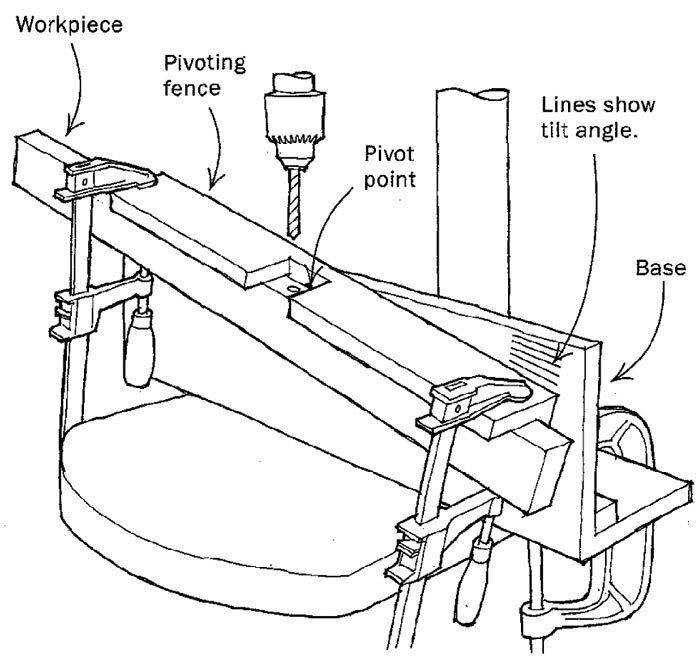
Recently I built a spindle-sided cradle with angled sides and ends. This type of construction requires that each spindle mortise be bored at a slightly different angle. Not trusting my eye to drill each mortise by hand, I built a simple but useful drill-press jig to accomplish the job accurately and quickly. The jig, built of 3/4-in.-thick medium-density fiberboard (MDF), consists of an L-shaped base that clamps to the drill-press table and an inverted L-shaped pivoting fence for holding the workpiece. The pivoting fence should be a couple of inches shorter than the base.
To make the jig, construct the two L-shaped pieces, then drill pivot holes in both the vertical plate of the base and the fence. Drill the pivot hole in the fence right at the joint of the pieces forming the inside of the L-shape. Mount the fence to the base with a 1/4-in. countersunk stove bolt. By mounting the pivoting fence as an inverted L and clamping the workpiece to the underside of the short leg, you can set the mortise depth, and it will remain the same for all mortises, regardless of the angle of the bore.
To use this jig, simply clamp the workpiece to the underside of the pivoting fence, rotate the fence to the correct angle and drill. Because the fence is shorter than the base, you can mark all of the reference angles for the mortises to be bored Where each mortise angle is different, I usually just hold the pivot angle by hand. But for repeated mortises at the same setting, it is best to clamp the fence to the base at one end.
Richard Brening, Bellevue, Wash.
Fine Woodworking Magazine, February 2001 No. 147

Fine Woodworking Recommended Products
Incra Miter 1000HD
Veritas Standard Wheel Marking Gauge
Leigh Super 18 Jig




Log in or create an account to post a comment.
Sign up Log in