Cutting Circles on the Bandsaw

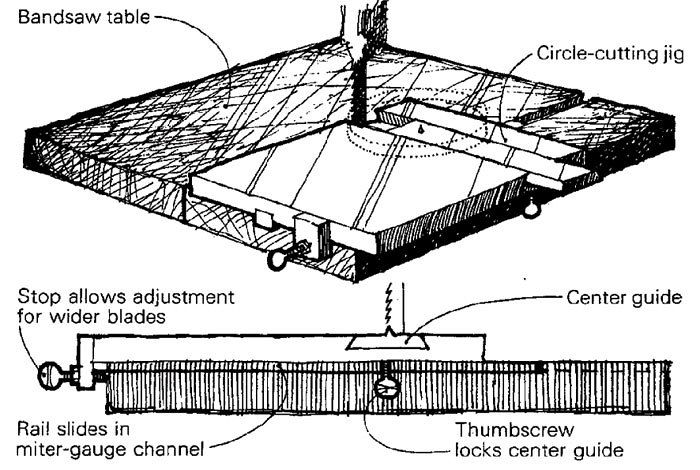
The circle-cutting jig I use in my shop offers several advantages over other circle-cutting jigs published in Methods of Work. First, because the jig uses the miter-gauge slot in the saw’s table, no clamps are necessary. This not only saves time but also guarantees perfect size duplication even if the jig is removed from the saw. Second, since the jig’s base stays in a fixed position relative to the blade, you can put marks on the base to calibrate circle sizes. Third, you can reverse the sliding-dovetail center guide to cut large circles. And last, an adjustable stop can easily be added on the front of the jig so it can be used with a variety of blades. The stop ensures that cutting always takes place at the true tangent of the circle.
To use, set the center guide to the desired radius, lock it in place with the setscrew and place the circle blank on the center pin. If the blank cannot have a center hole in it, then cut a dummy disc from plywood and secure the blank to the dummy disc with double-sided tape. With the jig’s rail riding in the saw’s miter-gauge slot, ease the jig straight into the blade until the stop contacts the front of the saw table. Then turn the blank until the circle is completed.
Although you can make the jig from solid stock, it is easier to make the dovetail slot if you laminate the base. My jig (shown above) is made of acrylic plastic, which is threaded for the two thumbscrews. If you use wood, let in square nuts for the thumbscrews and secure them with epoxy.
Thomas G. Marston, Mill Creek, W. Va.
Fine Woodworking Magazine, August 1981 No. 29

Fine Woodworking Recommended Products

Ridgid EB4424 Oscillating Spindle/Belt Sander

Starrett 12-in. combination square

Incra Miter 1000HD


Log in or create an account to post a comment.
Sign up Log in