Pennsylvania Tall Clock – Part I
The hood is one-third of this curly maple masterpiece, but it's half the work
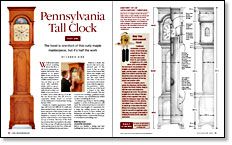
Synopsis: In the first of a two-part series, woodworking teacher Lonnie Bird details plans for building a Pennsylvania tall clock. The design, which incorporates details found on several 17th-century clocks, is basically three stacked boxes—the hood, waste and base. This article focuses on the hood, which is built to fit around the mechanical clockwork and incorporates mortise-and-tenon joinery, half-blind dovetails, arched moldings, and turned columns.
Lonnie Bird is an author and woodworking instructor. Visit him online at www.lonniebird.com.
From Fine Woodworking #171
With its decorated hood towering above the floor, a tall clock commands attention. Tall clocks, often referred to as grandfather clocks, are among the most elegant forms of 18th-century furniture. You can dress up a tall clock with embellishments, such as a gooseneck pediment complete with carved rosettes and finials, or you can choose to build a more subtle flat-top clock like the one shown here. This tall clock incorporates details found on several clocks fashioned in Pennsylvania during the late 1700s.
Despite its complex appearance, building a tall clock isn’t difficult: It’s really just three stacked boxes—the hood, waist, and base—and most of the joinery is not complicated. The waist and the base are the simplest to construct. In fact, the waist is just two sides joined to a face frame; it has no top or bottom. The base of the clock has a bottom that is dovetailed to the sides, but it has no top. (I’ll talk more about the waist and the base in Part Two of this article, which can be found in the next issue.)
Without a doubt, the hood is the most complicated part of the clock. It has an open frame at the bottom that allows the weights and the pendulum to hang into the waist below. The sides of the hood are joined to the bottom frame with through mortise-and-tenon joints, and the top of the hood is joined to the sides with dovetails. The rest of the hood—moldings, pediment board, and columns—are embellishments added on after assembling the hood.
It’s always a good idea to start by putting together a cut list of all the parts you will need. The cut list doesn’t have to note all of the final, exact lengths of components, but it helps the milling process go more smoothly if you’ve at least worked out thicknesses and widths.
For the full article, download the PDF below.
Fine Woodworking Recommended Products

Stanley Powerlock 16-ft. tape measure

Dividers


Log in or create an account to post a comment.
Sign up Log in