Finishing Mahogany
Transform the light-pink color of freshly milled mahogany into the deep, rich shades of old-world furniture
Synopsis: If you want your finish to enrich the colors of bland mahogany, try this recipe. Professional finisher Jeff Jewitt explains why mahogany stock used to look so much better than it does now, and then offers tips on how to improve the appearance of today’s wood. Start by filling wormholes, sand it, lay on some water-soluble dye, seal with tinted oil, and then build up the finish with thin coats. Jewitt also includes handy finishing tips, such as using Scotch Brite pads for sanding.
From Fine Woodworking #164
When the cabinetmakers in England and America who built early 18th-century furniture fell in love with mahogany, most of the wood was of a color and quality that few woodworkers will have the chance to work with ever again.
Those old-growth trees of Cuban and Santo Domingan mahogany (Swietenia mahagoni) yielded lumber with a much darker color and a finer texture than what’s commonly available now. I first saw that wood up close many years ago, when I toured the collection of American furniture at a museum in Williamsburg, Va. The first thing that struck me was the color of those pieces: It wasn’t just the patina—it was simply awe-inspiring wood.
So when I recently had the chance to put a finish on a pie-crust table made with a single-plank top, I knew I had to come up with a way to coax that rich, dark finish from the lighter color of the Central and South American (also called Honduras) mahogany (S. macrophylla) available today.
It is not uncommon to find worm holes in otherwise perfectly sound mahogany lumber. To avoid wasting a lot of wood, you can fill and color them easily. After that, you can lay on the first level of color. I use an amber-colored water-soluble dye as a base coat to mimic an old finish. The amber undertone evens out color variations in the wood and adds depth to the final finish. I prefer water-soluble dyes because they’re easier to control. Also, they tend to absorb more evenly into the wood than alcohol-based dye stains, which dry faster and leave behind unsightly lap marks.
Before applying the stain, sand the piece with 220-grit paper, then raise the grain by wiping the surface with distilled water to minimize any further grain-raising. (Tap water can contain mineral impurities that may discolor the wood.) Wait several hours for the water to dry, then resand with the 220-grit paper.
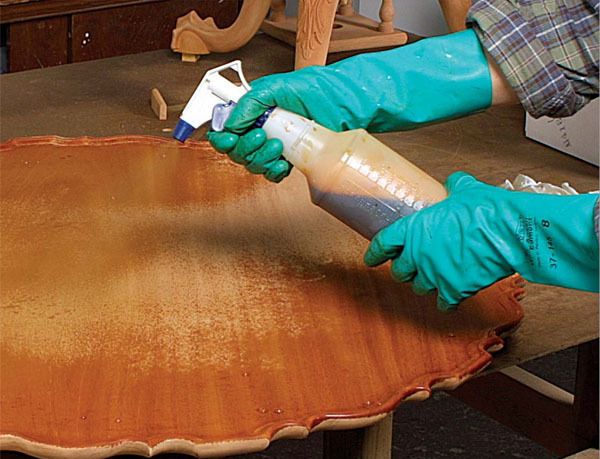
Use a plant mister to spray on the amber dye, saturating the surface quickly and thoroughly. Water-based dyes are very forgiving compared with alcohol-based dyes, but make sure you soak up any excess with clean rags. After the amber dye has dried, scuff the dry surface using a gray synthetic abrasive pad such as Scotch-Brite brand; go lightly so that you don’t cut through the dye.
For the full article, download the PDF below.
Fine Woodworking Recommended Products

Bessey EKH Trigger Clamps

DeWalt 735X Planer

Dividers


Log in or create an account to post a comment.
Sign up Log in