Build a Wine-Glass Cabinet
This elegant wall cabinet has tapered stiles and glass panels. Get step-by-step instructions and buy full-size plans.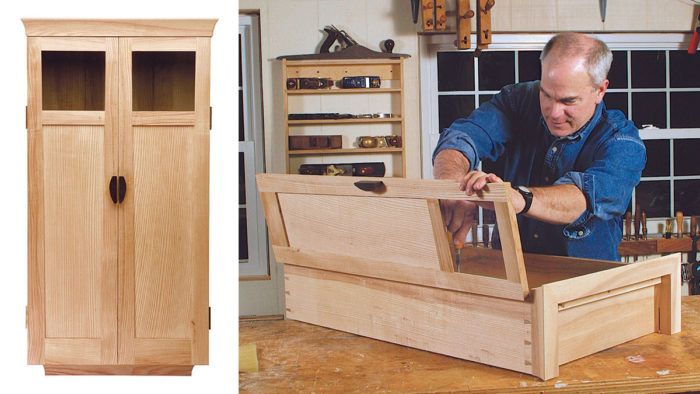
Synopsis: Wall cabinets lend themselves to many variations in design, depending on where they will be installed and what they will be used for. The cabinet that Scott Gibson details in this article covers a variety of woodworking skills, including cutting coved cornice molding on the tablesaw and tapering parts with a tablesaw jig. It also features detailed project plans. This article will help you build an elegant shallow cabinet with a minimum of hardware.
Wall cabinets are relatively small. That’s one of their beauties. They can be used in many spaces that would be too cramped for larger pieces of furniture, and their scale makes them familiar and approachable. A wall cabinet also can be made from scraps and offcuts of prized lumber that would be unusable elsewhere.
Wall cabinets lend themselves to many variations in design, depending on where they will be installed and what they will be used for. This cabinet is made of quartersawn white ash. It is for wine glasses and is intended for a dining room. It is less than 7 in. deep. With the exceptions of the cornice and the matching base, the cabinet is rectilinear. Door stiles are tapered slightly on the inside edge to help the cabinet appear lighter at the top. A coved cornice gives the top of the case some heft, and small windows at the tops of the doors give you a peek inside. There’s minimal hardware, so the wood is really what’s on display.
Size the cabinet to fit the glasses
Unless the cabinet has no specific use, it makes sense to size it carefully for the things that are to be stored there. Wine glasses come in many sizes and shapes, but those in the mixed collection my wife and I own are about 31 ⁄2 in. wide and about 7 in. tall. Those dimensions became the rough guide for laying out the cabinet. Although adjustable shelves allow some flexibility in height, there is no way to fudge a cabinet that is too shallow.
There are two other considerations: the thickness of the back, which is set into rabbets in the back of the case, and whether the doors will be inset or overlay. The back of this cabinet was made from four shiplapped boards. A frame-and-panel back was another good option, but shiplapping these boards was the best way to present the bands of browns and creams in the wood. Because the boards were set into the back of the case, the overall depth of the cabinet had to be increased by at least that much. I added a safety margin of another 1 ⁄2 in. in case we ever get slightly larger glasses.
If you choose inset doors—those that fit inside the case—they also must be factored into the depth of the case. Doors should be a full 3 ⁄4 in. thick, so the sides of the case must be that much wider if this is the door style you choose. I chose overlay doors, which are attached to the outside edges of the case. One visual advantage of overlay doors is that they give the case a cleaner, less cluttered look—from the front, you see the doors, not the edges of the case.
From Fine Woodworking #158
For the full article, download the PDF below:
Fine Woodworking Recommended Products

AnchorSeal Log and Lumber End-Grain Sealer
Ridgid R4331 Planer

DeWalt 735X Planer

Get the Plan
CAD-drawn plans and a cutlist for this project are available in the Fine Woodworking store.





Log in or create an account to post a comment.
Sign up Log in