Six Ways to Edge Plywood
The choices vary in their complexity and durability and the time they take to execute
Synopsis: It’s hard for Mario Rodriguez to imagine building some furniture and cabinetry without plywood. The challenge is what to do with the unsightly edge where the lamination is revealed. Rodriguez shares tips for edging plywood at every skill level — from simple edge treatments to complex edging with sophisticated joinery. Choose your technique and follow these illustrated steps.
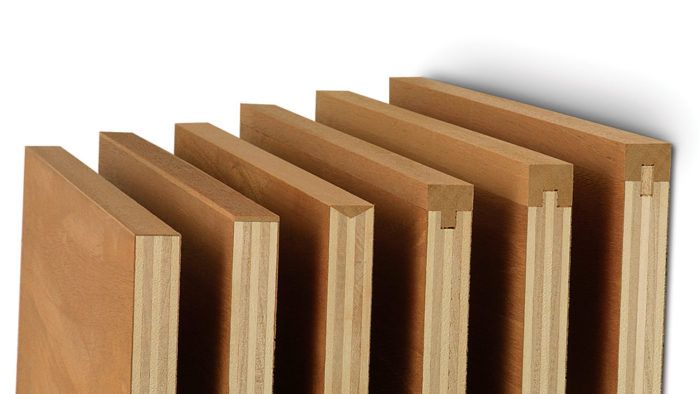
To the world of woodworking, the innovation of plywood ranks right up there with the invention of the tablesaw. It’s hard to imagine building some furniture and cabinetry without it. Plywood gives you the relative stability and flatness of a 4×8 panel, combined with the beauty of select veneers. You also get a variety of thicknesses, from 1 ⁄4 in. to 3 ⁄4 in. on stock items and up to 11 ⁄2 in. on special orders—and you get all of this at a reasonable price. The challenge when using plywood is, of course, what to do about that ugly laminated edge. The goal is to create an edge treatment that looks like a continuation of the veneered surface without an obvious seam. You can achieve that goal with a simple layer of veneer or a more complex edge treatment that requires sophisticated joinery techniques.
The decision about how to treat a plywood edge can be influenced by a number of factors—aesthetic and design considerations (how do you want it to look?), function and durability (what kind of wear and tear will this edge face?), time and labor (how much of either do you want to spend?). The choice should depend on the planned use of the furniture piece or cabinet component. For example, a thick, solid edge would be appropriate for the exposed edge of a cabinet carcase. But for shelves contained and protected within a cabinet, an iron-on veneer edge would probably be sufficient. What follows is a look at the choices, from the easiest to apply but least durable to the more complicated versions that take longer but offer more protection.
This material, also called edge tape or edge-banding, commonly measures 13⁄16 in. wide for use with 3 ⁄4-in.-thick plywood. It is sold in rolls from 8 ft. to 250 ft. long, and it is available in a number of different woods. Birch, cherry, mahogany, red oak and walnut are fairly easy to find, but you can also buy it in ash, maple, pine, white oak, teak and just about any other species of hardwood plywood that is made. Because it’s so thin, edge-banding isn’t suitable for furniture components that will be subject to heavy use. But once the heat-sensitive glue has melted and cooled and the edge-banding has been trimmed, the seams are virtually invisible. Just remember that heat causes the glue to release, so don’t choose edge-banding for pieces that will be exposed to heat.
A standard household iron is the tool of choice for most people who use edgebanding. Set the iron to a medium heat level.
From Fine Woodworking #156
For the full article, download the PDF below:
Fine Woodworking Recommended Products

Bessey K-Body Parallel-Jaw Clamp

Festool DF 500 Q-Set Domino Joiner

Starrett 12-in. combination square


Comments
I find the iron tape a really distracting and obvious solution. Not attractive at all, and detracts from the overall craftsmanship of the project. I will never use it again.
Amen
Log in or create an account to post a comment.
Sign up Log in