A Tablesaw Sled for Precision Crosscutting
An indispensable jig that makes accurate miters, crosscuts and tenons a cinch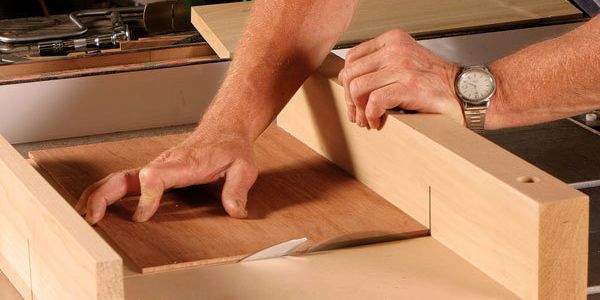
Synopsis: Take the time to make a super-accurate, super-versatile, and extremely safe crosscut sled, advises Lon Schleining. Your sled should fit your work; he explains here how to make one 30 in. by 21 in. Start with a solid platform of Baltic-birch plywood, and use quartersawn hardwood for the runners. He shows how to make the front brace and rear fence, how to attach the rear fence, and how to make trial cuts. In a side article, Schleining discusses how to make a miter template to fit on your tablesaw.
Crosscutting with a standard tablesaw miter gauge can be frustrating, inaccurate, even hazardous. Adding an extended fence helps, but the miter gauge still will be limited and imprecise. Don’t bother with it. Instead, take the time to make a super-accurate, super-versatile and far safer crosscut sled.
A crosscut sled is a sliding table with runners that guide it over the saw in the mitergauge slots. It has a rear fence set perpendicular to the line of cut to hold the workpiece. Because it uses both miter slots, the sled is remarkably and reliably accurate. It also easily accepts any number of stop blocks, auxiliary fences and templates, allowing miters, tenons and many other specialty cuts. Nearly every small commercial shop I know uses some variation of this sled. I use mine primarily to square the ends of 12-in.-wide stair treads.
Your sled should fit your work. There’s no sense in making a huge, unwieldy sled if you’ll use it mostly to cut 3-in. tenons. The one I use is 30 in. wide and 21 in. deep. It’s capable of crosscutting a board up to 2 in. thick and 18 in. wide (see the top photo on the facing page). With a miter template (see the box on p. 68), the sled can cut a 45° miter on the end of a 3-in.-wide board. The rear fence is 5 in. high in the middle, in. high on the ends. Though I rarely crosscut a board thicker than 2 in., the fence needs to be at least 4 in. high to accommodate the height of the sawblade. The extra fence height also supports workpieces on end when I cut tenons.
Start with a solid platform of Baltic-birch plywood
I build jigs like this from what I call not-yetused materials (some call it scrap). I used void-free -in. Baltic-birch plywood for the platform. Baltic birch is often mistaken for Finnish birch—its waterproof and much more costly cousin. Baltic birch is not as high quality, but for the price (about a dollar per square foot), it’s perfect for making stable, durable jigs. But any plywood you have around the shop will probably work fine as long as it’s flat.
The first step is to cut the platform to size. Make the platform as square as you can get it. You can check for square by measuring diagonally across the comers: The measurements should be the same across both corners. But before you make the sled, it’s a good idea to make sure your tablesaw is tuned up. For the sled to perform well, your saw’s blade must be precisely parallel with the miter-gauge slots, and the table must be flat.
From Fine Woodworking #128
For the full article, download the PDF below:
Fine Woodworking Recommended Products
Double Sided Tape
MicroJig Matchfit dovetail clamps
Hedgehog featherboards




Log in or create an account to post a comment.
Sign up Log in