Router Fixture Takes on Angled Tenons
Versatile device ensures tight joints every time
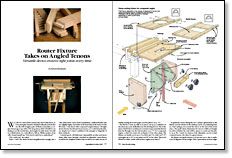
Synopsis: Edward Koizumi figured out how to make compound-angle mortise-and-tenon joints for some Arts-and-Crafts chairs. A detailed project plan shows the tenon-routing fixture for compound angles, and two more drawings show other views. Koizumi explains how to make the fixture and guide frames, how to rout test tenons, and how to rout the angled tenons. Photographs show how he sets up for angled tenons.
We live in a turn-of-the-century Arts-and-Crafts house, so it seemed quite natural to furnish it with pieces from that era. My wife bought a pair of Mission armchairs a couple of years ago to go with a 9-ft.-long cherry table I’d built for our dining room. Six months later, she bought two side chairs. It would be a while before we could afford a full set. Within earshot of my wife, I heard myself say, “How hard could it be to make these?”
“Oh, could you?” she asked.
“Sure,” I said. The chairs looked straightforward enough, just a cube with a back. Upon closer examination, I realized that the seat was slightly higher and wider in the front than in the back. For the first time, I was faced with compound-angled joinery. I thought about dowels, biscuits and loose tenons, so I could keep the joinery simple, but I wasn’t confident in the strength or longevity of these methods.
I wanted good, old-fashioned, dependable mortise-and-tenon joints. After some thought, I decided an adjustable router fixture would be the simplest solution that would let me make tenons of widely varying sizes and angles.
The fixture I came up with is as easy to set up as a tablesaw. In fact, there are some similarities. The workpiece is held below a tabletop in a trunnion-type assembly that adjusts the tilt angle. For compound angles, a miter bar rotates the workpiece in the other plane. The fixture can handle stock up to 2 in. thick and 5 in. wide (at 0°-0°) and angles up to 25° in one plane and 20° in the other. This is sufficient for chairs, which seldom have angles more than 5°.
To guide the router during the cut, I clamp a guide frame to the fixture over the window in the tabletop (more on positioning it later). And I plunge rout around the tenon on the end of the workpiece. The guide frame determines the tenon’s width and length, as well as whether the ends will be square or round. I made two frames, both adjustable, one for roundcornered tenons, the other for square tenons.
The fixture and guide frames took me just over a day to make, once I’d figured out the design. Then I spent about an hour alignning the fixture and making test tenons in preparation for routing the tenons on the chair parts. The fixture worked just as planned and allowed this relatively inexperienced woodworker to produce eight chairs that match the originals perfectly.
From Fine Woodworking #114
For the full article, download the PDF below:
Fine Woodworking Recommended Products

Festool DF 500 Q-Set Domino Joiner

Veritas Standard Wheel Marking Gauge

Dividers


Comments
I am curious how the mortises were made. Is that with another jig, or with a bench mortiser?
Log in or create an account to post a comment.
Sign up Log in