Picture-Framing Techniques
Use router table setups to shape profiles and joinery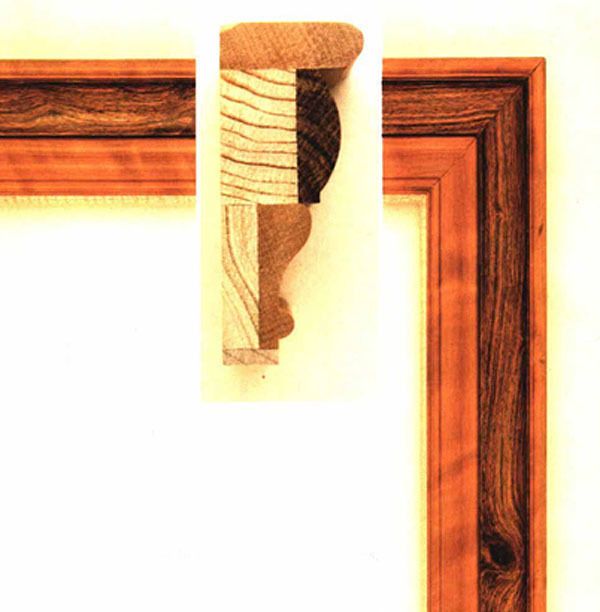
Synopsis: Leon Segal makes high-quality picture frams, and his shopmade router table performs 90% of the work of making picture frames of high quality. It shapes the outside of a frame and rabbets for a picture and glass. With special fences and jigs, the router also neatly plows grooves for miter splines and for a slide-in back. Segal discusses design and materials, and how to shape and assemble the frame. He talks about mitering and pre-finishing parts, cutting and inserting splines, making and fitting the back, installing the picture, and other back details. A short side article by Ted Myers describes making frames from recycled molding and building a miter-marking gauge and clamping fixture.
I started making frames for my family’s paintings and photographs because I was unimpressed by the cheap pressed-wood frames I’d seen in department stores. Once I decided to make my picture frames from exotic and domestic hardwoods, I quickly found that no matter what type of frame I built—whether a simple solid frame or a built-up frame like the one in the photo on this page—I could use my shopmade router table to perform 90% of the work and achieve high quality. The router does a fine job shaping the outside of a frame (see the top right photo on the facing page) and rabbeting for a picture and glass. With special fences and jigs, the router also neatly plows grooves for miter splines and for a slide-in back.
Design and materials
I often vary a frame’s design to suit a picture. Although most of the differences are in the frame profile and decorative treatment, I’ve also tried variations in the construction of the frames. For example, if I need to frame a large portrait that necessitates a wide frame, I combine several profiles in the frame, such as coves, flutes and ogees (see the inset photo above). Using individual sections can give depth to a frame, and it allows me to save precious species of wood for the visible parts. I use less valuable woods for the unseen fill areas.
Before I make a frame, I usually sketch a profile and note any critical dimensions. I can still refine details and proportions later, but the sketch helps me to choose the woods to use and to figure approximately how much of each kind I will need. Depending on the hardwood that I select, I can give a frame a light look or a more formal appearance (see the top left photo on the facing page), and I can even pick woods that will complement the colors in the picture to be framed. If I’m gluing up a frame, I often prepare contrasting woods, being sure to plane surfaces that will be mated.
From Fine Woodworking #104
Fine Woodworking Recommended Products

Suizan Japanese Pull Saw
Olfa Knife
Leigh Super 18 Jig





Log in or create an account to post a comment.
Sign up Log in