Router-Assisted Cockleshell Carving
A swinging jig shapes the interior and defines the flutes
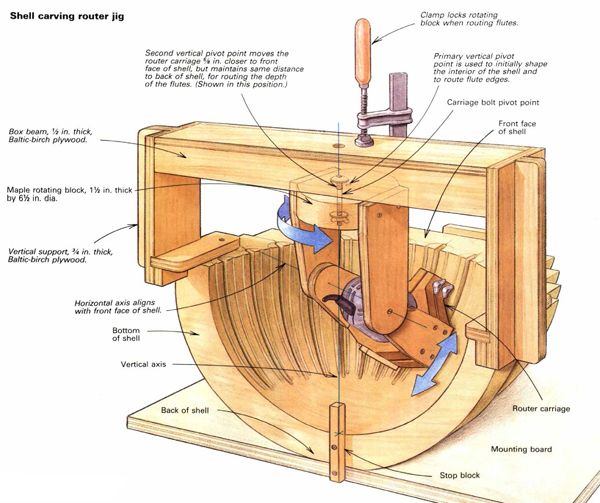
Synopsis: Howard Wing figured out a router setup that could shape the basic spherical surface of a cockleshell as well as rough out the flutes. He developed a two-axis router jig to shape the interior of the shell and to define the flutes for the cabinet he built. He explains how to stack-laminate the shell by making a blank glued from brick-layered arches of decreasing diameter. Wing bandsawed the inner diameters and chiseled away enough material to provide clearance for the router jig. He explains how to build the jig and use it, and then details how he carved the flutes. Large drawings illustrate the jig and shell construction, and side information details how to glue up a shell with tapered segments.
The key to making a profit on a complicated piece like a shell-top cabinet is to control labor hours. When researching shell design before my first attempt at carving one, I read an article by Franklin Gottshall, an experienced carver and period furniture maker. Gottshall acknowledged putting two weeks of labor into carving a shell, and I got the impression he worked long days. If I took that long just to carve the large cockleshell, the cabinet would be a sure budget-buster. So I began to think about a router set-up that could shape the basic spherical surface of the shell as well as rough out the flutes.
The two-axis router jig I developed worked well to shape the interior of the shell and to define the flutes for the cabinet shown at right. However, I did notice some undesirable flexing in the jig, so when the next shell-carving job came along, for a smaller shell to top off a clock, I reworked the jig to eliminate these problems. The new jig, shown in the top photo on p. 89, worked perfectly. I first cut the inside of the shell to a spherical shape with a straight bit mounted in the jig-held router. Next, I changed to a core-box bit to outline both edges of the flutes. Then, by shifting the vertical pivot point, as shown in the drawing on the next page, I was able to cut the bottom of the flute with decreasing depth from front to back. Although I could have continued to rout away the waste in each flute, I found it quicker to hand-carve the waste with a gouge, connecting the router cuts along the edges of each flute with the bottom cut that defined the flute’s depth. The total time to make the shell, including building the jig, was just 36 hours.
Stack-laminating the shell
The blank for carving the shell is glued up from a series of decreasing diameter brick-layered arches. I made a full-size drawing so I could determine the inside and outside diameters of each layer, as shown on the next page. From the drawing I was also able to determine the approximate angle of the inside face of each layer. To minimize the amount of material I would need to remove with the router, I bandsawed the inner diameters to these angles. The angle for the top layer is too acute to bandsaw, so I left it as a solid slab for glue-up and later chiseled away enough waste to provide clearance for the router jig. After bandsawing the semi-circular bottom layer, but before cutting its inside face, I used an extended fence on my tablesaw’s miter gauge to guide the piece while crosscutting flat reference surfaces on the outer ends.
From Fine Woodworking #92
For the full article, download the PDF below:
Fine Woodworking Recommended Products

Dubuque Clamp Works Bar Clamps - 4 pack

Stanley Powerlock 16-ft. tape measure

Estwing Dead-Blow Mallet


Log in or create an account to post a comment.
Sign up Log in