Synopsis: Tony Konovaloff took an old tool chest he built early in his career and improved on it. The original had eight drawers, removable boxes and racks to hold tools in specific places. He explains how the improvements evolved and how he built it, using hand tools exclusively. He discusses how to plan places for your tools and recommends using a light-color wood for the inside for visibility in finding tools. He used sliding dovetails on the ends of the lid and installed cleats to act as stops. He details how he hung the lid and installed the storage compartments, and offers information on how to thickness with a scrub plane. Project drawings show where each tool goes and how the piece comes together.
If you work wood, you need a place to store your tools. So for many of us, a tote box, a tool cabinet or a chest is one of the first woodworking projects we undertake. My pine tool chest, shown on the left in the photo on the facing page, was one of my earliest projects, and it served me well for years. Each tool has a home—on the bottom of the chest, in one of eight drawers, in removable boxes or on a rack inside the chest or its lid. As I collected new tools and learned new storage tricks, I altered the chest’s storage layout by moving drawer guides and tool racks. The inside of the chest is now pockmarked with screw holes, as evidence of these alterations. So after too many alterations on my pine chest, I decided to build a new chest of walnut.
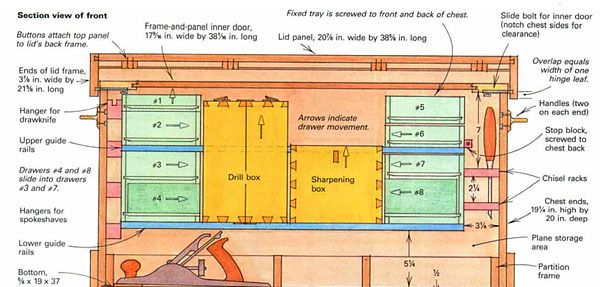
Since the size of my first tool chest is as practical as it is big, I made the new one, which is shown in the drawing on the bottom of these two pages, the same size. I wanted the chest to be portable, although it takes two people and a forklift to carry it. I was so familiar with my first chest that I could find anything with my eyes closed. So, I reasoned, why not just refine that same storage system in the new chest?
I went through the same steps to plan my new chest as I did when I built the first one—listing, grouping and measuring all my tools (as well as some I hoped to buy)—but in the end, I only altered my original design slightly. I decreased the tolerances between drawers and boxes, I made some drawers shallower, and I added a couple of drawers. And, for appearance sake, I made the kick board wider so it would be in balance visually with the sides of the lid. I’ll tell you how the new chest was built and more about its design, but remember that the compartments inside are for my tools. So use the drawings as a guide to customize a chest for your own tool collection.
Planning a place for each tool
A snug home for the tools not only saves space, but also prevents them from banging around when I move the chest or shuffle through its contents. I arranged my planes and other large tools on a “floor plan” of the bottom to arrive at the chest’s overall length and width. The chest’s depth was determined by the 16-in.-long tongue of my framing square, which I decided to hang between the drawers and the front. And I designed a compartment within the lid for storing my handsaws.
From Fine Woodworking #90
For the full article, download the PDF below:
Fine Woodworking Recommended Products

Festool DF 500 Q-Set Domino Joiner

Jorgensen 6 inch Bar Clamp Set, 4 Pack

Woodriver Rechargeable Desiccant Bag


Log in or create an account to post a comment.
Sign up Log in