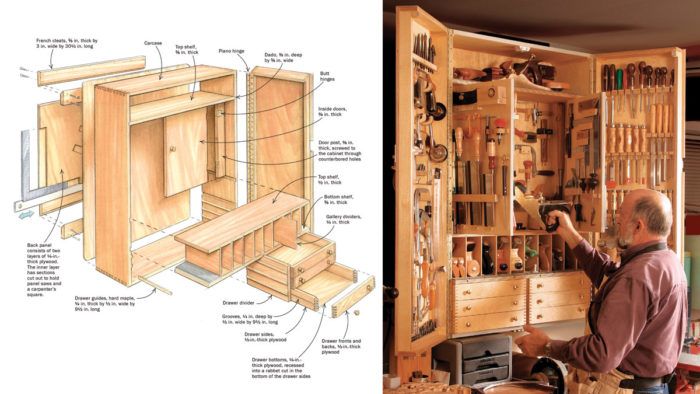
Jan Zoltowski didn’t build his tool cabinet until he’d been woodworking for 35 years. The results were clearly worth the wait.
His wall-hung cabinet holds more than 300 hand tools while taking up only about 12 square feet of wall space. The design is an ingenious combination of interior doors and drawers, along with multiple divided storage compartments.
This free dowload includes a measured, annotated drawing of the project, along with Zoltowski’s full article about its construction. There’s no reason for you to wait 35 years. Click on the link below and get started. Your tools will thank you.
For more inspirational tool storage, check out
- North Bennet Street Tool Chest
- Tool Chest with an Arts and Crafts Lineage
- Heirloom Tool Chest
- Tool Chest with Drawers
- Divide and Conquer
This site is protected by reCAPTCHA and the Google
Privacy Policy and
Terms of Service apply.
Download FREE PDF


Comments
I built a cabinet very similar to the one described in the article when it first came out, and I suppose it's "quick to build" vs. 18th century fine furniture, but it still took me almost 6 months of casual shop time to finish it. It's a good design, and it does hold a lot of tools.
-----wade
Working wood in Milton, PA
I agree with wolf23. It took me a little longer to build the tool cabinet. I added additional support for the french cleats and used brackets on the top to attach to the wall studs. My cabinet also sits above a bench and I have additional supports under the cabinet. I added all of the additional supports after reading an article critical of this design. The author of the article felt that the cabinet loaded with tools was way too heavy to trust to the two plywood cleats alone. Also, this is not a one man job. Sawing the case in two on a table saw will take two people. I do feel that I built a good cabinet and a lot was learned building it.
I would love to build this, but I worry about all that weight hanging from the wall. Thinking about my tools crashing to the floor would keep me awake at night. Will the wall studs hold several hundred pounds?
Useful looking cabinet but I'd be wary of storing heavy or sharp tools above head height.
I built mine shortly after the article appeared in the magazine. I shortened mine by a couple of inches because I had the material handy. I hung it on the wall with the "French wedge". I spent about 1 month of off and on work time. It was my first time doing box joints. As a result I now have a sled to do box joints. I have all of my woodworking hand tools stored in it. It definitely was not, for me, a quick build. I really like having these tools in 1 place. Sam
Toy maker in Studio City, CA
How long did it take Jan to build the stool to reach the tools on top? THanks, but I'll stick to my dumb old peg board....I can change tools around to suit the job at hand or just on a whim.
I am assuming the photo is not where the cabinet normally resides.
Sorry to troll, but it seems counter productive to go through the effort of putting a wall chest to put all your most used tools within arms reach, only to mount it on a wall where 50% of the tools are placed above one's head and 25% completely out of reach.
Otherwise, wall chests rock!
I like the design but as a predominantly hand tool user, the example is configured in a manner that I would not be able to accept. If you ever use the large chisels on the left, sooner or later you are going to knock some of the old style screwdrivers above them down and endanger your feet and the screwdriver. The brace bits on the right are so inaccessible, that I doubt the braces are ever used.
Since the design is tablesaw intensive, my suspicion is that the layout and height of the cabinet are ideal for a power tool using hand tool collector. With a touch of rearrangement and a little bit less crowding, this looks like could be a fabulous cabinet. It is pretty stuffed with tools the way it is though.
I built the cabinet from the plans FW sells. While the cabinet is supposed to be a "weekend project" they don't say how many weekends. Also, note that the plans for the inner doors and some of the other pieces call for 5/8" plywood. I live in a major city and could find some at a specialty lumber store, but come on folks, how about selling plans for those who are lucky to have a big box store within an hour? I did do everything myself, including hanging the cabinet, but I sure don't recommend it.
Great idea, however, good luck hanging the cabinet if you follow the exploded plan. The French cleats will not work. Look at the side view drawing bellow the exploded view.
@Maigret: You are absolutely correct. Nice catch, and thank you for pointing it out! Folks, the bevels on those cleats in the color drawing will not interlock. They'll slide right past one another and your cabinet will wind up on the floor about as soon as you let go of it. Refer to the side detail drawing underneath, as Maigret suggests. It will definitely work better that way. In the meantime, I'll see what I can do about getting that color drawing fixed. - Steve S.
@sscott @Maigret
Actually the color drawing is correct albeit a bit confusing. the cleat closest to the cabinet is the one that goes into the wall... the one that appears like it should be on the wall actually goes into the cabinet...Check out the screw positions and direction they're facing. Confusing, yes. But correct.
After reviewing the plans for this tool chest, watching the related video on the arts and crafts tool chest, and reading the comments of others, I plan to build this chest to sit on a base with legs. That should put the tools a little lower and give me the ability to move it around as my shop grows and develops. This is a great series of articles that is truly inspiring. Thank you!
You know, I have bifocals. Maybe I need to start wearing them. Apologies to all for the misdirection in my previous comment - and thank you, PumaDave!
Nice cabinet. I've built a similar cabinet from plans in, ummm, another magazine. If I hadn't already built mine I'd consider these plans. Stranded, I understand your concern. I had the same concern when I made the one I have (mine weights about 80 pounds empty). But just think of all the weight kitchen cabinets have to support. Stacks of plates are HEAVY. Anchored to my shop wall, my cabinet is rock solid and is not going to fall. I think you'll be alright. Cleats and screws are a lot stronger than you'd think.
I built this cabinet from the FWW plans, but with a few changes. The 3/4" Baltic birch plywood would not behave when making the finger joints for the case; occasional voids in the core would ruin some of the fingers. Luckily, I practiced on scrap first. I was also nervous of the gluing process - too tight and I would have a mess, too loose and it would not hold. So I used biscuits for alignment of the case sides, top and bottom, and Joint Connector Bolts for strength. I had a good experience with the latter while making John White's outfeed table (FWW #202). The finger joints for the drawers however were perfect!
My wife helped guide the box on the table saw while cutting it in half. We discussed having her inside the box for the cutting process – like Harry Houdini would do – but decided against it.
I had an issue with finding 5/8" plywood as well and solved that problem by laminating 1/8" & 1/2" material. A little extra work, but the experience was worthwhile. I also used the JCB's to attach French cleats to the cabinet and wall. I had to think through how to insure the bearing weight was distributed evenly between the top and bottom pairs of cleats, but that got solved as well.
There were oddities in the plans, like the ends of the lower shelf needed to be notched so the doors could close. I also used two JCB’s for each of the door posts as I didn’t trust the eventual weight of my tools to wood screws. They screw in from the outside, but as they are decorative anyway, it looks good.
Lastly, given that the doors are only ½” thick, I had concerns about how to attach the chisel racks on the inside of the doors. I used threaded steel inserts (McFeely #3603-STS) with 8-32 machine screws. The inserts are only 0.4” deep and did not punch through to the front of the doors. Since the racks are not glued to the door I can change the configuration around if needed.
It was not “quick-to-build” but it was a very rewarding experience. Thanks, Jan!
QUESTION: Does anyone know the purpose of those four countersunk holes and screws on the bottom shelf, just below the carpeting and above the upper drawers? It’s driving me nuts.
I'm currently building it and almost finished. Didn't take too long, (3 weeks of occasional evenings and a few hours each weekend), I guess due to having a detailed cut list per plywood thickness, and doing all finger joints of a particular size at once to minimise dado blade changes. An accurate sled is essential.
Also reduced overall height down to 850mm (34") to enable reach of most tools, plus position tall tools (long planes) at top so as they can be handled from lower. I deleted pigeon holes from one side to enable jointer and other longer planes to fit vertically.
A fun project which I was mainly motivated to do to learn finger joints, prevent tools rusting from salt air and create more space in my shop.
Haven't dealt with the cleats/weight issue yet.
I really like the layout of this cabinet and bought the plywood the other weekend. I haven't started yet because I have a concern over what does it look like with doors shut. There are not good pictures with the doors closed. I didn't want to put all this time and effort into a project that only looks great when its open. I've been looking at other styles and really like the look of a finished door, not fancy panel raised doors, just a nice simple finished look. I like the way this one is made in a box and then split into pieces, but I've been trying to figure out how to incorporate a more finish look on the outside. Not edges of plywood showing and an overlapping piece of plywood to cover the gap between the doors. Does anyone else feel this way and have any suggestions to improve the looks of the exterior?
Thank you Stephen for this article, it is a beautiful and useful cabinet design, please keep posting this kind of projects, I also found more than 16,000 woodworking plans at http://bit.ly/16000WoodPlans
juildaes: Are you spamming us?
Yep, I think he was.....6 years ago. :)
Does anyone know how to get the plans now? The link on the original article just goes to the store main page and no plans appear to be available.
I built Mike Pekovitch's hanging tool cabinet from the FWW plan about 5 years ago. That plan addresses the structural issues by using 7/8" maple and dovetails for the case and doors (yeah, its heavy). The hanging issue is solved by letting the entire back become a giant french cleat; i.e., the top half fits over the bottom half. I did hedge my bet by adding a couple of 3" cabinet screws through the top into the studs.
It does not hold as many tools, but it meets my needs. Thinking about removing the small plane till at the bottom and replacing it with drawers. https://www.lumberjocks.com/projects/260962
I too would like a set of plans for this tool cabinet but they don't seem to be available on the FWW website. Any help would be appreciated.
Thx, John
Log in or create an account to post a comment.
Sign up Log in