Build a Table Saw Sled for Precision Miters
 Aug 04, 2011
Learn how to build a simple tablesaw sled for more precise miters.
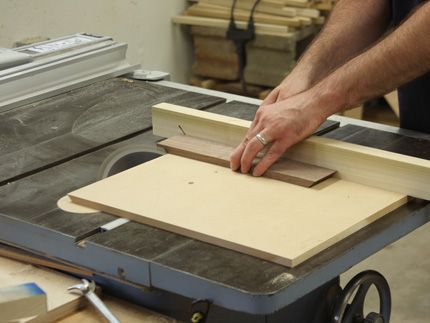
I use a sled to cut case miters, because its far easier to hold the workpiece in place as you push it past the blade when you use a sled (versus a miter gauge). Also, the sled can be set up for zero-clearance, which tells you exactly where the blade will cut and that means its easy to miter a box side or other workpiece precisely. Here is a quick-to-make miter sled that I use all the time (it tookabout 5 minutes to make this one). It’s a snap to set the fence accurately. And it always cuts perfect case miters. Finally, the reason that there is a base on one side only is so that the offcut can fall to the saw table and not be trapped beneath the blade (a trapped workpiece can be thrown at you by the blade).
 click to enlarge |
Step 1: |
 click to enlarge |
Step 2: |
 click to enlarge |
Step 3: |
 click to enlarge |
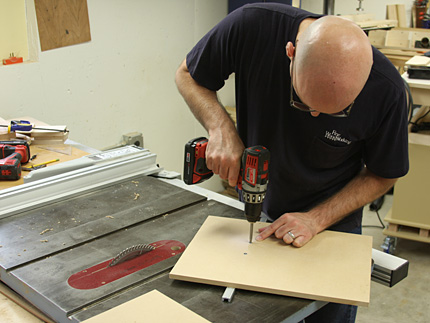
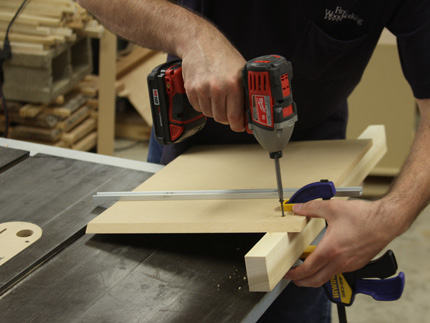
Step 4: Attach it with one screw. Put it near (but not too near) the mitered edge–about 1 in. from the edge is fine. |
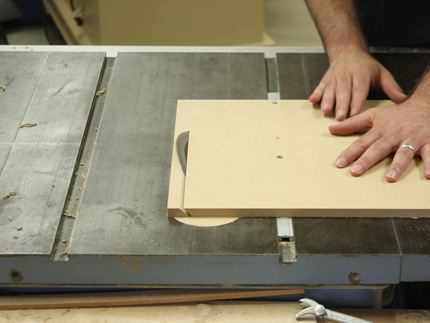
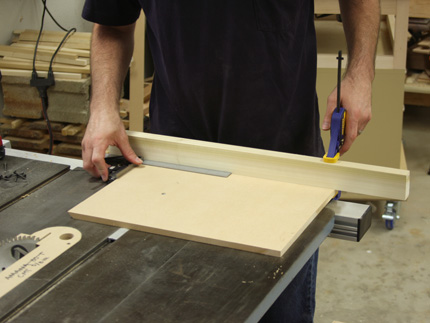
| Step 5: Resquare the fence. The first screw acts as a pivot and holds that end of the fence in place. Clamp the far end of the fence to the base. |
|
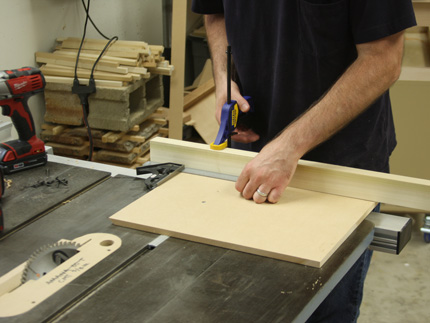
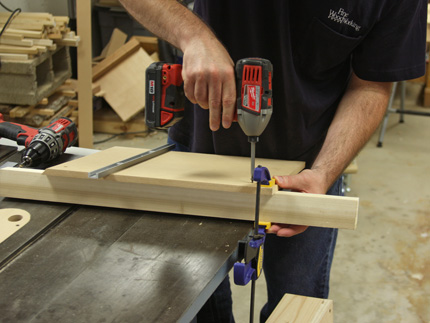
| Step 6: Lock the fence square. First, drive a second screw at the end opposite the first one and then a few more between them so that fence doesn’t bow during use. |
|
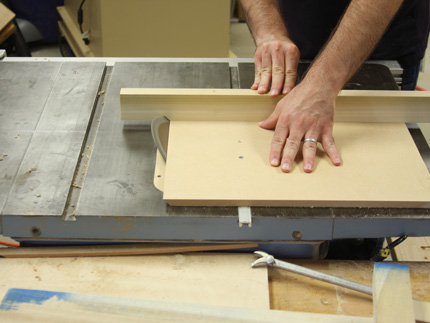
| Step 7: Zero out the fence. Run the sled past the blade a second time to make a kerf in the fence. This shows you exactly where the blade cuts and makes it very simple to align a workpiece for dead accurate cuts. |


Comments
The precision seems to depend entirely on dialing in a perfect 45 degree tilt on the blade, as opposed to sleds that use a vertical blade and 45 degree fence that, once dialed in, is screwed down in place. I wonder how many test cuts it takes to get the blade dialed in correctly each time? Or are digital tilt gauges accurate enough to get it right the first time?
In this instance, it appears the width of the board being cut would preclude using a vertical blade and a 45 degree miter. I have a digital gauge and it is amazingly precise. It would make it easy to get the 45 degree tilt right the first time and allow one to come back later and repeat the cut with the same accuracy. To me, the hardest part is getting that second screw in the fence in exactly the right place. (And how do you adjust it afterwards if you miss?)
Larry,
Good question. This sled is for case miters, like those found at the corners of a box, and are usually several inches across. As jlanc57 pointed out, they are typically too tall to run past the blade on edge (against a fence that is 45 degrees to the blade, which would be at 90 degrees). As for setting the blade to 45 degrees. It doesn't take any test cuts. I use the head of my 12 in. combination square to set the blade's angle. As long as you have a good one, there shouldn't be any problem. A digital gauge is unnecessary. And a good 12 in. combination square is useful for so many things.
As for getting that second screw set, if you run into trouble, just pull it out and put in somewhere else. Don't try to reuse the same hole. It will just continue to pull the fence out of square. However, I recommend that you re-check the fence for square after you have it clamped down but before you drive the second screw. That's what I do and I don't have any trouble getting the fence screwed down square.
--Matt
Sorry, Matt, but *precision* miters are done with a well-tuned shooting board, not a table saw. At least in my experience, the TS is not a precision instrument.
Matt,
Oh, right, combination squares! Sometimes I forget we have wonderful low-tech solutions right at hand. I look forward to giving this a try.
-Larry
Ralph,
I'm a big advocate of shooting boards. I use mine all the time, and you might recall my article in FWW #214 where I show how I made it (and two other bench jigs) and how I use them. Also, I used to think that the tablesaw wasn't a precision tool. I was wrong. I set mine up properly, got a good fence and some great blades and use the appropriate jigs where they are needed. This sled is an example. It cuts dead accurate miters. I use miters straight from this sled to make boxes and they are perfectly square. However, when I need to fine tune a miter, I use my shooting board, because I take off the thinnest of shavings one at a time.
--Matt
Matt, I'm just debating semantics. I simply see a difference between "precision" and "precise enough". To me, having a TS that has any run-out or blade flex/deflection takes it out of the running for a "precision instrument". It can, however, be "precise enough" for the task at hand.
Matt:I have one of those digital gauge and will never work without it, you can set any angle you like, you are not limited to 45 degrees like a combination square and they can be used on a variety of tools, the best part is they have become very cheap, costing less than most good combination squares,
Any tool, hand or power, is a precision extension of the craftsman/artist himself......Great shop assist tool Matt!
Al "the replicator" Krull
Built the sled a while back and ran a test cut. It seemed to work fine. I used it for real this afternoon cutting the sides for a couple of keepsake boxes. All I did today was to cut and miter the box and cut the lid parts to length. Just for the heck of it I dry assembled the sides. With no glue and no clamps, I had a perfect fit at all four corners. Thank you, Matt. Also, a nod to Wixey.
blakewd,
Thanks for posting your experience. I'm glad the sled has proved useful.
--Matt
I have done custome picture framin, and still do. I have specific equipment to do this joint. The sled is a very good idea and would be useful to all. A secret to cutting a picture frame is to allow an extra 1/8" on the inside rabbit. TxBill
If you have one of those digital "Tilt" things.. just set it on the base of the jig and zero it out and then put it on the blade and tilt till it says 45 degrees and it should be dead on at least for the "session". It's not rocket science.
I do it this way all the time and it's much easier than trying to use a triangle or one of those speed squares.. which may be great for framing jobs but not so much for small boxes and picture frames.
I use a digital "tilt guage" thing to set my sawblade to 45 degrees. It has worked flawlessly. Sometimes the new stuff is better! It is accurate to 1/10th of one degree, and that's more than most people can see.
5 minutes! How can anything be done in 5 minutes? My estimate for this project is about 2 hours once you've located the materials, cut them to size, drill the holes, located the screws. Great idea Matt, but you are "pulling our legs" on how long it takes to make the jig which is so typical of the woodworking "media". Now, I just need to allocate 2 hours for this job, heh, heh.
AZOR,
Perhaps I'm just quicker because I've made a lot of sleds this way. But, really, it took me 5 minutes to make it. I wouldn't misrepresent that for sake of making it more sensational, which really amounts to lying. However, I the sense you're joking, so no worries.
-Matt
Log in or create an account to post a comment.
Sign up Log in