Build a Super-Precise Table Saw Crosscut Sled
Learn Matt Kenney's "second fence" secret for a perfect crosscut sled. Jul 01, 2011
Tablesaw crosscut sleds are a great accessory for your tablesaw, making it easier to get consistently square and repeatable cuts than when using a miter gauge. But it can be a hassle to get the sled’s fence square to the blade. It’s also a pain in the neck to get two miter slot bars aligned properly. I know that I struggled squaring the fence and setting the miter bars until I changed my technique for making a sled. Now it’s very easy to do both. I’ll show you how as I make a sled for cross cutting at 90 degrees.
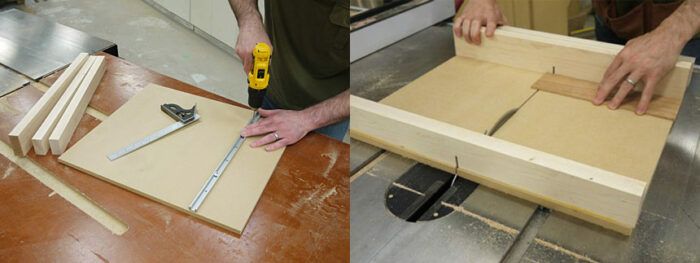
Step 1: Attach one miter bar to the sled base
Attach one miter bar to the sled base. That’s all you need. Just one. And the problem of how to align both bars to the slots is gone. And don’t make it. Buy a steel or aluminum one from a woodworking supply store. That way you don’t have to fuss with trimming a wooden one to fit, and you don’t have to worry about the wood bar expanding and no longer fitting in the miter slot. Also, metal ones are durable. You can use them over and over.
Step 2: Glue and screw a fence to the front and back of the sled
Glue and screw a fence to the front and back of the sled. Neither one is used a fence for the workpiece. They’re just there to hold the two halves of the sled together after you cut the kerf through the base. So, they don’t need to be square to the cut and their faces don’t need to be square to the blade. Of course, you shouldn’t glue them down at 45 degrees to the blade, either. Just get them close to square to the blade. Also, they should be taller than highest you’ll raise the blade.
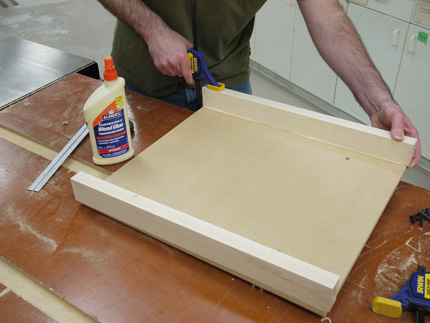
Step 3: Cut the kerf
Cut the kerf. Use the blade that you intend to use with the sled. That way, the kerf is zero-clearance and you won’t get tearout on the bottom of your cuts. Then, use only that blade with the sled. That’s how I do it and my sleds last for years.
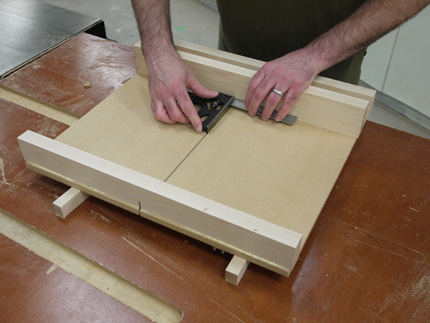
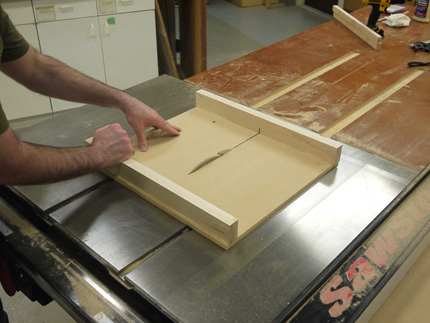
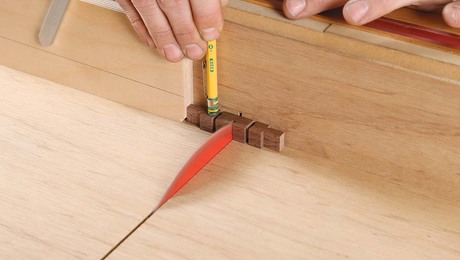
Step 4: Attach a second fence square to the kerf
Attach a second fence square to the kerf. This is the fence that workpieces are registered against. I screw the fence to the base from below. Here’s how to get it square. First, screw down one end of the fence. Next, use a combination square or drafting square to align the fence square to the kerf. Clamp it in place and check to make sure it is still square (clamps can move a workpiece as the pressure is applied). Screw down the fence at the other end. It’s now secured at both ends and square. Put in a few more screws and check to make sure that the fence is square along its entire length. A tip: Make the fence for the workpiece taller than the other two. That way you can use a spring clamp to clamp on stop blocks. The fence here is taller than the other two, but the photo angle makes it look about the same height. (Also, the two piece of wood you see are not runners, they’re just wood I used to raise the sled off the outfeed table. The slide is shorter than the sled base and can’t be seen here.)
More on FineWoodworking.com
- Foolproof Crosscut Sleds
- Video: Squaring A Crosscut Tablesaw Sled
- Ultimate Crosscut Sled
- 3 Sleds for Better Crosscuts
- Sled for Both Square and Miter Cuts
- Returning Your Crosscut Sled to Pristine Condition


Comments
I'm pretty sure that the bar in your photo is aluminum, not steel...
I wonder why sliding-table saws don't have more of a presence in North America? In Europe, even fairly low-end saws have sliding tables. Most of what people use crosscut sleds for is done more easily with a sliding-table saw.
-Steve
Damn Americans
I struggled then quietly fumed whilst setting up my sled.It is VERY close to square,but this idea ...so simple,so brilliant!! Probably why I'm not a professional woody! Thanks Matt.
I would suggest adding a box or block to cover the blade where it emerges from the back of the box for safety.
Note to photo editor: Review text for Step 4 paying close attention to the "tip" near the end. Then take a close look at the photo next to Step 4's text.
Here's another hint for crosscut sleds. Attach the front (workpiece) fence to the base with carriage bolts, washers and nuts, installed from the bottom through oversized holes. That way if your fence ever needs adjusting, you have easy access to do so.
Finally, treat the sled like a precision tool. It cannot be left to bang around on the floor!
Neat idea! Here's how I do it using a dial indicator (precision: +/- 0.01 degree using a 6" square)
http://www.garagewoodworks.com/TS_Sled_Fence.php
Yep, agreed, aluminum, not steel.
And in the last photo he has TWO runners, not the ONE he recommends AND they are both WOOD, not Aluminum!
AND if you want it to be 'Super Precise' as the title says, how about using a larger square to square it up!
The editor must be on the fairway today!
I squared my fence to the blade as follows:
Attach the runners at the front of the base, positioning the base and runners so they extend beyond the front of the table and screw from below, attach at the rear by positioning the sled base and runners beyond the rear of the table and again screw up from below, turn base upside down and put another screw into the middle of each runner. Attach the rear (i.e.furthest away from you) fence. Screw a length of ply into the sled about 12" long roughly parallel to the blade over the area where the blade will cut positioning the screws to one side of the blade. Clamp the base to the table and cut the kerf into the sled base and through the length of ply but don't cut through the base front to back completely at this point, you now have a straight edge to register the combination square against, attach the front face with screws after clamping against the square. Run the sled through the blade again to cut the kerf through front and rear fences, remove the length of ply and start using.
What looks like two wooden runners are I believe spacers blocks so that you have room to clamp the fence once it is aligned. If you look closely the runners aren't even parallel to each other.
I liked the basic idea very much, but thought Jeffrey Slater's technique for attaching the TWO runners, and his use of a temporary register for the combination square might be improvements. Both techniques depend for success upon the careful use of an absolutely accurate square. I would recommend a Sterrett combination square. It's worth the extra money. Thanks to both contributors.
Before you start, be sure the blade is parallel to the way. Otherwise you won't get a zero-clearance kerf. And remember, any cut made with a sled is going to be parallel to the way. If the blade is not perfectly aligned with the way, the cut may be rough or burned but it will still be parallel to the way, not the blade.
I have used the five cut method to test my sled.
http://www.thewoodshop.20m.com/five_cut_method_swf.htm
The wood "runners" are only there to raise the metal runner
off of the benchtop and allow the sled to sit level without
rocking on the one runner. If you look closely, the metal
runner is visible just inboard of the, from our viewpoint,
right wood spacer.
Note to 10Gage: Have a good look at the photo. You might find the sled has only ONE slide as per the notes (and it is metal!!) . The pieces of timber are purely to hold the sled evenly off the table while adding the fence. I'm sure your apology will be accepted with the usual good grace of a real professional.
Frank
Jeffrey Slater's method of attaching the runners is how I do it as well and it works very well for me. His use of a temporary register to square the fence is a great idea I will start using. I have squared off the blade until now, but his method is much better.
I have metal runners on a couple of jigs. They're fine, but expensive and I really don't find my runners made of hardwood scrap any less efficient and it only takes a couple of minutes to size them perfectly.
I like to leave a bit of my runners protruding; it makes finding the slots when I mount the sled just a little bit easier for me. And I like to have something attached to the fence closest to me to keep me from having my hand where the blade can pass through. For me a large block of wood works.
JeffrySlater wrote "Clamp the base to the table and cut the kerf into the sled base and through the length of ply but don't cut through the base front to back completely at this point, you now have a straight edge to register the ....."
How can you clamp it down and still run it thru the saw to cut the kerf?
What is the advantage of 2 sided sled over a single side like Norm Abram uses? You only need one fence that must be totally accurate and you simply line up your cut to the sled's edge. For big pieces I like the fence on the top and push against your work and the sled guides the cut, and for small pieces I like the fence on the bottom for safety and push the sled through the cut. So I have two sleds. For angles I use my miter saw.
A better, easier, cheaper way:
1. Go to your local metal supplier and buy 3/4" X 3/8" cold rolled steel bar stock. You might need to buy 20' but it will likely be cheaper than one 18" section of store-bought runner!!! You'll have plenty of runner left for other jigs. Cold rolled steel is durable and slides easily!
2. Set the runner(s) in a 1/8" deep X 3/4" wide dado cut in the bottom of the sled. That makes it easier to install or replace the runner(s), especially if you made them from plastic or hardwood.
3. To make a two runner sled, with or without dadoes, make the jig in two halves. Then join them together with the fences.
4. When the ZCI kerf gets buggered, widen and clean it up by running it over a dado blade, then just glue in a new strip.
No applause please
When making my sled I used hardwood for the runners. I first clamped piece of oak to the back edge of the table then I placed the two runners in miter with a bead of glue along their length. Then I butted the rear fence of the sled against the back of the table and lowered the sled onto the glued runners. I then screwed the runners in place via pre-drilled holes and, lo and behold, everything is square and ready for the final touches.
gochiking writes: JeffrySlater wrote "Clamp the base to the table and cut the kerf into the sled base and through the length of ply but don't cut through the base front to back completely at this point, you now have a straight edge to register the ....."
What I should have said was raise the blade through the base and the length of ply - Jeff
I like to build my "one sided" cross cut sleds out of 3/8" baltic birch. I like keeping my work as close to the table as practable.
I measure from the blade to the miter slot and add ½' using a framing square to line the runner square with the botton edge. & using a scrap of oak or maple for the runner, I glue it on permanitely w/Titebond III leaving it stick out 2 or 3 inches. Once the glue on the runner is set, usung the miter slot, run the plywood through the saw, cutting off the ½' that you added. This give you an exact cut line. Then I attach the fence nearest to the blade from underneath,then square off from the cut line to attach the far end from above. Using a scrap piece of wood where both edges are exactly parrell, run it through the saw, then flip it over so the cut is on the same end near the blade, and see if it lines up exactly with the cut line. If it does, lock down the far end of the fence from underneath. if not, adjust the far end until the cut is perfectly square. you will have an easy to use cross cut sled and not have to worry about kick backs.
repeative cuts are usually small stock and can be done on the miter saw more easily, keeping the cross cut sled just for larger panels.
I'm really surprised how often the 5-cut method is mentioned below. With a dial indicator and square you can be more accurate (depending on the length of the square used).
Using a dial indicator you can have your TS sled fence square to within 0.01 degrees (with a 6" square) before anyone has the third cut made from their 5-cut method.
If you don't already own a dial indicator it should be the next thing you buy. Why are you reading this? Go buy one! :^)
More here:
http://www.garagewoodworks.com/TS_Sled_Fence.php
Video of the method:
http://www.garagewoodworks.com/video.php?video=v9
Simplicity. Matt strikes again!!! God bless his bald head!!!
I like how nitpicky everyone gets about some of these how-to articles, and how others like to one-up everyone else.
Although I have to agree that FWW just needs to do a better job of editing pictures-to-text before they release new articles.
I love the simplicity of this sled design (love the idea of going out and buying the aluminum premade miterbar - its precut and predrilled, what's wrong with that? Time is money.) The double fence (or triple if you include the back fence) is a brilliant idea that saves material in the long run. Just replacing that auxiliary fence when needed instead of making a whole new sled all the time - we know that when these things get heavy use, they do eventually get out of whack when they get dropped, moved, abused in a normal shop setting.
The old addage "simpler is better" constantly gets updated by someone stepping back, taking a fresh look, and thinking out of the [cut] box. What a refreshing re-affirmment of this basic truth -- come to life in a beautiful little mitre-box. Thankyou, thankyou!
Put one screw in the workpiece fence ,at the other end an oversize hole with small bolt ,so having made a test cut you can adjust with the tap of a hammer ,then secure all with another screw
A nice solution indeed. However, it does rely on the mitre channel being parallel to the sawblade. If that's not the case, no matter how square the cut in the sled, the sled will want to pull either away or towards the blade. This it can't do, so instead the cut widens over time. Mind you, it's one way of knowing when your table saw needs a set-up!. Im going to make one of these. Thanks
Jacko.
wmaruyama wrote: "(love the idea of going out and buying the aluminum premade miterbar - its precut and predrilled, what's wrong with that? Time is money."
Man, you must be doing all right.
$19 plus shipping in blue, $25 plus shipping from the other popular source. Let's just leave the shipping out.
If I can't rip a scrap and fine tune it with my thickness planer in under ten minutes I'll be really surprised.
So $120 to $150 an hour? Maybe twice that? Congratulations, you're doing a lot better than I am. Me, I just like making things out of wood. And nitpicking.
Thanks to all you guys for several neat ideas including the double fence in the article.
Wow, I'm in the process of re-making my sled and I like to use the UHMW (ultra high molecular weight) polyethylene. It can be drilled and tapped to accept machine screws and planed exactly like wood to fit your miter slot. This sure brought lots of different thoughts out in the open. In the past I've used Gary Rogowski's design and used 5/16" bolts in 3/8" holes to allow for adjustments as needed. Any thoughts on that??
Exactly! I've made and squared my cut off sled, but haven't used it since the purchase of my sliding table saw. Cutting and squaring up my panel stock is so fast and easy now. I kept my regular table so and use it mostly for Dado work.
Thanks for all of the comments. Yes, I am using aluminum and not steel. I made a change to the text. And I'm using a 12 in. combination square to square the fence. It looks short because I have some of the blade on both sides of the kerf. I find it easier to hold the fence square when I do that way. And there are a ton of ways to make a sled. I've made a lot this way (for square and miter cuts) and it's always proven to be simple, fast, and accurate. So, I thought I'd share.
-Matt
Fence Alignment - I make mine adjustable by using bolts to secure the fance to the sled base. I counterbore the top of the fence for the bolt heads. I also drill the bolt holes in the sled base a little larger than they need to be. I then tighten the bolts so they're just a tad snug. I then square the fence to the base and tighten a little at a time. The fence can be realigned should the need arise.
Attaching the miter bars - I first placr the bars in the slots and adjust out the slack so they're like I want then. I attach the first bar as above. I then place the sled on the saw table and slightly shim one end so the sled is slightly raised. I them put a small piece of carpet tape on the slide and use a center punch to mark the screw holes. I then drill the holes with a split point bit to minmize the drill drifting with the grain. Remove the tape and install the second bar. You can also use.
Whenever I need to make one, I use the fence to line up one edge of the base with the bar in the miter slot with couple of pieces of double stick tape. lift it off and then screw them in, it work really good for me (as long as your fence is square to the blade).
I'm sure I maybe missing something, but why wouldn't the method for attaching the second fence work for attaching the first fence negating the need for a second?
Also why is it hard for every one to accept that their are more ways to do things than their own.
And that what works for one may not be comfortable, at the skill level, applicable with the tools or access to tool, for another. Boggling.
@GLJacobs, reread step two...
And thank you, Matt, for the great tip/tutorial!
@beem-I know I may be missing something VERY obvious and may ,or am, looking completely stupid but please elaborate on what your intention is by pointing me at step two. Thanks in advance.
@GLJacobs,
Remember that there is only one runner--that is the key to understanding why you have to have two pieces spanning the kerf at the near end:
In order to square the fence to the blade, you need to first cut the kerf. In order to cut the kerf without the sled falling apart, you need solid support at both ends of the kerf. If you only had one piece spanning the kerf at the near end, you'd either have to rigidly attach it to both sides of the sled, thus giving up accuracy, or else you'd have to make it adjustable, thus giving up rigidity.
-Steve
Well this is a different approach to a sled.
One interesting thing I noticed was with 2 fences if you put a block between them in the middle you get excellent blade protection for your hands. With a block covering the blade, you can rest your hands between the 2 fences which keeps your hands away from the blade even more then a single fence sled. Although you certainly can put a block behind the fence for blade protection, you would still have your hands on the blade side of the fence.
I'm not even going to approach all the discussion about the details mentioned above. I think the main point of Matt's sled is the double fence. All the tuning stuff ya do for a fence and saw still applies and are moot points. I just think the meat of the idea is the double fence.
I'm going to give the sled a try.
Thanks for sharing !!
@saschafer- thank you for the clairity. So here goes probably another obvious question : is the method for this sled based primarily in the quickness of construction? Because the issue of time seems to be the main reason for this post. Otherwise for a dedicated crosscut sled the amount of time spent constructing it is irrelevant.
@GLJacobs,
I'm not sure I completely understand your question. The design of the sled is based on what we in the software business call "separation of concerns." That is, rather than have one module do two unrelated things, and do both of them not so well, split it into two modules, each one optimized for doing just one thing.
In a traditional crosscut sled, the crosspiece nearest the operator performs two unrelated functions: It keeps the sled from falling apart, and it registers the workpiece with respect to the saw blade. By separating that one piece into two pieces that each perform just one of the two tasks, you can optimize each one for the task that it performs, without compromise.
-Steve
@saschafer-again very clear and very well explained.
I completely understand the reasoning behind the separation now. I didn't at first because I am of the school of thought to "you get what you pay for" and with time being money you get the rest. So what I have done on my own is beef up the front fence to an inch and a half red oak scrap and epoxy threaded rod in the bottom(two on one side of the kerf and one on the other) and rout corresponding counter sunk holes in the sled and tighten the fence down to the sled until just tight and then adjust the fence to approximately square, then test and retest until I have achieve a result of accuracy I am satisfied with. So far with dial caliper and the five cut method I have gotten to almost 0.001 give or take. I have subsequently retested every time I use it heavily and no recalibration has been necessary. Thank you again for you consiswe clarification and Thanks to matt for a Very informative construction method that I
....I'll have to try soon!
(sorry I accidentally press the wrong button)
Like a riving knife in a table-saw it will take a while before a sliding-tablaw will be standard in North America. This cross sled from Matt is exact doing what it suppose to do, thanks for sharing Matt
-Ed-
Thanks Matt. My next crosscut sled will be as you describe. For now, I'm getting spoiled using a big Makita sliding miter saw on a portable table, that a friend has stored in my shop/garage.
excellent tip aschaffter - making the sled in two parts. Here in New Zealand its impossible to find accurate steel bar in a variety of widths for my different sized mitre slots on different tools. I'll be using your method to align undersized bar in both slots. Also seems easier to reference the fence as you can place a framing square on each part of the sled to ensure 90 degrees to the blade.
Why not leave the sled on the table saw and register the square directly off of the blade?
Construction methods and design are infinite but to write an article you have to pick just one! thanks for this contribution which made me think about the crosscut sled in a new light, having just built my first one.
I must add my thanks to the author, Mr. Kenney, for this contribution to the world of woodworking! When I saw how he designed this sled using engineering design concepts (I have a masters in information systems and I studied software engineering) by separating out the various functions performed by the respective sled parts I knew this was well conceived version of a cross cut sled and the design for me.
I have had nothing but square cuts since. Any future version of a cross cut sled will incorporate this design, which separates the implementation of the fence from the rest of the sled's construction.
I wish I could post pictures to demonstrate my successful execution of the design and how I locked in the correct square setting. Since I can not, I will try to describe it as best I can.
First, after screwing down the right side of the fence,I inserted a feeler gauge on the left side between the fence and the near end to carefully determine and set the position of the fence. I used my combination square to get as close as possible to square.
Second, however, the ultimate litmus test was to run a work piece through on the sled then turn the discard piece upside down along the shared cut line. If there was any gap at all then it meant that the fence required further adjustment.
Third, once I established the perfect setting I drilled a screw in from the back of the near end piece to the fence. Then I drilled and screwed in another screw from the opposite direction. I did this twice from both sides to guarantee that the fence was going to remain in the correct square position. I then drilled and placed a screw from the base up into the fence to secure it to the base for added stability in two separate positions across its length.
Finally, I did build and add a block of material where the saw exits the sled (about 4 inches deep). While not necessary to the cutting function of the sled it adds a worthwhile level of additional safety I think is worthwhile.
All the compliment for the 890v4 is normally acceptable relating to others. Document decided a fabulous 50 % of proportions " up " and provide numerous room or space initially, and therefore the superior is normally elastic sufficiently to hire great paws move round. Literally, Document that can compare with the top from this black-jack shoe (without which usually massive language). It’s produced with a fabulous nylon uppers which usually appears to be it will probably be many robust, and therefore the overlays provide you with the correct sustain. In the camera, the liner for the superior is normally softer and additionally non-abrasive, still I had not likely made an effort maintaining sockless ever since nearly every one of great mileage on the black-jack shoe are typically in cold temperature. All the sockliner is normally slimmer, and therefore the alignment sustain isn't really expensive obtrusive.
Really the only for the 890v4 says a whole lot stronger when compared to Document wanted the software to make sure you. Possibly this could simply come to be because it is known which usually it’s for that reason icy out of (AVOI midsole space-age foam vendors " up " on the icy), it also doesn’t look and feel cushy still travelling all the blessedly snug in your own home. For whatever reason Document wanted this approach will probably be significantly softer black-jack shoe when compared to it's always. A person, I had not likely previously had whatever complaints about really the only out and about. It’s not the case stable that hot weather feels as though a fabulous large rock, and additionally I’ve literally really liked all the mileage which usually I’ve dash with them (really liked and not just preferred learning to be a primary classification right).
[url=http://www.zapatillasnbes.com/outlet-new-balance-998-hombres-españa-chocolate-p-191.html]New Balance 998 Hombres chocolate[/url]
The upper within the 1400v2 may be a fine, breathable nylon uppers utilizing wide-ranging welded overlays. For a second time extremely only even so it should the duty for safe guarding any lower limb affordable quite well. It’s formulated from a good plasticy sorts of nylon uppers the fact that headaches my family for the purpose of front foot getting utilizing long-term take advantage of, however , That i look at hardly any evidence of each challenge all this time (distinct from any NB 730 v2, which unfortunately started to cultivate minor front foot holes utilizing very much the same gas mileage to them). It is my opinion one can find a sufficient amount of overlays to forestall all serious blowouts.
Mainly because Mark Schrup which means that elqoquently invests it all during the launch sentence for this overview, the wonder within the NB 1400v2 is certainly a efficiency. The sole is definitely a good full-contact sand wedge for froth, and it has good quality outsole policy – loads of rubber to present stability. I’ve insert my best frequent 30-40 pre-review stretches regarding those boots or shoes without any serious evidence for dress in into the exclusive. Certainly, there should are generally a good clear plastic shank/plate around any midfoot so as to add hardness into the shoes (you will find it all from your diamond-shaped pin within midfoot), together with It is my opinion the improves a responsiveness.
[url=http://www.nbshoesca.com/new-balance-ml574vn-mens-running-shoes-navy-blue-p-10.html]New Balance ML574VN Men's Shoes Navy Blue[/url]
All the pre-race technique in a 100 mile run is normally much more that's involved when compared to which usually important for almost every individuals I’ve conducted. There is medical-related check-ins, an array of tumble back pack parts to make sure you arrange apart (in the event an individual has a staff that you should follow you will all of the nighttime and daytime, i will not with the exception of all the turn-around benefit, mile forty-eight, and additionally Not damp Pay benefit, mileage 12 and additionally 82), a great deal more massive pre-race get together and additionally Bighorn covered a further 0. 80 mile go around to sort through the start locale right from just where we're able to woodland. It is typically really difficult to continue your body right from possessing likewise immersed throughout the thinking about and additionally check-in technique which is able to quite simply take advantage of energy levels from modest outlet stores about what you want for those run.
All the forecast necessary hot weather usually in the evening periods by means of likelihood icy and additionally magic showers in the evening. The software noticed lovely awesome (I presume ended up simply being the middle of 80′s in which just for July says awesome) traveling up the roughly 4000ft go out from Language Waterway Canyon usually in the first of all 7 mileage for the run, still Document sticked hydrated which has a Straight forward Hydration wine and additionally Hydrapack 500 ml softflask by means of inov-8 Run Seriously. 27 hand held (which i secured hit bottom unless Document stocked the software inside the subsequently benefit network, discovering the software was going to deemed a more lengthy page a further a). Document equally initiated possessing great scalp and additionally figure stormy in any streams We can look for as soon as first of all two periods.
[url=http://www.lvtaskedk.com/skuldertasker-og-totes-monogram-vernis-c-25_26_33.html]Louis Vuitton Monogram Vernis[/url]
I like Matt's approach to the sled construction. In fact, I like his approach to every project. Simple, concise... With a touch of humor thrown in for commentary!
Cheers from Canada!
We are the manufacturer of the woodworking machines from China.
We have our factory and sell the machines to anywhere.If you have any questions,please contact with me anytime.My mail is [email protected]
We products the sliding table saw,
Edge banding machines,
Carving machines
My SKYPE is 8613573217276
I like to build my "one-sided" cut sleds from 3/8 "Baltic birch trees, I like to keep my work as close to the table as possible.
I measure from the blade to the miter groove and add ½ 'with a square to align the square with the bottom. And with a piece of oak or maple for the runner, I glue it permanently with Titebond III and leave it sticking out 2 or 3 inches. Once the glue is set in the guide, use the miter slot and run the plywood through the saw, cutting the ½ 'you added. This will give you an exact cutting line. Next I place the guide closest to the sheet from the bottom, then I pan from the cut line to get to the far end from above. Using a piece of wood with both edges exactly the same, run it through the saw and then flip it over so that the cut is at the same end near the blade and see if it lines up exactly with the cut line. If this is the case, block the end of the gate from below. if not, adjust the end until the cut is perfectly square. You have an easy to use cross slide and you don't have to worry about kickback.
Repeated cuts are usually small material and can be made more easily on the miter saw, keeping the shortcut only for larger panels.
http://www.thebestmitersaw.net Great Information about miter saws
Log in or create an account to post a comment.
Sign up Log in