

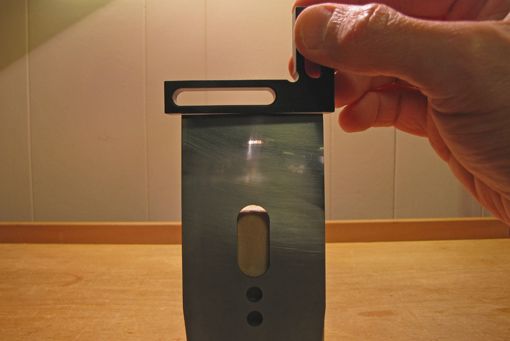
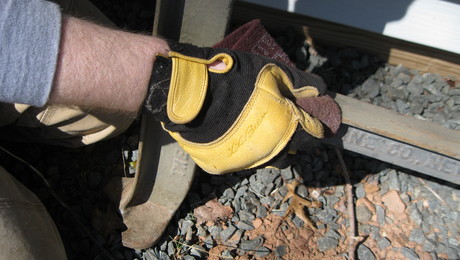
The slight curve (camber) in the edge of the plane blade is visible as a light gap against the straightedge.
Trick question. It depends. This post will discuss factors in the amount of camber in the edge of a plane iron with attention to an under-appreciated trigonometric quirk.
The slight convexity or “camber” in the edge of a smoothing plane iron should allow the production of airy shavings that are thickest in the middle, say .001″, and feather out to nothing at a little less than the width of the blade. This produces imperceptible scallops on the wood surface and avoids square-edged tracks or “gutters”.
A similarly small, or perhaps a bit more, camber in the edge of a jointer plane blade allows one to bring down the “high” side of an out-of-square edge without tilting and destabilizing the heavy plane. The camber should be positioned at the center of the blade projection so the plane can be shifted toward the high side of the board’s edge to remove a slightly thicker shaving there.
For jack planes, more camber lets this workhorse take thicker shavings without producing gutters. The more pronounced camber also makes it easier to direct the plane’s cut at the high spots on the surface of a board being dimensioned.
When grinding and honing a plane blade, I check the camber by setting the blade’s edge on a small aluminum straight edge and holding it up to the light to look for the tiny gaps that gradually enlarge from the center to the sides of the blade. (I never measure this amount so I cannot answer the question posed in the title of this post.)
|
More on Handplanes and Plane Irons |
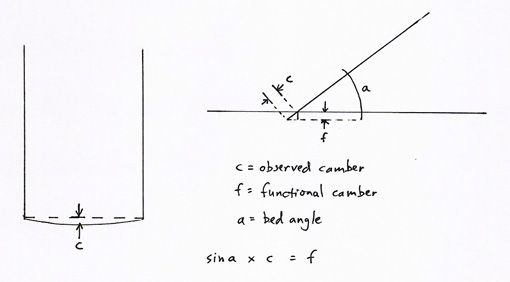
Now for some trig. (Refer to the diagrams in the second photo.) Let’s say the camber – the depth of the convexity of the edge – is .005″. When this blade is installed on a 45° frog in a bevel-down plane, the actual functional convexity is reduced. Think of it this way: if the blade were laid flat and you viewed it toward the edge, there would appear to be no camber at all. The functional camber is reduced by the sine of the bed angle.
sin 45° x .005″ = .0035″
Look what happens in a bevel-up plane with a 12 degree bed:
sin 12° x .005″ = .001″
Therefore, I sharpen more camber into a blade for a low angle bevel-up plane than for a bevel-down plane to achieve the same functional amount of camber. The camber that you observe sighting 90 degrees to the face of the blade will mostly disappear when you install the blade in a 12 degree-bed, bevel-up plane and sight down the sole to observe the camber. Compensate for this by being generous with camber in the sharpening process. A more direct approach during the sharpening process is to check the camber against a straightedge with the blade tilted at the bed angle.
Again, I do not measure these things but rely on my eye, experience, and especially feedback from the work. Of course, sometimes I’m off, usually by over-cambering. However, since the middle of the blade is thus destined to dull first, it is easy to reduce the camber on the next honing.
There are undoubtedly other factors affecting shaving thickness, such as blade sharpness, blade edge deflection, and wood grain, so it is most important to monitor the performance of the plane and make adjustments when you resharpen.
You can use trial and error or a set of leaf gauges to work this out to your liking. Like just about everything else, there’s more than one good way. Use the principles and find your way.
http://www.rpwoodwork.com/blog/
-
The slight curve (camber) in the edge of the plane blade is visible as a light gap against the straightedge.
-
A trigonometric quirk to be aware of. Here's the math if you want.
-
Bench plane blades are sharpened with a slightly curved edge or "camber". Why? How much? Is it different for a bevel-up vs bevel-down plane?


Comments
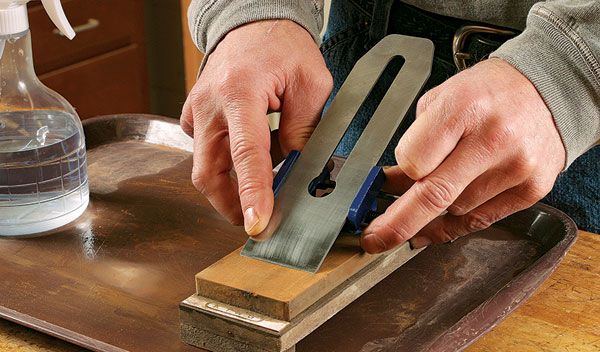
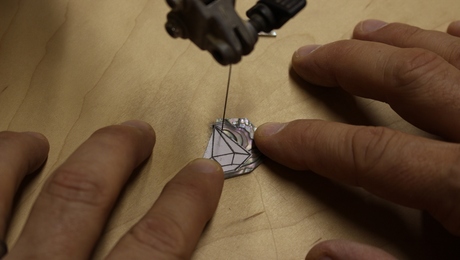
The photo with the square showing the camber and the diagram are mine. The photo of someone, not me, using the Eclipse-style honing guide was added by the FW editors. I don't happen to use or like that guide although it can be used to produce a camber in the edge. Just a matter of personal preferences.
Rob
Good article, but how do you actually grind or hone the camber onto the plane iron?
thanks for the article. if it wasn't for cambering blades, planing would be much much more difficult for me. *I* grind a camber using the eclipse jig - the narrow wheel means that the blade is a little unsteady, but it also allows you to camber very easily. all you need to do is apply a bit more pressure on the corners of the blade during the rough grinding stage, and then make sure to get those spots on finer honing. Like Rob, it's not something I measure precisely, I just hold it up to a straightedge to make sure it's even (also I do grind a heavier camber on rougher tools (e.g., jack plane than on smoothing plane).
this technique might work on veritas-style jigs, but the wide wheel on that might make it harder to do so.
there are photos/comments on brent beach's excellent website on making jigs with cambered edges to aid in cambering the blade:
http://www3.telus.net/BrentBeach/Sharpen/index.html
and specifically further down on
http://www3.telus.net/BrentBeach/Sharpen/camber.html
Hi Aaron,
Good question. I'm sure different folks have different methods. I'm going to send Rob an email to make sure he chimes in but I can tell that my method - also the method of our art director whose blades cut shavings fine enough to see through - is to simply apply more pressure on one side of the iron (in a honing jig), then switch pressure to the other side, then even pressure, repeat, etc. This method has always produced excellent results for me. It's largely a matter of trial and error. There have been plenty of times when I've put a bit too much camber on a smoother. Just experiment.
Cheers,
-Ed
Well written but didn't you get the math backwards? Didn't you give us the depth of the cut "f" as .001" and the question was what would "c" or the height of the camber be?
Then by simple algebra: C (height of camber) = F (depth of cut) divided by the sin of the angle.
I think the point you want to make is that you have to have a greater camber on a bevel down plane than a bevel up plane for the same depth of cut. I stumbled when your math example seemed to show that you got a thicker slice with a bench plane than block plane with the same camber.
Peter
I do most of my sharpening freehand, so to produce a mild camber such as for a smoothing plane blade, I just lean a bit more on each side of the blade on the stone and work the pressure smoothly toward the middle. It doesn't take much.
For a blade where I want more camber, I start it in the grinding stage at the Tormek. There is a little bit of give to the guide bar, enough to make the camber. I find no need for a special rig, though I suppose that could help for a blade with a pronounced curve such as a scrub plane.
As I said, I never measure these things. The important thing is to observe the plane's performance and let that guide your perception as to what is "enough" camber next time at the sharpening station. It's like adding spices to your food.
I find it's easy to overdo it. No problem: The center of the blade will take the most wear and you can hone away some of the hump to resharpen the blade and reduce the camber.
Yes, the math is correct in the post as written. I am comparing the camber you observe when you look at the edge 90° to the face of the blade ("c") with the camber that the wood "sees" - i.e. the depth of the camber projection when observed parallel to the length of the sole ("f", the functional camber). C is reduced by the sine of the bed angle to yield f. The overall depth of cut does not figure into that relationship.
The math is tangential to the main points which are to use differing cambers according to the task of each plane and, to realize that bevel up and bevel down blades, all else equal, require different approaches to producing camber in the sharpening process.
The performance of the plane is all that really matters!
Rob,
The post started with a question: how much camber should I put in a blade. You then gave us a starting point, a fact or a known if you will, saying you want to make a shaving .001 inch tapering to nothing at the edge. The problem becomes if you want to do that, how much camber is enough? The direct answer to the question is the thickness of shaving desired divided by the sin of the frog angle. You can and did, despite your denial, answer the question in the post.
My point was the math you used, in the form you used it disguised the answer, rather than reveal it directly. It doesn't matter much whether you use the answer directly or not. It is an answer to the question posed and something, someone might find useful.
The math reflects the variables you describe. If you want to take thicker shavings, or if you change the frog angle, the height of the camber arc will change. So as you say, it depends on what you want to do. But you have an answer that links all the possibilities.
Peter
I hope adding my two cents will be helpful in this discussion. After a lot of experimenting I've developed an easy and quick method of sharpening and cambering my smooth plane blades. I use sandpaper sharpening on a stone surface plate with the Veritas MK II honing guide and camber roller. After honing at the finest grit (2000 wet/dry paper), I hold the blade vertically and gently round off the corners. Next, I change the honing guide roller to the cambering roller. I put pressure with one finger in the middle of the blade and make five strokes pulling toward myself but not pushing forward. Then I move about one quarter from the outside for five more strokes on both the left and the right. Lastly, I move my finger pressure to the extreme outside corner and make ten strokes on the left and right. I then repeat the same process using Lee Valley's green honing compound on a 3" x 8" piece of MDF. This whole thing goes much faster then this description and produces blades that cut smoothly with out blade marks. I use this routine for bevel down planes and haven't found it necessary to to change it for different types of planes. I don't try to camber bevel up planes because I would then damage the flat side of the blade which is the reference side from which to measure the bevel angle. By the way, if you are a new to sharpening, the sandpaper method using wet/dry silicon carbide paper is the least expensive, no maintenance and easiest way to get a very sharp edge.
Camber or not on a jointer plane for trueing edges for board glue ups?
Log in or create an account to post a comment.
Sign up Log in