Gallery
Self center mortising jig
Jul 21, 2010
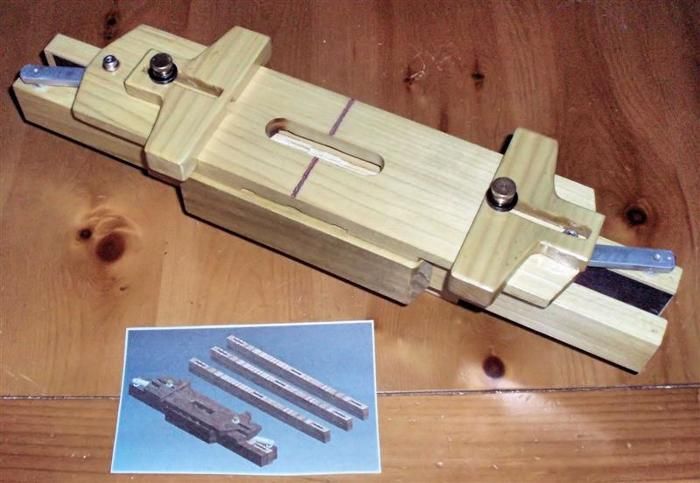
Self center mortising jig with 75″ diameter guide slot, adjustment from 1″ to 2.5″. slots long with stops.
This site is protected by reCAPTCHA and the Google
Privacy Policy and
Terms of Service apply.


Comments
Great idea. Are the metal pieces the self centering mechanism? Does it act like a parallell rule? I'm assuming the two metal pieces are bolted to the center of the slotted piece so when it's opened they two sides stay paralell and the slot template stays in the middle. What is the fence-like wood strip I see in the center front and why is it needed?
Thanks.
Cool jig. How about some more detail?
Syeates observations seem reasonable to me. What appeared to be hex-head screws about a half-inch in from the ends of the template are attached to the center of the parallel bars. These obviously keep the template centered, if I am correct. Since the bottom of the template must be relieved to allow the parallel metal arms to work, my guess is that the fence-like wood strip on the front is there to provide stability that was lost by the relief cuts on the bottom of the template. If I am correct, there'll be another one on the backside to support that side of the template as well.
It is difficult to see that the end stops seem to have been routed out so that they fit down over the template so that they will remain parallel. Initially I thought that the cap screw and the holddown screw provided that function. Then I realized that the end stop on the left was beyond the hex head hold-down screw, and I looked closer to see the ears on the end stops.
cool jig.i hope use this idea for my next job thanks.
Looks good and seems simple to use. I am a firm believer in KISS
This router jig has (2)1/4" shoulder bolts, and (2).250" oil lite bushings with flanges, on each hole on main router base, and they are centered, and added short wood support to each side arm keeps it very stable when routing 3/4" malt. The 1/2" wide aluminum bar, has (2)#10-24 tap hole in the center of the bar, and (2)5/16 tape hole on each end to the center hole. Clamp your pcs in place to center and set your stops, and plunge to depth per path. This was drawn up on a (2)cad design program (Inventor and Solidworks). You can even predrill the slot in the pcs with a drill center jig if you what to, before using router jig if you prefer. Then clean it up with the router jig.
OK! No guess work here, thinking and designed behind jig is making it real accurate.
1)One thing to remmeber about (Aluminum 6061 bar) 2 pcs I made exact same length and same width (0 to 1" tenth Mike was used, and 12" calipers). Tell you in a moment. I swept the center in both directions with a Indicator on a vertical mill, for center tap hole. When tapping the 2 end tap holes, moved 1/2 distance to the edge width from center, drilled and rotated aluminum pcs around to get exact center distance from center, do both pcs same setup time. (that's why both pcs are same all aspect) This makes the jig more accurate off the center line off your work Pcs each end.
2) The 2 wooden pcs that attach to Aluminum bars, holes are done the same way(length, width, and height)same on both pcs. (trick of trade being a machinist for a long time, that worked well for me is drilling under size, than step to hole size you want, this makes the hole more straight and more accurate in diameter and location.
3)The 3/4 slot on the router base, was done on a router table with a under size router bit. I made the slot to accuate diameter of.751 for the reason the part was rotated from side edge to side edge width to make the slot accurate fom center line for a .749 bushing guild. A stop was setup at the time I made router base working off center for length (1/2 distance) of slot. In the future this may change to longer height for angle slot.The accuracy of the jig is up to you! When I checked out the wood parts, they had .002
thickness difference from each other, error, the jig keep it to a minimum of .003 total from center. This can be done on a drill press if the head is (Trame) indicated in to the table, plus a thickness gauge, shims and table jig.
Now, I came up with a attachment, mount on a worktable with vacuum hose.
Log in or create an account to post a comment.
Sign up Log in