
The Cut List plugin written by Steve Racz is one of the more useful tools in my Plugins folder. I use it on nearly every SketchUp project I do these days. In my previous blog entry I announced the release of the latest version of the Cut List plugin. Here’s a little more detailed look at it.
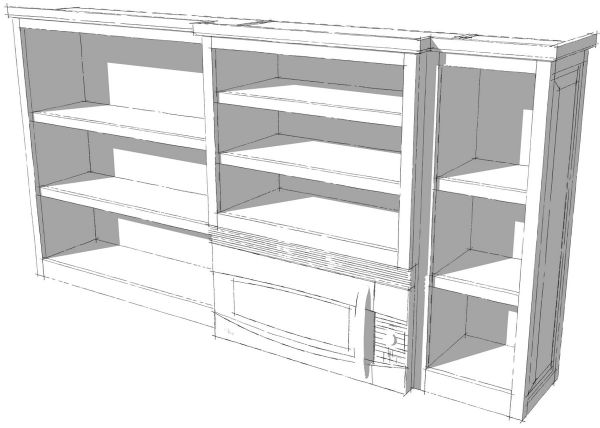
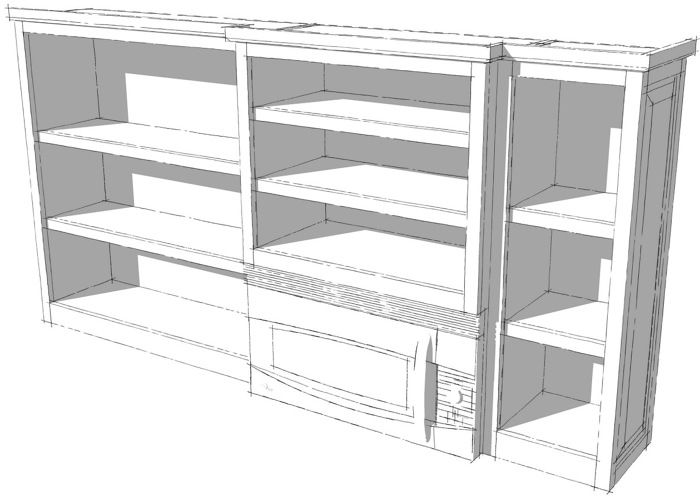
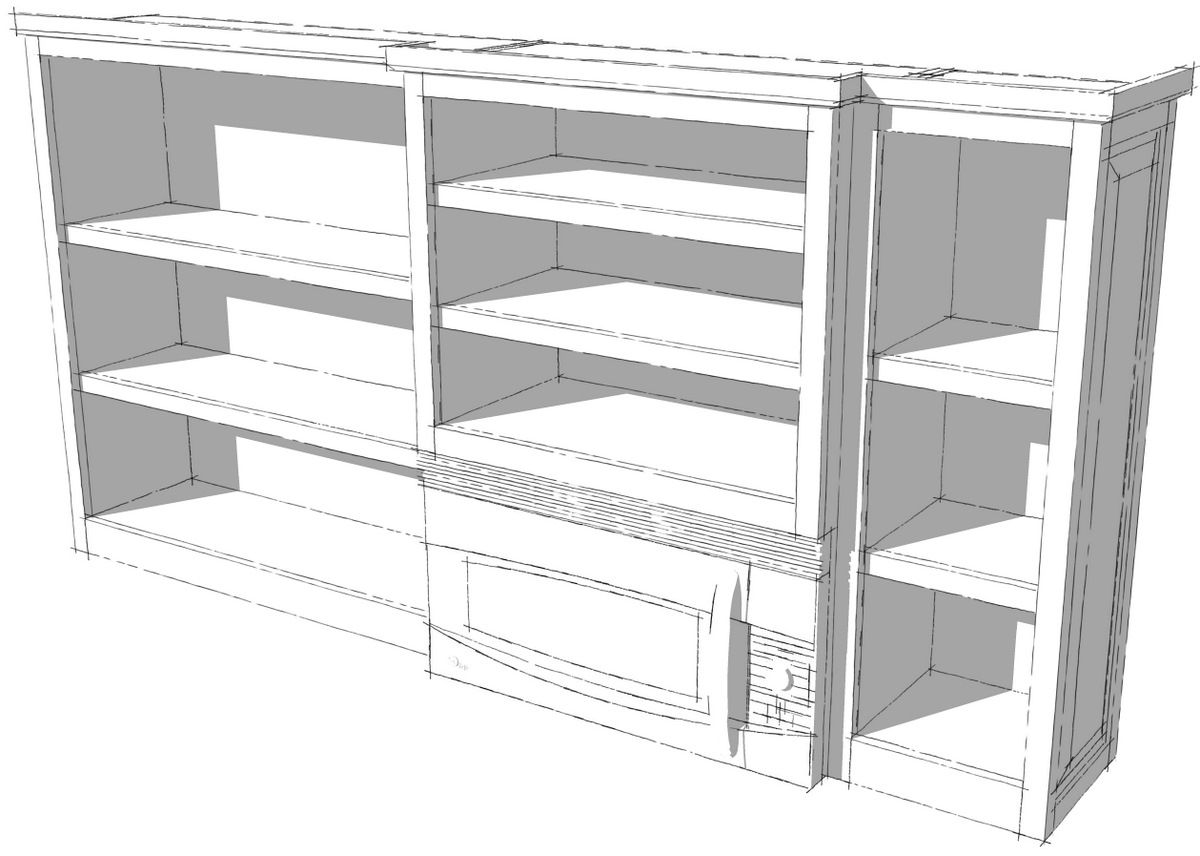
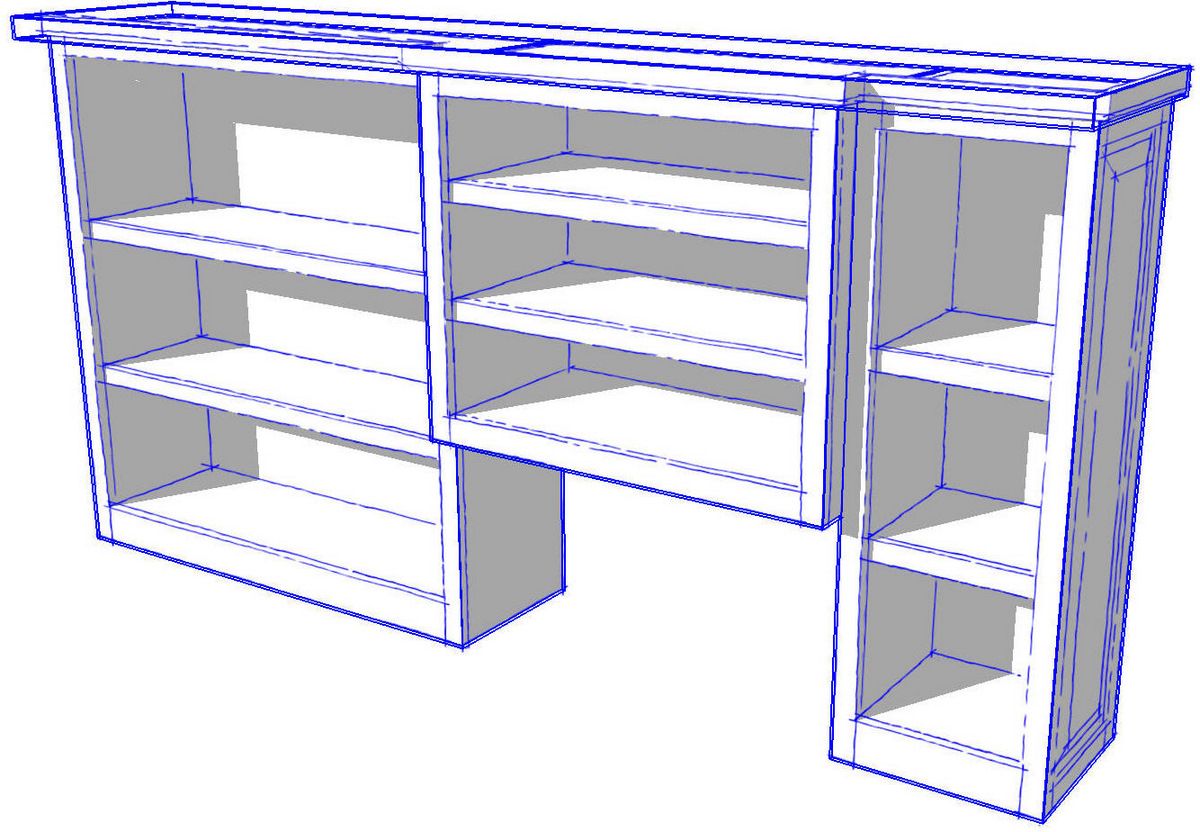
One of the cool new features is support for sub-assemblies. For the plugin, a sub-assembly component is the level above the bottom level component. In the model I’ve used as an example, I’ve made a sub-assembly of each of the three cabinets and one of the molding at the top. I’ve selected them in the next image.
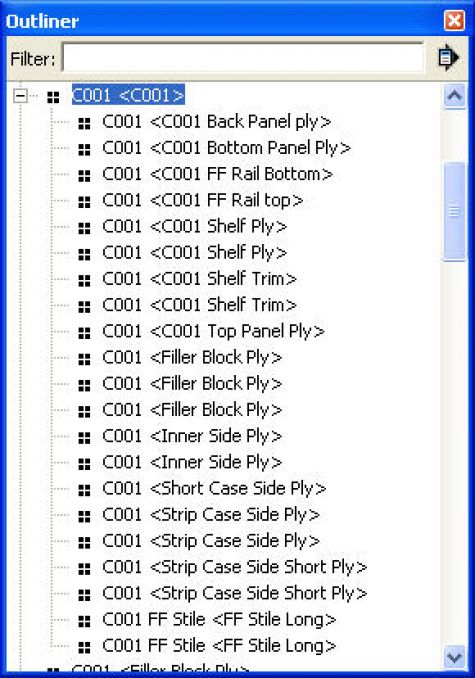
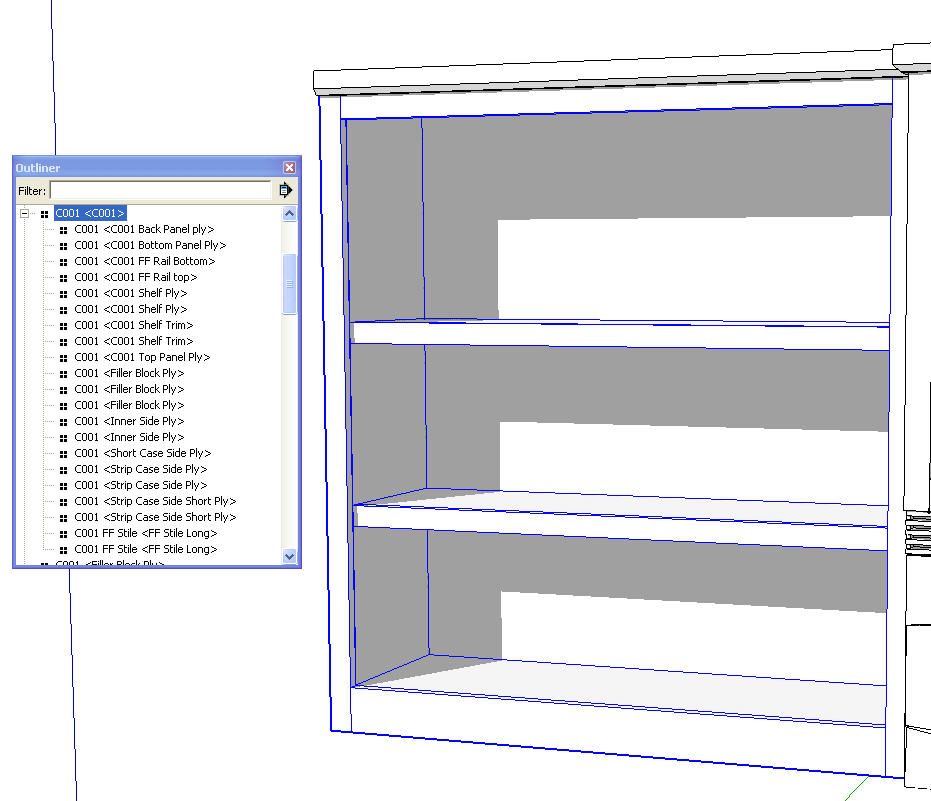
Also, a look at the Outliner shows the sub-assembly as C001 in this case and the components underneath that.
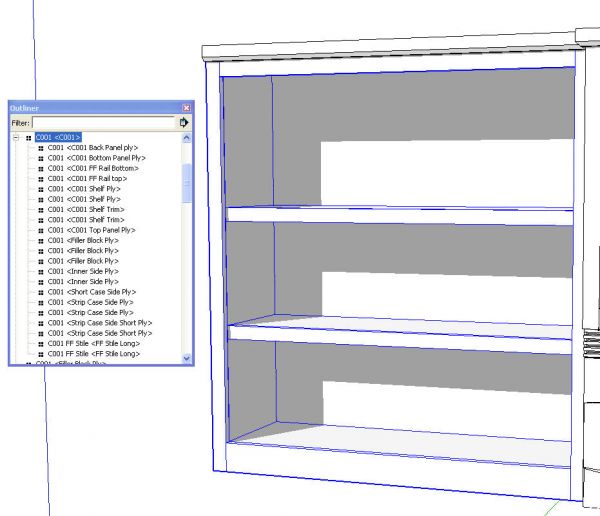
And a closeup of the Outliner:
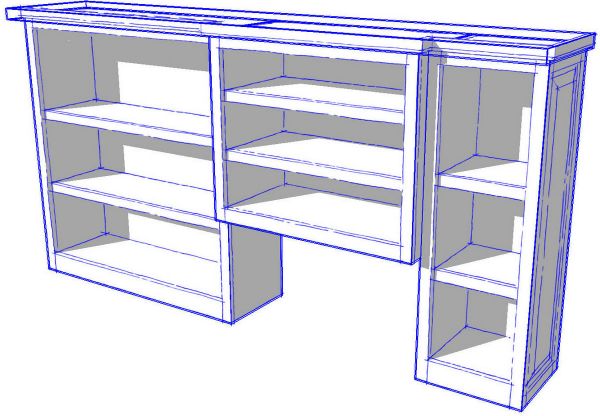
Unless you want all instances of all components to be included in the cut list, select only those you need to have included.
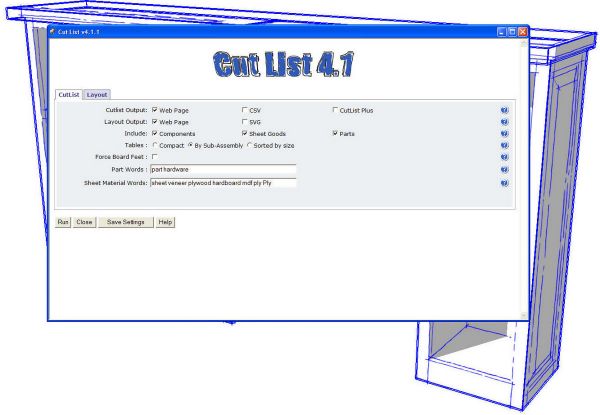
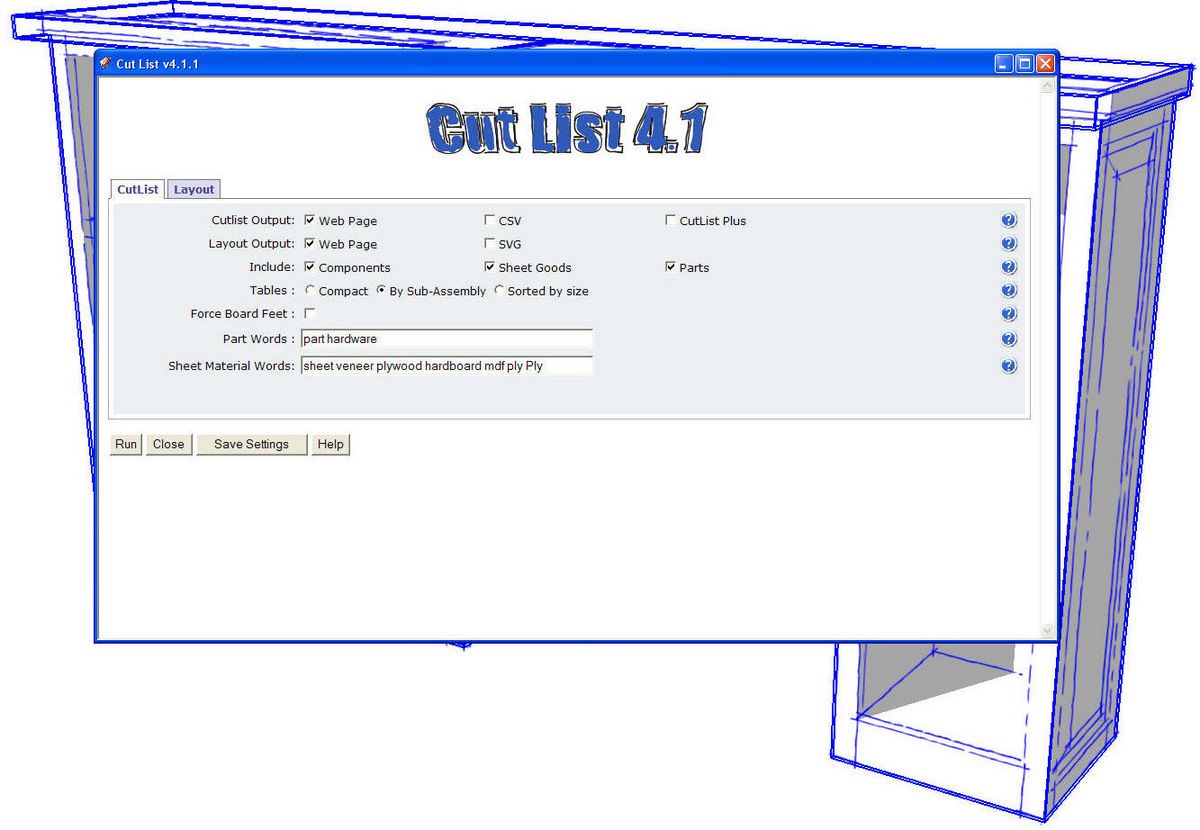
When you run the Cut List, a box will open to give you some options.
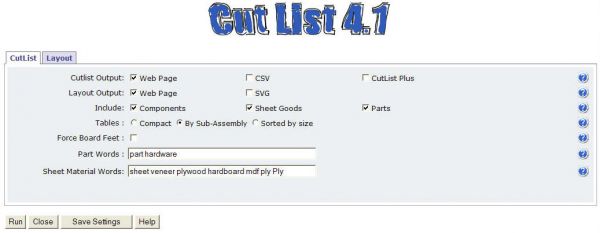
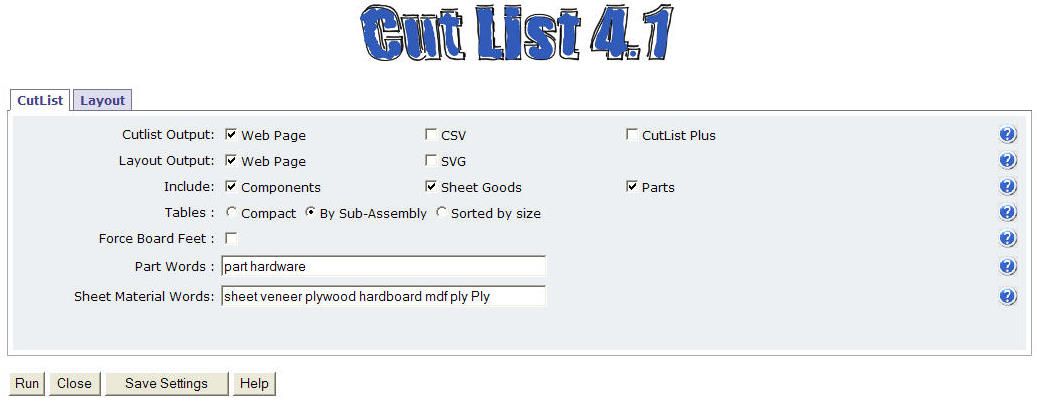
Under the “CutList” tab you can choose options for the cut list as well as for the layout diagrams. The ‘?’ buttons to the right open some little boxes to give you help information if you need it.
If Web Page is checked you’ll get immediate HTML pages showing the Cut List and/or Layout if you want to see them.
CSV generates a Comma Separated Values file that can be opened in your favorite spreadsheet program. I rarely need all of the info included in the cut list so I will edit out what I don’t need in Excel.
CutList Plus creates a file formatted for use in the CutList Plus program.
SVG creates Scalable Vector Graphics files that can be opened in some image editors. when I need the layout images I usually use Inkscape to edit them.
These output options will be saved in the same directory as the SKP file.
You can choose which elements of the model are included in the cut list if desired. Components refers to those elements that aren’t included in the Sheet Goods or Parts sections. the Tables section gives you options for how the cut list tables are sorted. I’ve chose Sub-Assembly for this model.
Force Board Feet allows the table to display volume as board feet instead of cubic meters even if you’ve used metric dimensions in your model.
The cut list can be sorted into sections that differentiate parts and sheet goods from the other components. This helps to improve the cut list accuracy and make it more useful. Add one of the Part or Sheet Materials words to your component definitions to have them sorted into the proper section of the list. You can add other sort words to those included with the plugin by just typing them into the lines. Click on Save Settings to save those new words.
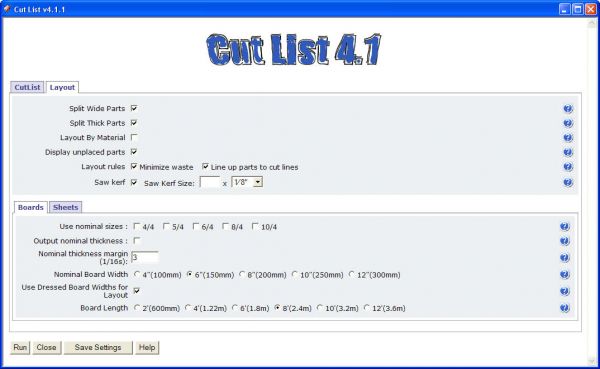
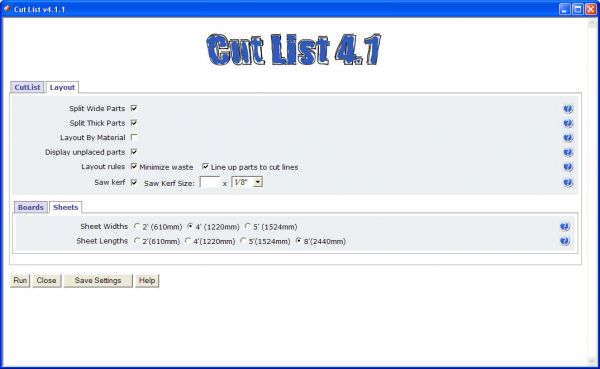
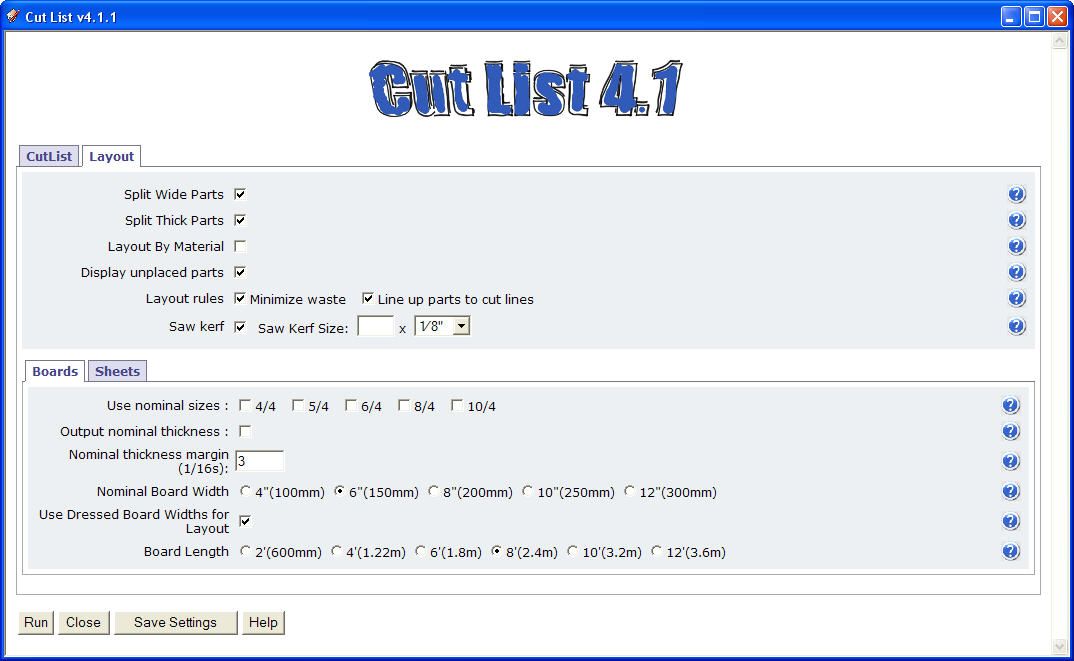
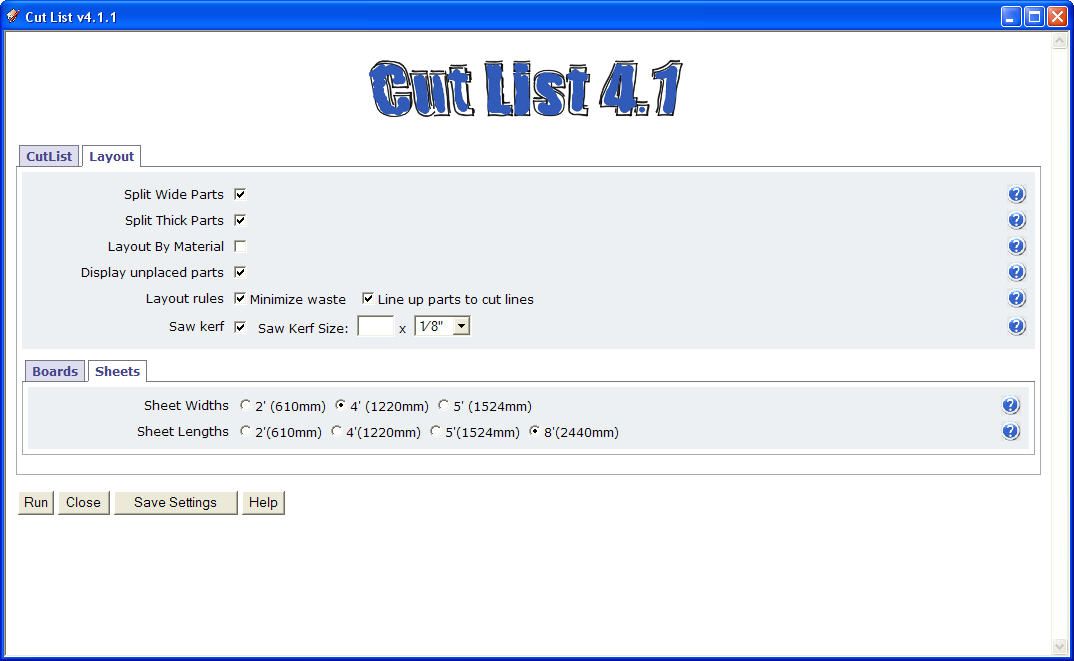
If you click on the Layout tab you have some options for determining how boards and sheet goods are displayed. You can choose the sizes of the boards you’ll use as well as the size of sheet goods.
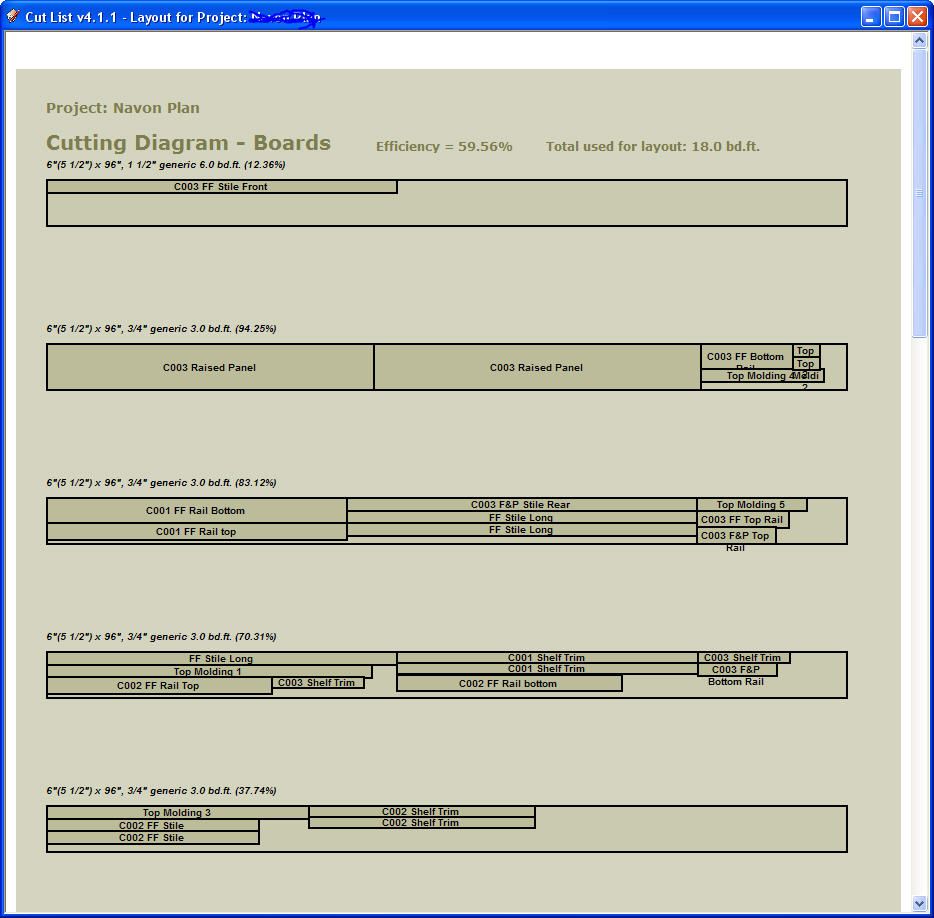
Click on Run and in a few seconds you’ll have the files you’ve chosen to get.
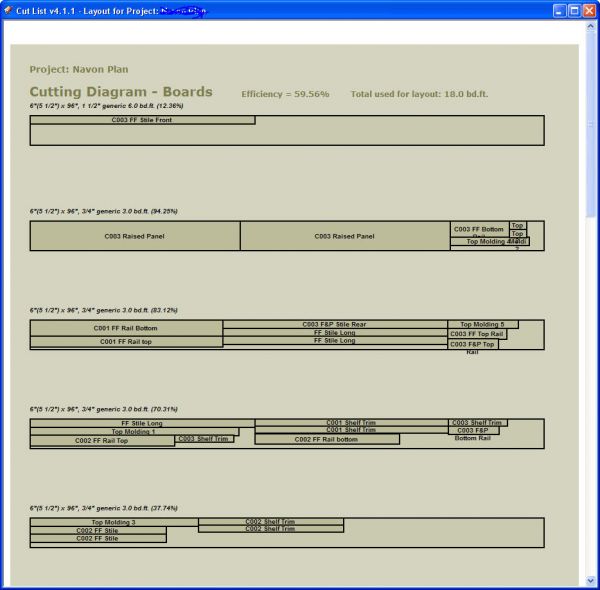
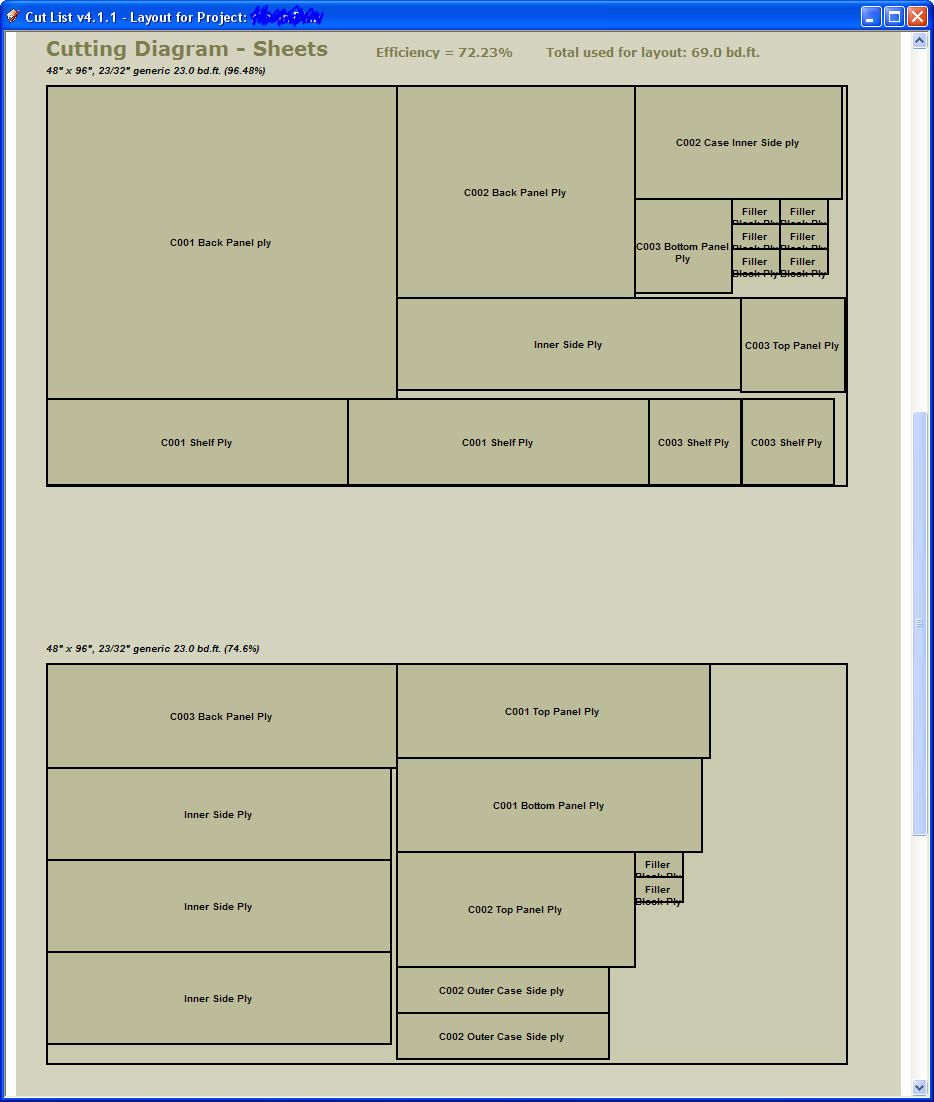
The lumber will be shown in the first part of the layout…
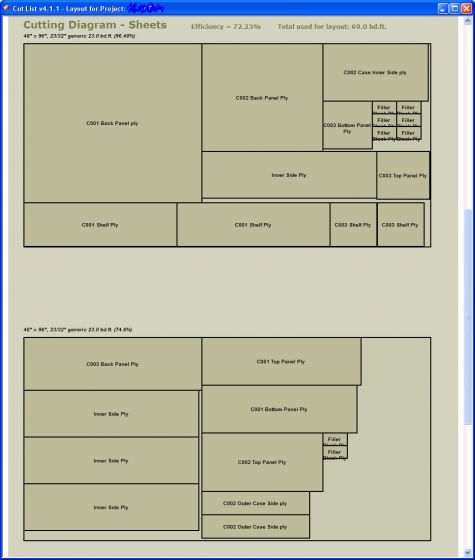
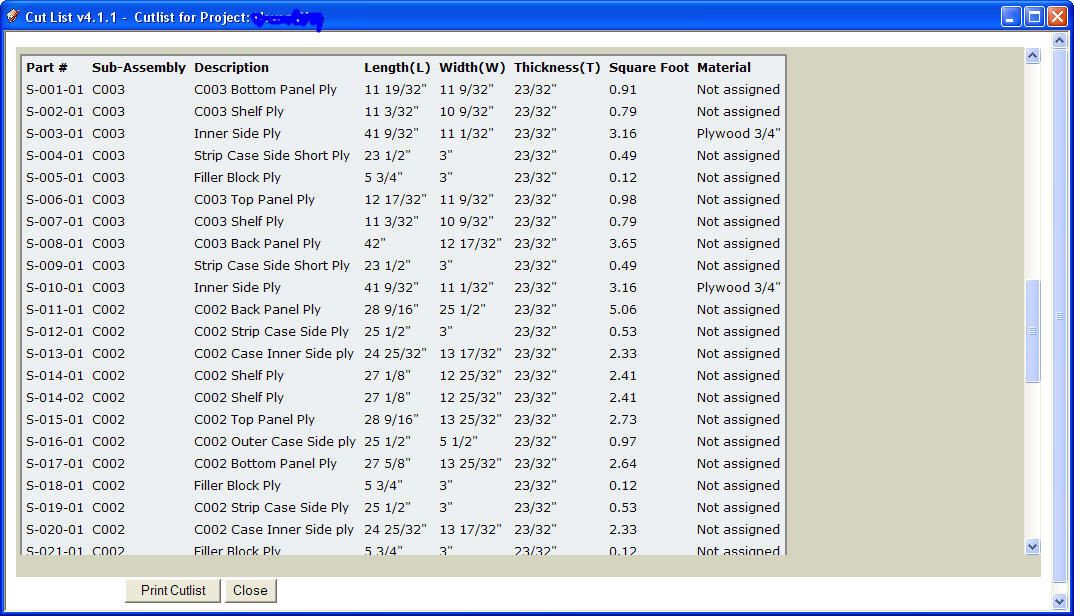
…and the sheet materials will be shown next.
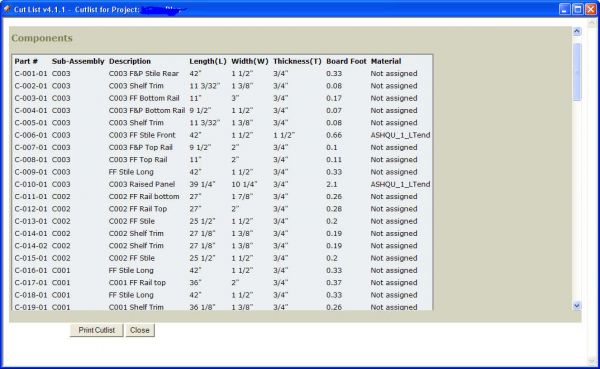
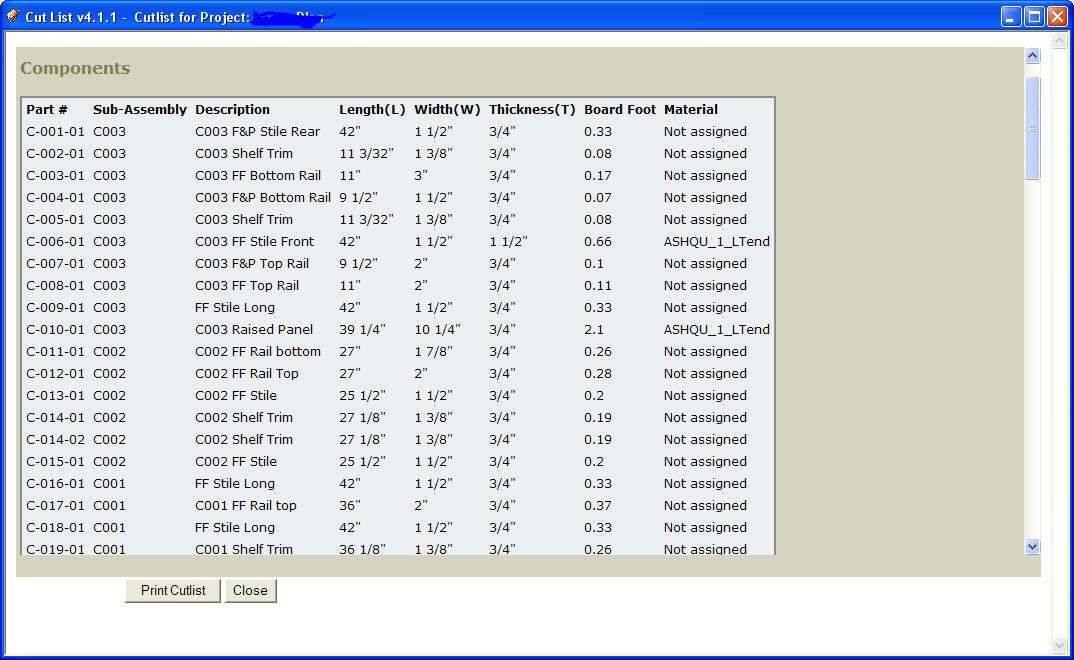
In the cut list tables the lumber is also listed first…
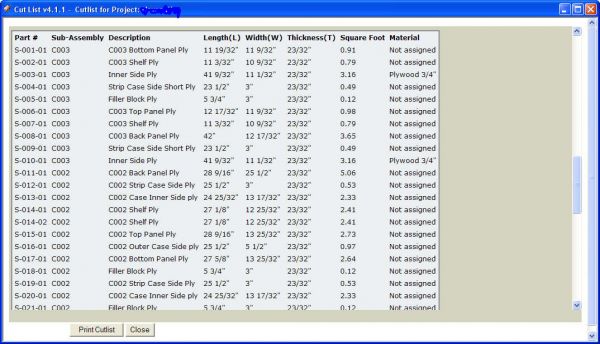
…followed by the sheet materials and the parts if any. I don’t have any parts in my model so there’s no parts section in my cut list.
If you choose the Compact table option the cut list will create a single line for each component instance regardless of the sub-assembly in which it resides. You might find it useful to run both versions if your project is complex. Materials, if assigned, will also be displayed. You can use that column in the CSV file to further sort your cut list if desired. Most of my project here has no materials assigned and those that are are just for some detail views in the plans.
I also use the cut list table as a quick method for error checking. The Length, Width and Thickness dimensions are displayed to the precision level you have selected in Model Info. I work with Precision set to 1/64″ but I don’t intentionally draw parts with dimensions in 64ths. When I am getting close to ready to run my cut list for the plan package, I’ll run a quick cut list, web only, no layout, and scan through the dimensions. If I see a dimension showing 64ths or a ‘~’, I will go back to the model and check to see why. Usually it’s because I have a diagonal component and the dimension just works out that way. If that isn’t the case, however, I make the corrections as needed.
If you haven’t used the Cut List plugin, I would recommend that you give it a try it’s an easy way to expand your capability with SketchUp. Do keep in mind that the information it gives you is only as good as what you put in. If your modelling is sloppy, you won’t get accurate results. The dimensions it reports are derived from the dimensions of the component’s bounding box so you’ll want to make sure you have the bounding box aligned correctly. See my post on Axes.
If you have the previous version already, remove all of it from your Plugins directory. There should be a folder called cutlistui and a file called CutlistAndMaterials.rb. The new version uses an entirely new structure and so the old won’t be overwritten by the new.


Comments
I agree - CutList is one of the most useful plugins I have. I have questions about the kerf option.
1. What is the first box for? Is it the size of the blade (eg: 10")?
2. Why isn't there an option for 3/32" kerf width? It is the most common thin kerf.
Thanks.
Dave
Hi DaveS48,
The first box is for the number, the second is for the units. So, for 3/32" type in 3, then select 1/32" units in the second box.
This way, any kerf size is possible ( because there are no standard kerf sizes!).
You can also use this feature for say, rough dimensioning of your parts. If you need to add extra width to your pieces to account for planing and dimensioning plus the kerf, make this even bigger. The layout still shows the finished size pieces but leaves enough space for whatever kerf you have specified.
Steve
Steve, thank you for clarifying that.
I forgot to add that Steve made other improvements such as the support for saw kerfs and the ability to print directly. Output is faster and it'll support larger project sizes. These are all major improvements as well.
Dave
daltxguy,
Thanks for the info. I couldn't find a clear explanation anywhere. How did you discover this?
Dave
DaveS48, daltxguy is Steve, the author of the plugin.
Dave
I too love cutlist, but I can never seem to get the cutting diagram to recognize my sheet goods, they all seem to be split into boards. What am I doing wrong?
Slivers Dave, you need to add one of the 'Sheet Materials Words' to the Component Definition Name to get it to be recognized and sorted as not boards. I've added the word "Ply" to Sheet Materials Words and, if you look at the screen shot of the Outliner, you can see the word "Ply" in the Component Definition Names such as .
Dave
Hey Dave
Speaking of sheets goods what about controlling for grain direction? I may be just being lazy but I haven't been able to figure how to do it in the embedded version.
I'm not certain what you mean by "embedded version" but grain direction is assumed to run the long direction. Obviously this isn't always the right way. If I remember correctly, this is on the wish/to do list but I think there are difficulties in finding something to use to determine grain direction in the component.
Dave
Sorry for the terminology confusion. I was trying to distinguish between the version that runs with Sketchup and the standalone version of the software(which I also use).
It doesn't surprise me that it is on the 'to do' list due to the difficulty of graphically denoting which way the grain is running.
Thanks for confirming.
I understand now, Jim. this plugin is totally independent from any stand alone cut list programs out there. the CutList Plus export option simply generates a file that is formatted such that things end up in the right place when that file is imported into CutList Plus.
Where did I get "Jim" from? Sheesh!
That last was addressed to Smith5963
Thanks for this entry, Dave. It clears up a lot of questions I have had about this plugin. It also clears up some of the component issues we have discussed. Jerry in Modesto :)
I just downloaded the plug in for Mac and I found some differences for the installation. Previous version had a folder called cutlistui, this 4.1.1 version has a new folder.
I have compiled the steps if you are migrating from a previous version.
1. Download cutlist 4.1.1. zip file
2. Open Finder
3. Go to the library folder, the main library /library....
4. Click on Application support folder
5. click on Google Sketchup X (X could 6 or 7 depending of your vesion)
6. Click on Sketchup
7. click on Plugins
8. Move cutlist zip file to plugins directory
9. Remove folder cutlistui (previous version)
10. Remove CutListAndMaterials.rb (previous version)
11. Unzip cutlist file. (Double click on it).
12. It will create folder name cutlist4.1.1.zip Folder
13. move folder cutlist from cutlist4.1.1.zip Folder to plugins folder
14. move file cutlist.rb from cutlist4.1.1.zip folder to plugins folder
15. re-start sketchup.
I hope this helps.
Thanks for that. You've made that more detailed than I did in the last paragraph of my blog post.
Dave
Thanks: To Steve (daltxguy0 for creating and releasing Cutlist and to DaveRichards for all the great Design ... Click ... Build articles and videos.
Dave48
Thank you to fidelfs for the MAC help!
It appears that I spoke my words of gratitude a bit early. It seems that I have made an error somewhere. The plug-in appears to be working perfectly, however when I hit the "run" button, I get a cut list, however no cutting diagram with either the sheet goods or the lumber.
Any ideas where I may have made a wrong turn.
Thanks in advance for your help.
PS-I am on a Mac.
PORC, that's a known current limitation on the Mac. You aren't doing anything wrong. To get the layout images tick the SVG box before hitting Run. SVG format images will then be saved in the same location as the SKP file resides. You can then view those to see the layouts.
Dave
DUH! (hit hand to forehead)
Right as I was reading your response, I remember seeing that somewhere else. You sure know the ins and outs of Sketchup. Thank you so much for sharing all your info with the rest of us.
Cheers.
Jason
Great stuff, David. This is my version of an Introductory Tutorial complete with download and sample project. I use SketchUp 8 in Windows 7, but the plugin works wherever SketchUp works. Hope I can help. Hope my small contribution adds some value with proper credits. http://wp.me/pOGgI-4s
Hi Dave,
This plug in works very good when doing furniture. My problem is that when doing sheet goods there is no sizes that matches our sizes in SA.I do some kitchen cabinets from time to time. Our sheet goods sizes are different than that of the USA. We have a size of 1800 mm X 2700 mm.Is there a way that i can maybe change the sizes in Cutlist to accommodate our sizes. Very rarely i use the 1220 X 2440 sizes
Thanks
Hi Nollie. I guess you'll just have to move to somewhere that uses proper size plywood. Just kidding. As I understand it, the author is working on an update that will allow additional sizes of sheet materials. Hopefully it'll come soon. When it does come I'll post something here on the blog.
Thanks for all the posts on this Blog. i learn a lot from it. I wish i could stay in the US , every thing woodworking is there.
I have a problem in assigning a material to a component. I designed a eight legged G&G table and i use three different woods. How do i go about to assign mahogany to some components and ebony and popular to other so it appears in the material column in the cut list.Maybe i am just missing it somewhere or is there an existing post that explains.
Thanks
Nollie
Hi Nollie,
You say you wish you could stay in the US. Are you here, now?
As to your question about getting materials applied to your model so they show in the list, the easiest thing to do is to open each component in turn with a triple click of the Select tool. This will both open the component for editing and select all of the faces and edges inside. Then apply the material using the Paint Bucket tool.
If you want you can use simple colors instead of wood grain materials and then edit the names of the colors in the In Model materials library to reflect the species. So you might use a pinkish brown color for the mahogany, a greenish yellow for the poplar and a very dark gray for the ebony. In the Materials window , click on the house icon. Then highlight a color and in the name line at the top, type the species name. Hit enter and you're all set.
When you run the cut list, you should get the materials displayed in the far right column and the board foot totals should be split out by species.
If this is still causing you trouble, send me your model by e-mail and we'll get you straightened out.
-Dave
Thanks Dave for that information. It works really good. I worked in Bay City Tx during 04 and 05. I can say that u folks out there are A+. I enjoyed the stay. But had to come back because of family obligations. Would like to go and work in the Us if situation permitted
Thanks
Nollie
Log in or create an account to post a comment.
Sign up Log in