
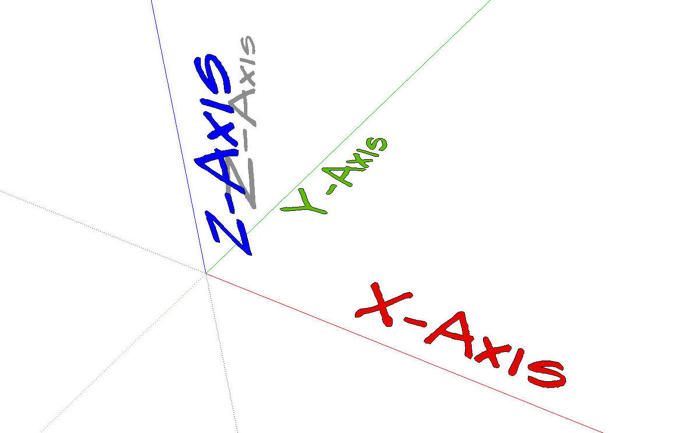
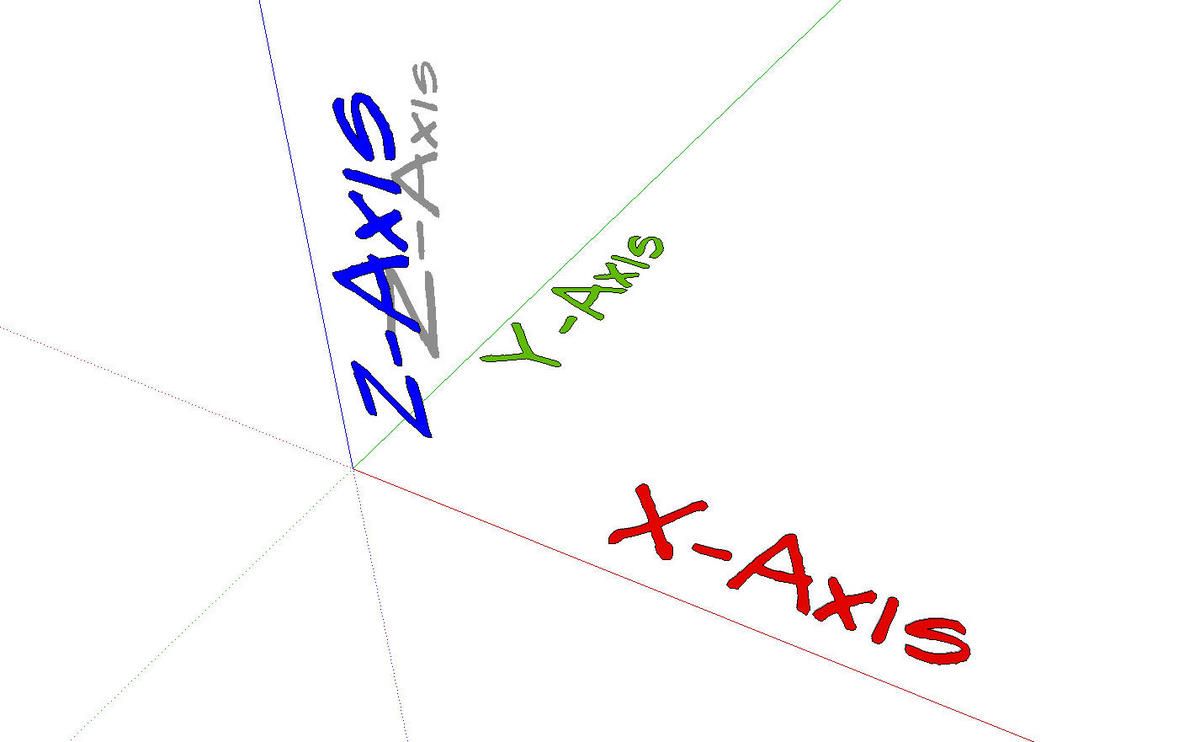
In SketchUp there are a number of basic concepts that, once understood, make it much easier to work in the 3D space of the drawing window. One of these is the axes. The Global axis lines are the red, green and blue lines that are normally seen in the drawing window. The point where these lines cross is called the Origin. The red line is the X-axis, green is the Y-axis and blue is the Z-axis. The Z-axis is the vertical one. Components are get their own axes. We’ll talk about them later. The solid axis lines are the positive direction while the dotted axis lines are on the negative side.
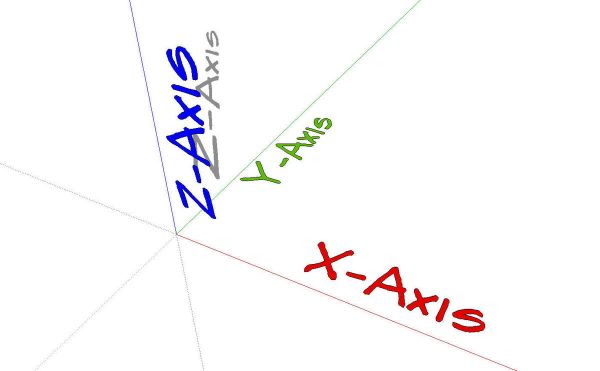
The orientation of the Standard Views is related to the the global axes. If, for example, you choose the Front View, the X-axis (red line) will run horizontally across screen and the Z-axis (blue line) will run vertically. The Y-axis (geen) will run away from you toward the background. I generally draw models so that their front is aligned with the red axis and on the solid green side of it so that when I choose that front view I’m actually looking at the front of the model.
If you are drawing a model in which the compass directions are important, by default, North is the positive Y direction and East the positive X direction. The global axis orientation can be changed as can the compass orientation but I generally find it easier to just work with them as they are.
Components also have axes. When the component is created, the axes are aligned with the global axes and the origin is placed in the corner of the bounding box nearest the global origin. The component axes impact the way materials get applied to the component’s faces. They also affect the size of the bounding box which is used in plugins such as Cutlist and Layout to determine the amount of wood needed.
For components that are made for use in other models such as door and drawer pulls, it is useful to remember that the component’s alignment is determined by its axes relative to the global axes and the component’s origin is the insertion point. This is the point you hold onto when bringing the component in from the component library. Axis alignment and origin placement can be adjusted if needed.
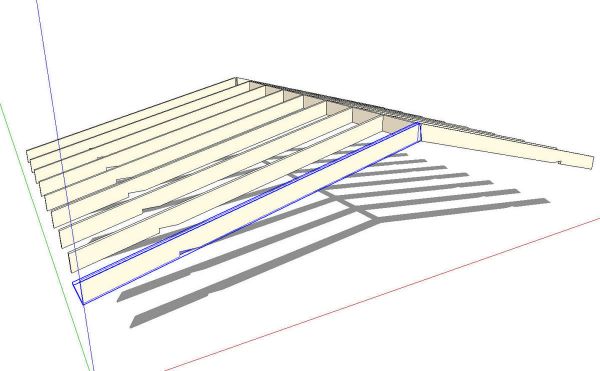
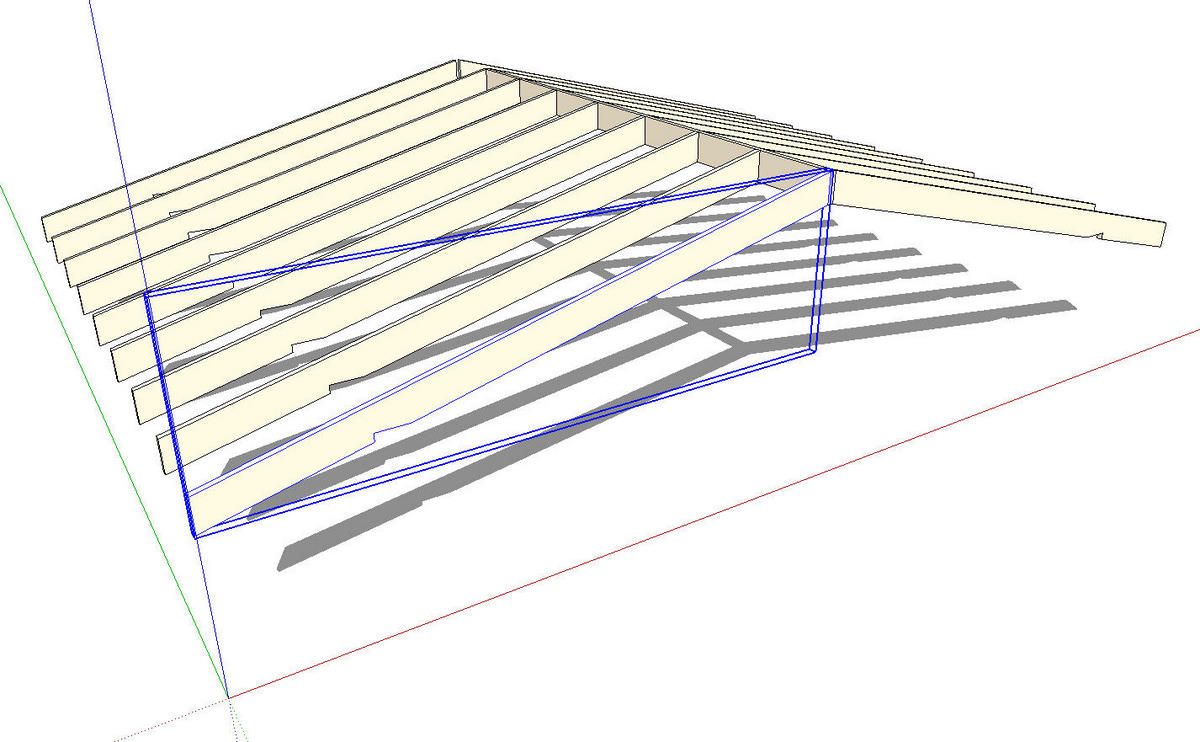
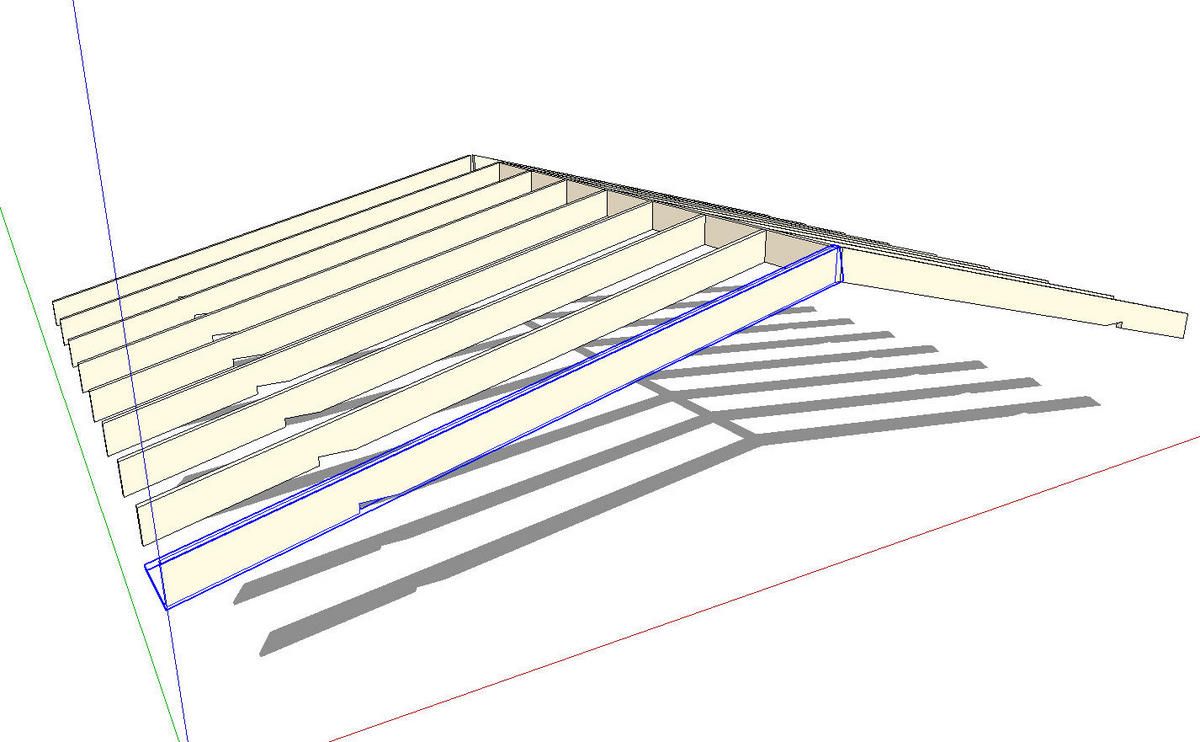
Tim Killen and I both tend to work in a similar manner when drawing. We draw components in situ as much as possible. One of the results of this is that the component’s axes are automatically aligned with the global axes from the beginning. For most components that works perfectly however there are some cases where it doesn’t. As examples consider the sloped front of a slant front desk, a chair seat that is higher in the front than in the back or a rafter for a shed roof.
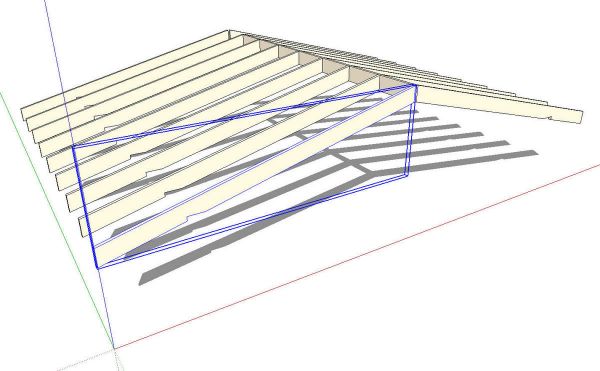
With the geometry drawn in place, the bounding box will be much larger than the actual geometry and the axes won’t be aligned to the sides of the component. These components will require the axis to be changed to ensure they are properly reported in a cutlist and/or to make them easier to texture. Of course the part could be drawn so it is aligned to the globabl axes and then, after making the component, it could be rotated into place. It is easier to accurately draw the part in place with its final orientation and then correct the axis alignment after creating the component.
In the following video, I’ve tried to illustrate some of the ways to work with compoent axes.


Comments
I have spent the past several months off & on trying to use Sketchup and have an apparent mental block with the program putting all of it together. I have viewed various tutorial and have some understanding of what the tool will do, but putting it all together and designing something is a problem for me. I am from the old school of sitting down with a manual starting at the beginning and working your way through the parts of the program that one primarily uses. The books I have found on the market appear to spend most of their efforts on everything other then what I care about---woodworking. There must be something out there to get me past this point; what is it and where? If not, I guess I stick with my T-square..
Thanks for your comments.
Hi Pickles,
I haven't seen any books specific to SketchUp and woodworking. SketchUp was designed originally as a sketching tool for architects and thuse the books that are out there tend to lean more toward showing its use for that.
If you've got specific questions about using the program, I'm happy to help. You can contact me directly via e-mail (click on my name at the end of the blog entries) or search through the blog posts here on Design. Click. Build. Specific questions are more easily handled via e-mail, though.
If you're in the Northwest part of the US, I'll be teaching a couple of SketchUp classes in June in Port Townsend, WA. You might be interested in signing up for one of those.
Dave
Hi pickles - I have had the same problems with Sketchup. This site (Fine Woodworking) is very helpful, but I have found that sketchupforwoodworkers.com is even better especially in the early phases of learning Sketchup. Hope this helps
Of course personal tuition is hard to beat.
Dave,
Thanks again for your blogs. I have been reading both yours and Tim's and find them very helpful in trying to get up to speed with SketchUp. While viewing this video on axes, I noticed you had a good collection of wood textures in your SketchUp tool. Where did you find all those wood grain textures that we could import into SketchUp? SketchUp comes with a small collection but nothing near the selection you had available - which is a great asset!
Thanks Dave,
Bill
Hi Bill,
Yes, I do have a lot of wood grain materials in my library. Unfortunately very few of them are of much use and I probably should delete them. They've been collected from a number of sources. I mainly find materials as images in Google searches. You need to be selective in your choices of images for materials. Large files should be reduced in size to prevent them from bogging down your computer. Highly figured woods and those with distintive features such as knots don't tend to work well because the features will end up repeating. Images of straight grained woods tend to work the best. Also keep in mind that photos of actual wood need to be evenly lit or they will look strange in the model.
You can import any image into SketchUp and use it as a material. You should give it a try.
Dave
Hi Pickles, Good feedback that we can use more info on “Getting Started in SketchUp”... we’ll see what we can do to organize the information better. As you can see, there is a ton of high-quality, reliable information right here in this blog.
Dave and Tim have been blogging here about the software for almost two years (Design.Click.Build. started April 9, 2007--anniversary on Thursday!)
For key SketchUp lessons, check out this recent round up by Tim Killen:
http://finewoodworking.taunton.com/item/5011/key-subjects-indexed-to-archived-posts
Or, if you can’t readily find a topic, check out some of our older, archived posts here:
http://blogs.taunton.com/n/blogs/blog.aspx?webtag=fw-designforum
Thanks, Gina, FineWoodworking.com
Thanks Dave,
I found this link that had a selection of wood that may be useful:
http://www.woodmagazine.com/materials-guide/lumber/wood-grain-textures/
Bill
Bill, I'm aware of those images. They are nice photos. I would suggest that before using them, though, you resize them. They are much larger (higher resolution) than you need for SketchUp and could create performance issues on your computer. JPG file sizes of 100 to 200 KB should be just fine for materials.
DaveRichards,
I have a question. I've imported an elevation of a building into Sketch up from AutoCAD. However, it's been placed on the X axis. I need it to be on the Z axis so that the building fascade stands upwards and not lays flat. I'm familiar with most if not all the sketch up tools. I've extruded the image to be in 3D which is great but it's still not perfect. I need it on the z axis so that I can past a roof onto the front of the building that I've done in another sketch up document. I've been playing around with the protractor but can not manage to get it to work for me. What advise can you give me? I appreciate anything I can get.
Have you tried the rotate tool? Select all of the geometry and rotate it about the origin 90°.
You can also realign the global axes. Click on Tools>Axes and then set them as you would a component's axes.
When I import a 2D CAD file that needs to be oriented vertically, I generally just rotate it so it is standing up before I get busy and draw anything else.
Let me know how you get on with that.
Dave
Wow, that was great. Thank you, for getting back to me so promptly.
I got it to work. I don't know why I didn't think to change my axes. It worked perfectly. I can now move on with my project. This is wonderful.
Thanks again.
Hi Dave,
Im new to sketchup and ready to update sketchup7 to 8. However when i downloaded for the first time sketchup7 i had a article from fww that allowed me to make some changes to help me get started. It was kinda a list of things that would make it more user friendly such as things to turn on and off. And also something about the measuring. would these same procedures be the same for sketchup8 or can you email me a list to help simplify this for me? Im not sure i remember what exact issue it was as i suscribe to fww,and probably assuming it would be different for the newer version anyway. thanks alot and i enjoy your videos and help.
Brent
email
[email protected]
Brent, I've sent you an e-mail.
Axes? I came here to see the Axes in SketchUp. I don't see no stinkin Axes. Where are the Axes? I am sooooo disappointed. :)
Hi Dave. What happened to the video that used to be here?
SteveR
Thumbs up!
Hi Dave,
A question regarding the Y-axis. By default the y axis projects back from the face on a X, Z object. When building dynamic components for cabinets, the ideal would be to have the Y-axis oriented forward from the face, so that it better relates to the wall that the cabinet will mount to. When in this situation, should the dynamic formulas just be converted to negative numbers on the Y-axis by multiplying the result by -1, or is there a more sophisticated way of working with this.
Troy,
I'm not exactly sure what you mean about having the Y-axis running forward instead of into the background. I guess if I was building up cabinet components, I would put the component's origin at the rear of the cabinet so that it can be placed on the wall easily. I guess this would require that sub components that need to be located with Y coordinates use negative numbers but I don't see that it would be a problem.
If you were to turn the axis around, the cabinet would get the wrong orientation when it is placed in the model. If you don't give it gluing attributes, it would be inserted with its back if the wall is viewed from the Front view. The component will be inserted with its axes aligned with the model axes. I think I'd prefer to work with the negative Y values over rearranging the axes. Besides, you really only need to deal with those numbers once while you're building the component. You have to deal with placement every time you use it in future models.
I hope that helps.
Dave
Log in or create an account to post a comment.
Sign up Log in