…it certainly has been as time consuming!
It all started off with the need to replace the shingles on the roof of my gazebo.

When we had the roof replaced on the house the roofing contractor asked about the gazebo. I said I was thinking of putting on cedar shakes. He said, “I’d replace that sheathing too.” He was right. After 25 years, it looked pretty bad. So off came the sheathing…
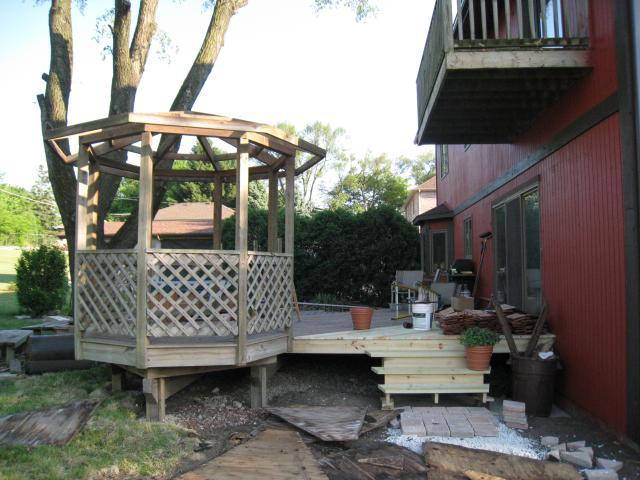
Then I thought, “Why not add a cupola? It would look so much nicer!” ![]() It shouldn’t add that much time or cost to the project, right? But when I had removed the sheathing and tried to figure out how to cut out a cupola section from the rafters I realized I had to start from scratch. So the entire roofing frame came off, and along with it the railing lattice. And why not power wash it while I’m at it?
It shouldn’t add that much time or cost to the project, right? But when I had removed the sheathing and tried to figure out how to cut out a cupola section from the rafters I realized I had to start from scratch. So the entire roofing frame came off, and along with it the railing lattice. And why not power wash it while I’m at it?

Then I thought, why not use something other than standard pressure treated lumber, so I looked into what is called “cedartone”. It’s PT but dyed to a cedar tone. I bought what I needed and began by making the opening for the cupola.

When that was done I cut the rafters and connected them with Simpson Strong-Tie brackets. But I painted them first since they would be completely exposed.
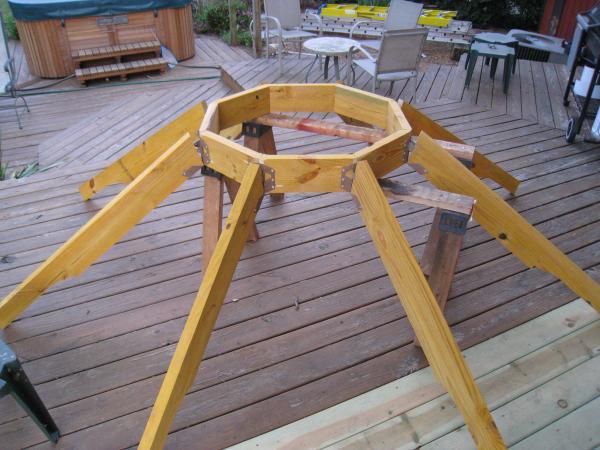
Once I got that up, I added additional rafters and sheathed the roof with fir siding grooved 4″ O.C., finished side down. This gave it the ceiling a finished look.
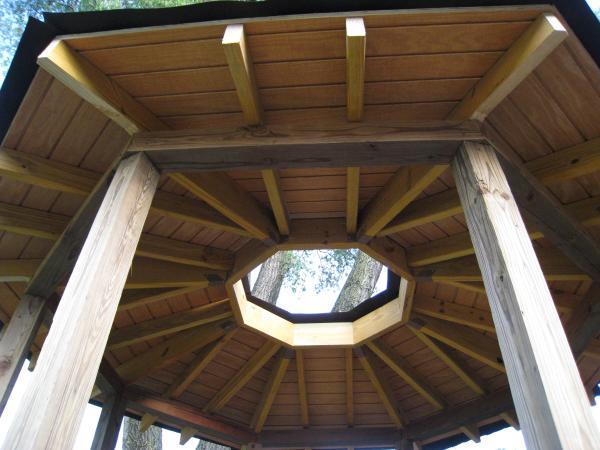
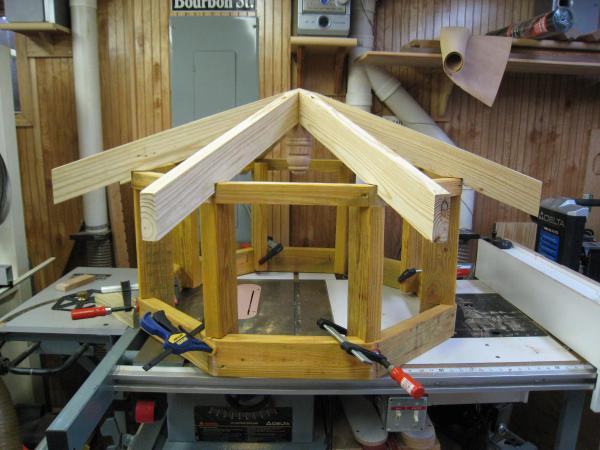
The weather got crazy hot so I used that time to begin working on the cupola in my basement workshop. I started by taking a piece of 4×4 cedar and ripped it on the bandsaw into an octagon. Then I took it to the lathe to give it some shape and create a downward finial. Next I cut the cupola rafters and attached them to the finial with pocket hole screws and glue.
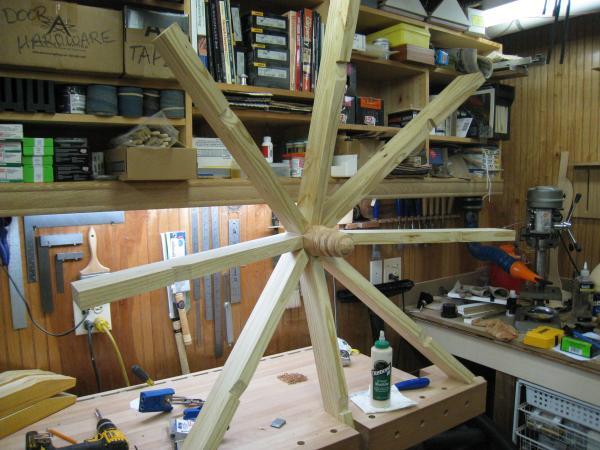
I had to brace one leg of the rafters into the workbench vise to attach the final legs.
I then made the “wall” for the cupola deciding on a 12″ raise. The 2×4 ring at the bottom matches the 2×8 ring on the main section of the roof. I won’t know if I’ll need it until after the shakes are installed.
The 2×4 “studs” looked too bulky so I formed them on the bandsaw.

I was about to find out that cedartone lumber likes to gum up the edges of your cutting tools. I learned how difficult the wood was to work with when I finished the studs on the router table and spindle sander. The sanding sleeve was shot after this!
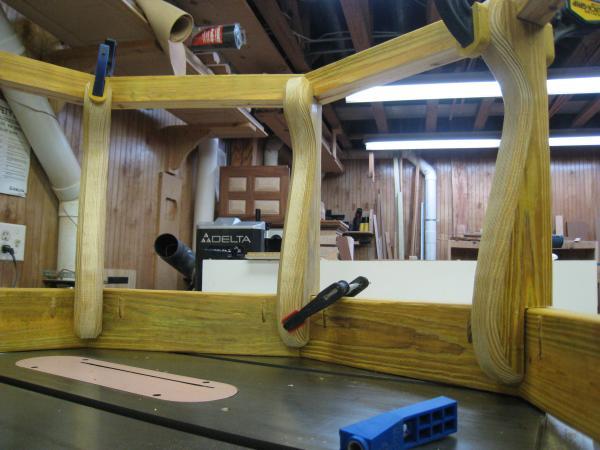
I made up some lattice strips out of cedar by resawing a 4×4 into 1-1/4″ and 1″ squares of 12″ lengths and then made a template for cutting dados. Once I set the first one in place I decided to lay strips of cedar on the entire wall exterior of the cedartone wood. It just looked better. Hindsight was telling me I should have done everything in cedar but when I was planning this I thought PT lumber would weather better.
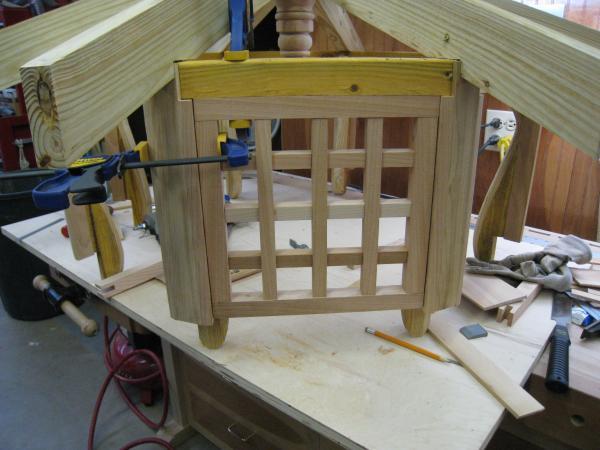
The top strip went in later. Of course, this added a lot of time to this “quick and easy” cupola addition. ![]()
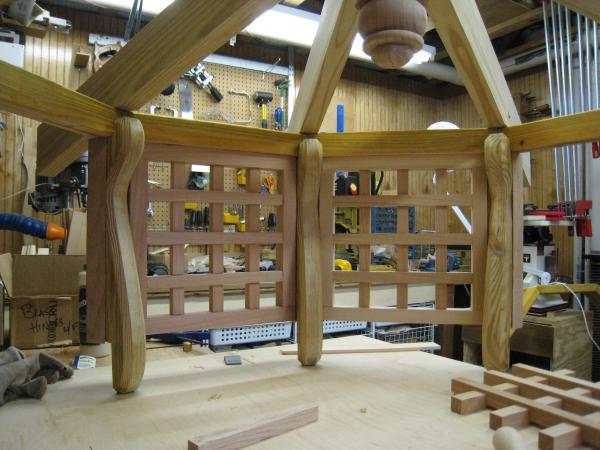
In shaping the cedartone studs, most of the rough surface of the wood was cut away. I’m hoping some cedar stain finish will match it all up when done.
I have never installed cedar shakes. I bought the shakes at Menards. I later found out they sell #2 medium shakes which are pretty gnarly. You also get a lot of narrow shakes with the bundle. After doing some research I found the Cedar Shake and Shingle Bureau roofing manual was the bible so I downloaded it and learned a lot while reading it. Any plans of laying the shakes directly on the sheathing and felt were ended. I also realized that by laying battens down first I would have something to nail the shakes to without piercing the sheathing.
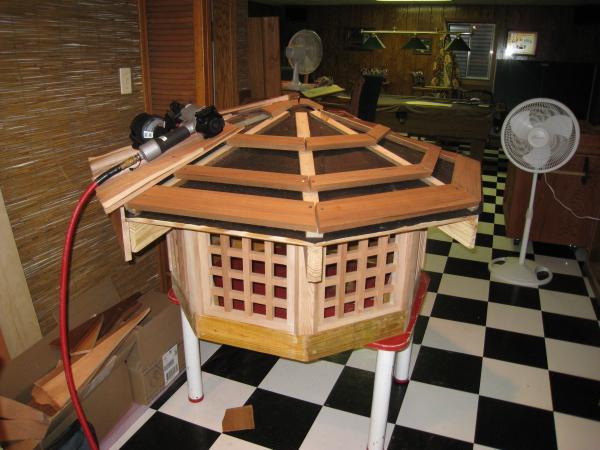
Once I was done with the field I tried to figure out how I’d do the ridges and cap. I laid down some pieces I cut to see what it would look like.
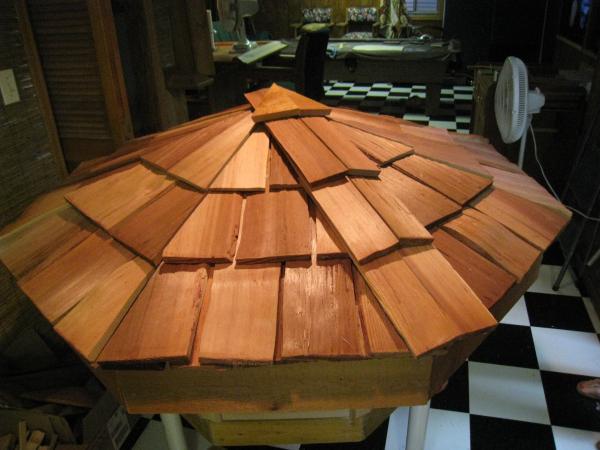
I finished the ridges, installing aluminum flashing under them as I went along, and then made up an aluminum cap with some flashing left by the roofers.
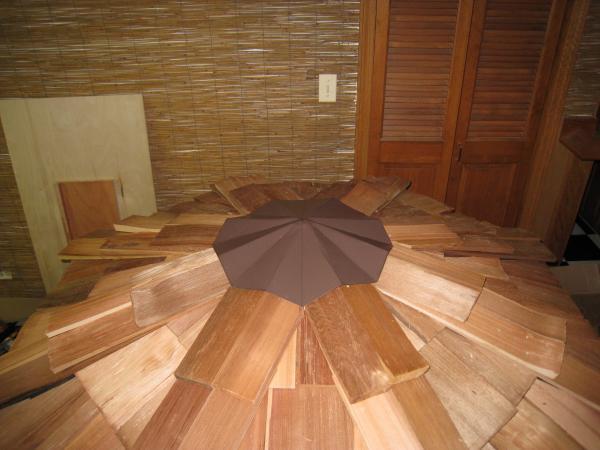
Not sure how I would finish the cap and if I should make a top finial or not, I moved to the outside with the newfound knowledge I had gained on cedar shake installation.
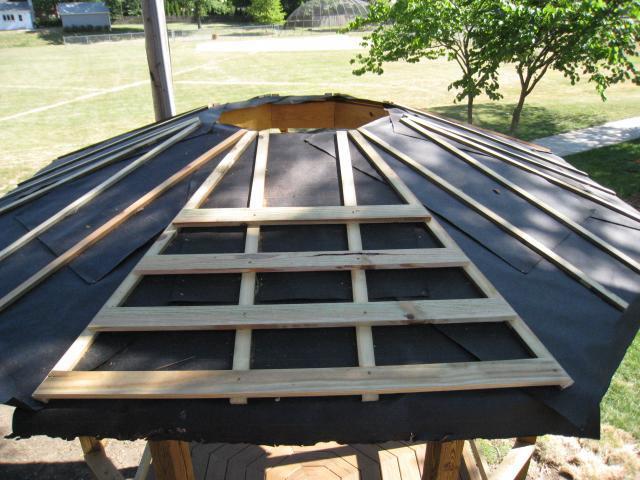
After laying down the first section of battens, I wanted to see how the roof might look with the shakes.

But before I could proceed any further I knew I had to finish the fascia before continuing with the battens and shakes.
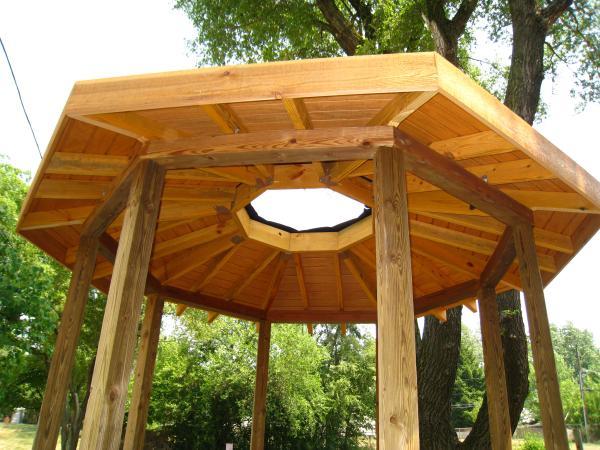
With 5 of the 8 fascia pieces on, I realized there was no way I would be able to do the roofing off a ladder safely. The ground conditions made even a well placed ladder wobbly and the amount of time I would have to be at each section, cutting the shakes at the ridges, using a power nailer and going up and down the ladder told me I needed some sort of scaffold or I would take all summer to finish this and I might avoid a broken leg too!
But before I did this, I wanted to install some bracing at the top. So I took a 2×8 I had and made up some braces for the inside and screwed and glued them into place.
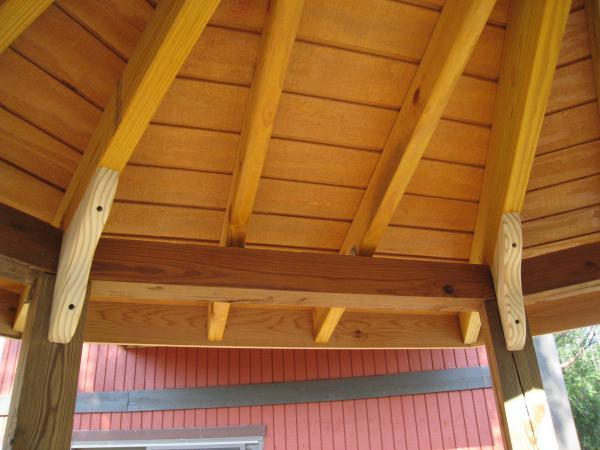
I used a Kreg pockethole drill bit to recess the screws and Kreg Blue-Kote screws to attach the pieces. I am also going to install braces at the post corners but I have to make a run to the store to pick up some more PT lumber.
I then took some 2x4s and made up a cantelever that I could secure to the post for the scaffold planking.
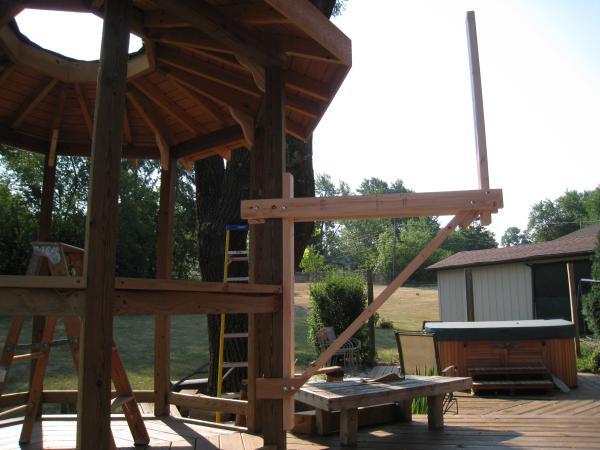
I used carriage bolts for the joints and made it so it can be folded up for storage later. (I couldn’t see myself throwing this away or breaking it apart for scrap after all the time I spent working on it!) I made a wedge block located at the top inside of the post (right about where the blue top of the ladder in the background is) to hold it in place. That way I won’t have to drill any screws into the posts. It seems pretty sturdy. But I will probably brace it additionally on the outer ends once I start working.
I have made up three more cantelever frames that I still need to assemble and I need to make up three more wedge blocks. Then I’ll put down 2×8 planks with cleats that will insert between the horizontal 2x4s and I’ll add the rails which will double as a place to hang a small tool platform I have to make. I figure it will need to hold the nailer, a small circular saw and some various hand tools.
Now all I need is some ENERGY!
So far I have learned that I should have bought a stapler rather than a nailer. The small shakes on the ridges tend to split with the nailer. Cedar shakes, while much more pleasing to the eye, take a LOT longer than asphalt shingles. And most importantly I am once again reminded that things are only simple when you don’t know what you’re getting yourself into. 😉


Replies
It is Fine Woodworking With Building Lumber
Norm could not have done it better ! Can't wait to see it finished - great story line - and you really have patients - you would have found me attached to the grill with a cold brew in one hand the spatchler in the other-
SA
I knew Francis Ford Coppola and that is no Coppola. That's some kind of a tower thing that sticks out of the roof
That is beautiful. What a nice job, and a learning experience to boot. Nothing is easy. As soon as you start taking things apart the smallest job always seems to escalate into something bigger. Be careful on the scaffold. As for not being "fine" woodworking... it looks pretty fine to me. Can't wait to see the final pictures. Looks like you are having fun.
Beautiful job
Ever read the children's book that begins: "If you give a mouse a cookie"?
"fine" or not?
Excellent work.
I would argue that the woodworking became "fine" when you sculpted the studs. ;-)
Fine Woodworking
I strongly disagree with the title of your post. Fine woodworking can be a post and beam barn or a delicate oriental table. This is an example of fine woodworking at it's best. Beautiful and intricate work. Thanks for sharing.
Thank you all!
After reading the compliments, maybe I was a bit too hard on myself.
I was under the weather since the last post but am coming around now. Since I was low on energy I decided to toy with a top finial to see if I could come up with anything that looked half-way decent.
I again began with a cedar 4x4 and cut it to an octagon. Then I put it on the lathe. This new wood was very different than the old stuff I made the downward finial out of. It didn't cut well at all. After I had the basic shape I had to sand it with 80 grit to smooth the surface. Nothing, not even very sharp scrapers, worked.
After I had the finial turned I made up some legs for it. I now refer to the assembled unit as the octopus.
View Image
Next I cut away the top extensions on the cedar ridges to open up the peak. I then cut away the felt paper to reveal the downward finial top. I used a 1" forstner bit to drill a hole in the center but hit screws about 1/2" in. Ignore the fact the dowel isn't plumb. When I set it permanently I'll glue it plumb then set the octopus later.
View Image
I'm still not sure if I will just leave the flashing as is or if I'll add some cedar under it to hide the flashing. The shakes are so rough it will be pretty time consuming to make something to fit.
View Image
The octopus is just stting on top. When I press it into place it smashes the flashing down. I have to stain before I secure it.
More and more I'm thinking I will have to remove the roof from the cupola wall to get this thing out of the basement!
UPDATE: I just got hit with a violation from the building department for "adding to gazebo". HUH? They also listed "hot tub" on the violation. It's been there 19 years. I resided it last year and put on a new top. I guess it looks new!
Building Dept Violations
Tell 'em you didn't "add" to it, you just "refurbished" it. ;-)
What they are really looking for, of course, are permit and inspection fees.
I ran into a similar situation with my local building department regarding backyard storage sheds. The local ordinance specifies that anything with more than 120 square feet must be permanently affixed to the ground (so it can be assessed and taxed accordingly), and is subject to the full architectural plan approval, permits, and inspection process. Strangely, however, they were OK with two 120 square foot sheds sitting on cinder blocks.
Code
The code says a permit is needed for any re-roof over 25% of the structure. The deck and gazebo are physically attached to the house so I saw the gazebo and house as one unit. The gazebo roof is less than 100 sq/ft. The house roof is about 2400 sq/ft. BTW, when I quoted the 25% rule to the inspector, she said she never heard of that! When I gave her the paragraph number, she said it was out of her hands.
And the "adding to the gazebo" part was in reference to some scaffold braces I had secured to the posts. Did she think I was building grandstands?
I go into today to argue my case.
Arguing your case
I'm not surprised the inspector wasn't actually familiar with the code.
Good luck.
Cedar shakes
Pre drill them for the nails and adjust back the indent on the nailer to make them just flush instead of setting them in the wood.
I've been toying with the air pressure adjustment to make sure the nails set flush. I'm finding that the pressure I apply setting the gun to the shake has an effect on how the nail sets. It seems to be a very fine line. The nailer has the option of shooting the nail on contact, which speeds up the work but requires a little practice. With just the cupola done, I haven't had enough to practice on to get a good feel for anything.
The other problem with splitting comes from how close to the edge I have to nail and the characteristics of the shake. When I have only a few inches of width is when the splitting becomes a real problem. I changed to splitless siding nails, nailed by hand, and that seems to work. But some of the shakes are very dry and split very easily, even full shakes. I think they may be #2 grade. I can't imagine how a roofing contractor could make any money laying these shakes.
In the meantime...
I finally decided on how I was going to deal with the top cap.
View Image
What I did was cut some shakes to size and screw them from the underside to the metal flashing. Then when I move the cupola to the outside, I will permanently affix the top finial and that will hold the cap down.
View Image
I think I'll replace that small flashing on the underside of the finial with something a bit larger. I don't think it will be an appearance issue.
It's been a lot of work, a lot of designing, a lot of time... but it's been fun.
View Image
Amazing
Once you get the situation resolved, I would consider filing a complaint with the appropriate person or entity. Getting a local TV station involved is another option. But, there is also the issue of backlash to consider.
Update on progress
View Image
The cupola rises from the depth of the basement workshop finally sees the light of day.
View Image
This was the progress at the end of the day yesterday. That bundle of shakes on the scaffold plank is the fourth one. Each bundle is supposed to cover 15 sq/ft with a 7-1/2" exposure, which is what I'm doing. It hardly looks like I've laid 50 sq/ft so far.
View Image
This pic shows the felt interlay method. Once the felt is laid properly, you can use the bottom edge to line up the butt of the shakes. It makes the job a lot easier.
With the quality photos and story here you have enough good stuff to do a piece for Fine Homebuilding Magazine. You don't even have to submit it, just tell them to have a look at this thread and cut you a check for an advance. Then use the money to hire a lawyer to fight the inspectors or homeowners board or whoever is giving you grief over permits.
Looking good, keep the pix coming.
Very good, what did you do for footings ?
Hmmm... I like the idea of the Fine Homebuilding article, especially the part about getting paid. But if they paid me anything, I'd use the money to get away. This house has been the toughest foreman I've ever had!
The footings are 12"x50" concrete pilings set 48" in the ground. Then I anchored the 4x4s to them with Simpson brackets.
I'm almost done! Yesterday I could have finished but I ran out of shakes. The bundles I've been getting from Menards have had about 25-40% stained, severly warped or too narrow to use so I weed them out and take them back for exchange. I just exchanged what I hope is the last of it. I'll probably be done today or tomorrow but I won't be able to put the cupola roof on until I get some muscle over here to help. My daughter and her boyfriend are coming over next week for dinner. He's a 250# bodybuilder. Maybe he will help.
View Image
This was taken last week. The scaffold is now about 180 degrees from where it is in the picture.
View Image
I removed the cupola wall and put a stain/sealant on it. I then toyed with forming up some flashing. I think it will work okay. I like this picture because it shows the steps taken in laying a shake roof. You can't see it in the picture but the bottom row has (3) 1x3 battens for the starter row. After that was the felt interlay. I started with the bottom edge 1-1/2" out over the fascia then laid the bottom of the next piece 15" above that then the rest were spaced at 7-1/2".
Once it's done I'll post the final pictures along with some detail pics of how I finished up the flashing and ridge shakes - I'm still not sure what I'll do there.
" . . . but I won't be able to put the cupola roof on until I get some muscle over here to help."
Use The Force, Juli, use The Force. ;-)
Excellent progress. Looks great.
How did you come out in your battle with the city inspectors?
The Force! Why didn't I think of that? Thank you Obi Wan!
I lost all the battles with the inspectors regarding what needs a permit. I think they feel EVERYTHING should have a permit. In the end it cost me $50 for the application fee, $40 for a drainage fee, $50 for a plan review, $50 for the electrical fee, $100 for the stair replacement and stone veneer coulmns and $100 building bond (refundable). I have 90 days to call them back for an inspection, finished or not. As long as I keep calling them back within 90 days and progress has been made, the permit remains active. If not they close it and I lose my deposit adn have to reapply. If they red tag my work, it's another $100.
I think I now have a new boss - the building department!
The inspector stopped by before the permit was even approved. I asked him when I should call him for the stone veneer (like after the building paper and lath are on). He said they don't inspect that but he'd be happy to stop by and make sure it's being done right. He's a retired electrician from my local. He was on one of my crews many years ago when I was a project manager. He didn't regognize me and had I not known his name I wouldn't have recognized him. He was in a hurry so I didn't try to jog his memory.
Yes, it seems that most cities have lost sight of their purpose (serving the taxpaying public) and are more interested in the revenue represented by permits and fees. Some make sense, but they have taken it to extremes, I feel. I'm waiting for them to fine you for the gazebo not having the proper R-rating. ;-)
Finally done!
Well, almost!
The roof was finished some time ago but I had other things to do. I laid down a new paver walkway and raised the grade to meet the walkway. Railings had to be installed on either side of the new stairs. I made ballusters for the stair railing but they don't look right. I'm not sure if I'll leave it or just install them and hope I get used to the look. I have to put lattice on either side of the stairs under the deck too.
View Image
To the right of the pavers I'm going to use the old decking to build a place for firewood. The new grade would have ended up higher than the top of the foundation if I filled that area in with topsoil. So I'll use the firewood storage bin to hold back the paver base. That area where all the junk is on the right of the pavers is the concrete slab from the old shed. I could never have planted anything there anyway.
I still have to make up the corner braces for either side of the gazebo posts but I'll make that a winter project. The past several weeks it has been in the 70's. Today it's 40. Winter is near!
Overall . . .
. . . I think it looks great, Juli. I do agree, though, that the stair railing looks a little "off" compared to the rest of the structure. Perhaps another post part way down to break the angle?
wood product manufacturer from China
GOOD WORK !
And if you need any wood product, like jewelry box, or gift box or wood storage box, pls contact us--IAT woodworking Co.,Ltd.
View Image
This forum post is now archived. Commenting has been disabled