A Clever Tool Case
Built-in stands keep an essential tool kit at the ready
Synopsis: Yeung Chan found that wall storage wasn’t enough for his beloved handmade hand tools, especially on installation jobs. So he came up with his own solution, a portable toolbox for the essentials. His toolbox meets important criteria: It carries and protects an essential group of tools, it’s big enough to handle most situations, and it’s not too heavy to carry. The article provides box layout and construction information, including a knockdown stand for the toolbox. At Chan’s classes, even his toolboxes become an exhibit.
From Fine Woodworking #167
Starting when I was a boy in China, making hand tools became second nature to me. Most of the hand tools I use today are ones I have made. My tools are the extensions of my hands, helping me work faster, safer, and with better results. So I treat them with care, keeping them sharp and well-tuned.
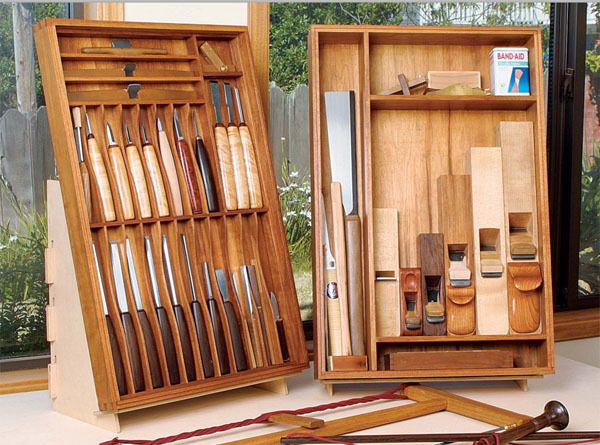
It’s not a good idea to store cutting tools in a box without separating each one; tools hitting one another will cause damage and dull the cutting edges. When I went into business as a furniture maker, my first solution for tool storage was a large tool board mounted on the shop wall. However, I soon found that I needed my tools with me when I did installation jobs. And I began to take on a busy teaching schedule, giving classes, seminars, and demos in many different places. It became a big job to remove all of the tools from the tool board and arrange them in good order for travel (not to mention putting them all back on the wall afterward).
So I made a toolbox with the following mission in mind: to carry and protect an essential group of hand tools, big enough to handle most situations but not too heavy to carry. My toolbox may be small, but it’s efficient.
To keep the tools from tumbling out when the box is closed, I made a retainer panel from 1⁄4-in.-thick Baltic birch plywood for each half of the box. Originally, I was planning on just a simple rectangle of plywood for each side, but then I had another idea: Cut each rectangle in a certain way, and it could form a knockdown stand for its box. To prevent the plywood parts from falling off when the lid is turned upside down, I use two wood retainer strips with a small tenon on each end. The tenons fit into small mortises on the box wall. The strips are bowed slightly so that they put pressure on the middle.
I used plywood for the top and bottom of the toolbox, as I usually do for boxes, allowing me to glue it into its rabbet and strengthen the case. To make the plywood, I glued 1⁄16-in.-thick shop-cut veneer onto a 1⁄8-in.-thick core.
Two straps hold the case together. I decided against hinges because the weight of each box would rip them off the thin walls. Plus, I like having the two parts separate because I can put them where I need them.
I was very happy that the idea worked perfectly: The tools stay in place when the box is closed, and the two halves stand up side by side, good for use in the shop or in the classroom. When I give seminars and demos, my handmade tool kit becomes an exhibit, always generating lots of interest and questions.
For the full article, download the PDF below.


Log in or create an account to post a comment.
Sign up Log in