
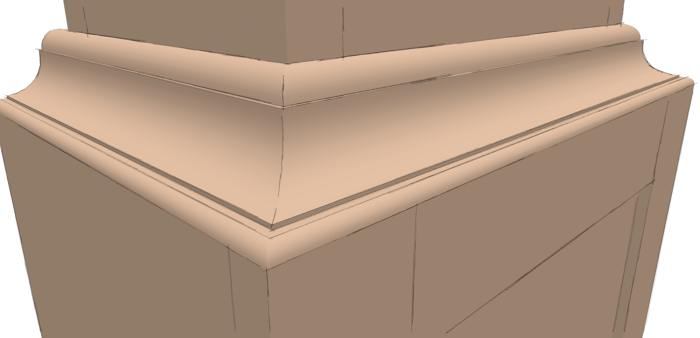
A friend of mine in the UK is working on a SketchUp drawing of a tall clock. this morning he sent me his file asking for some direction as far as mitering a molding made of several separate pieces wood. Here’s the way I went about doing it.
This site is protected by reCAPTCHA and the Google
Privacy Policy and
Terms of Service apply.


Comments
Excellent explanation of how to miter moldings. I've spent many hours rying to do just that with mixed success. Thanks for showing us a simple way to accomplish this task.
Good work but seems complicated to me. Can't you just stretch the moldings and trim them where they meet?
So many useful tips there, Dave. You make it look so, so easy! I've bookmarked this one.
Thank you gentlemen.
@knottyguy, yes you could take two molding components and extrude them until the cross in space. You would then use Intersect Faces on each molding component. You'll have to open each molding component in turn so that the edges created by Intersect are in the same context as the molding geometry. Next you'll delete the waste end of each molding. I made an illustration of what you'd be left with at this point. Look here: http://flic.kr/p/bgHMzn There will be three places where the intersections will be made: the back and front sides of the intersecting molding as well as both sides of the molding getting intersected. You'll need to delete the waste indicated by the green arrows in my image remembering that the curves are exploded so you can't select the entire curve like you can an arc or circle. You'll also need to delete the unwanted edges on the outside surfaces of the molding. I didn't mark them but you can see them on the curved surfaces of the top and middle pieces of molding.
Keep in mind that Intersect Faces cannot create intersections between coplanar faces so there'll be no useful intersections on any of the horizontal surfaces so you'll need to draw in the diagonals on the bottoms of all those surfaces so you get not only the miter faces but also restore any horizontal surfaces that were deleted when the waste ends of the moldings were deleted.
Finally, take a look around to make sure you got everything cleaned up and you're good to go.
Now, if you have the pro version you could use a box placed at the miter angle to trim the molding pieces. The trim would be very fast but the operation also converts the components to groups and leaves the instances of the components on the opposite side untouched. After the trim operation has been completed you would convert them back to components and replace the components on the right with the new ones, assuming there were molding components on the other side as there were in my friend's model.
No matter how you go about creating the miters, don't do it more than once. It is good practice but once you've completed it, save the molding components for later use in case you'd use the same molding profile again. The length doesn't matter because you can always move the miter end with the board stretcher AKA Move Tool.
Dave
nicely done Dave- similar but different to Aidan Chopra's "breaking apart a frame". Nice to see a different, but equally valid, approach. (Oh, and Happy Birthday!)
Michael
Thank you Michael.
Yes, another way to do this is to create the entire molding all the way around using follow Me and then split it into the sticks by dividing it at the miters. I showed that some time ago in a blog post here. In this case, I started from the sticks my friend sent me. I think that other way could be faster in many cases.
Log in or create an account to post a comment.
Sign up Log in