
I’ve emphasized often, the benefits in the shop of having full-size templates as an output from the SketchUp model. Until now, I’ve created these templates one-by-one, printing as jpgs or pdfs on a standard printer with 8 1/2 x 11 sheets. This requires several tedious steps of organizing the component on the screen to achieve the best arrangement of multiple sheets. Then it requires taping sheets together to accommodate the full length and width of the components.
Just yesterday I tried a new and promising method using Layout 2 and a local commercial printing shop. Here are the steps I used:
- Start a new file in Layout, using one of the templates with Paper Size to Arch D (24 x 36). This provides a large sheet for bundling all templates for one project.
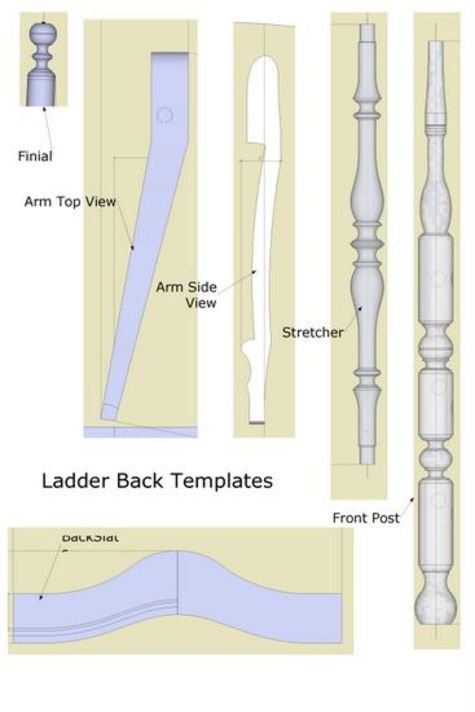
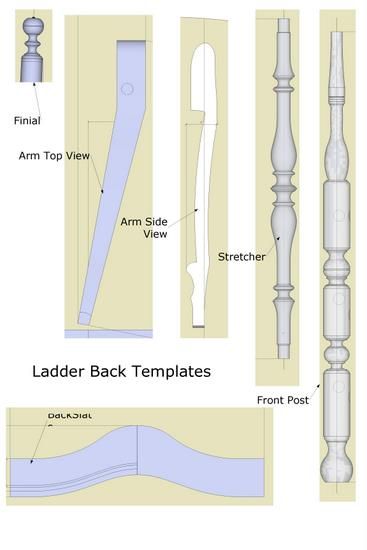
- Insert the appropriate SketchUp file – in this example it is a Ladder Back and Windsor Chair
- In the window on the D size sheet, right click and select the Scene for the first Template
- Again, right click on the window and select Scale and set to 1:1
- Adjust size of window to fit the full size component
- Copy the window using similar method as in SketchUp – that is, tap the Ctrl Key to get the + sign, then move copied window over to the right
- In copied window, select the Scene for the next Template, Scale, resize, and move
- Repeat this process for all templates
- Export drawing to PDF
- Using email, send the PDF to your local print shop
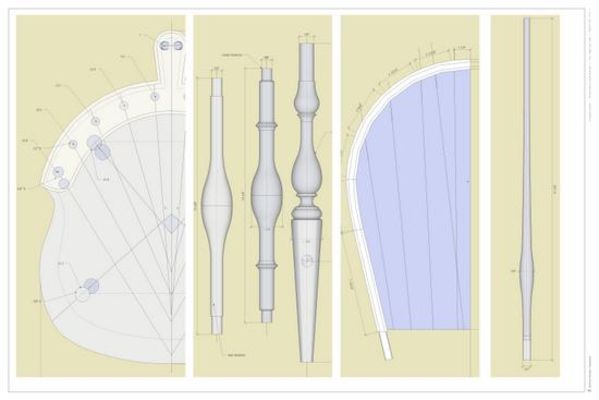
Here are a couple of my PDF files bundled on “D” size paper, as examples……
I received almost immediate turn-around, and the price was reasonable at less than $ 5.00 per D sheet, black and white. I think this will be my process for templates in the future.
Also, I needed a way to ship templates to students for their printing separately. I believe this will work quite well for my students.


Comments
Hello Tim, I haven't spoken to you for a while because your last explanations to me were great and I've been getting along fine. Now however I need your help again.
I'm designing a G&G bed with storage drawers below. It will be a double size version of the Gamble bed. I've drawn the head and footboards and made scenes of the cloud lifts in each piece. My problem is how do I print full sized templates? In your chapter on templates I got up to the "print set up for Macintosh" but not beyond. I can't figure out where the "restore down" button is on my Mac. The red, yellow, and green buttons you refer to on the Mac are close, minimize and enlarge respectively, I can't restore down with any of them. Can you help?
Timberlady, I'll make up something to show you how to do this on Mac. I need to make some screen shots first.
Timberlady,
To print full sized templates on Mac, you'll first want to go to File>Page Setup and select the page orientation and perhaps the paper size if you'll be using something other than letter sized paper. I made an example thing with a simple cloud lift. You can see the image here: http://flic.kr/p/audsxw I made it 18 inches long and 6 inches high. It should fit on 2 sheets of letter sized paper when printed. I adjusted the size of the drawing window by dragging the lower right corner so that the drawing window is close to the same proportions as the part we're printing. It takes a bit of back and forth between Zoom Extents and dragging the drawing window.
Next, go to File>Document Setup (see http://flic.kr/p/audsyS ) and untick the box for Fit View to Page. Set In Drawing and In Model to the same value. When you have it set correctly the dimensions in the upper part of the box should be slightly larger than the part you're printing and the number of pages should make sense.
If you only want part of the part to show in your printed pattern, just adjust the view and the drawing window to suit.
I did a blog post some time back about printing patterns. It's here: https://www.finewoodworking.com/item/25890/printing-templates-two-approaches I showed making some registration marks to help align the printed sheets. You may find this to be helpful.
-Dave
Hello Dave,
Thank you for responding so quickly. I think I've got it figured out but it does seem to use a lot of pages. What I'm trying to make a template of is the cloud lift rail on the top of the headboard and footboard. It's about 55 inches long and I can only resize the window to give me a drawing 54 3/8"w x 26 3/4"h. If I try to make the height smaller the scene gets smaller and if I do the "zoom extents" thing it just goes back to the zoomed out view of all the scenes. At this size the number of pages required is 24. Correct me if I'm wrong but it seems as though grouping several components to make up the height would make it less wasteful. My other thought was to just make a template 1/2 the length of the rail which would require less than 30". I think I saw your blog and just skipped through it, but I'll look at it again. Thanks
Actually, 24 pages seems reasonable for something that size. I assume you have the peice laid out with its longest dimension running across the screen and the paper set to Landscape. With the short dimension being 26-3/4 in., it'll take 4 sheets in that direction to print all of its height. And 6 for the length seems reasonable. Your printer most likely can't print to the edges of an 8-1/2 x 11 sheet of paper after all.
I'd consider printing just the corners and any other parts that might have details that are difficult to lay out by hand.
Timberlady: I'm assuming the top edge of the head board is the only shaped portion. Also, that it is symmetrical. If so, then this would seem to cut down on number of pages.
Nevertheless, send me the .skp of the headboard and footboard, and I will place on large scale paper in Layout. Then you can take the PDF to Kinko's or other print service for printing.
Tim
Thanks to both of you for your feedback. Tim, I've sent you the .skp. Dave, sorry I was not clear about the short dimension. That was the smallest I could get the screen to go without making the whole thing smaller. The actual dimension of the rail is about 55" long and only about 3" high so the rest was just empty space. I liked your info in the printing templates blog and will try that. I know I asked you in my comment on that blog but I'll ask again. What is the context menu? I can't tell you both how much I appreciate your help. Thanks again
Timberlady, it took a little back and forth but I was able to get a pattern for a 55 x3 thing. I ended up using the Zoom tool (not the scroll wheel) and dragging it to fill the drawing window closely. It says it'll take 6 sheets which is reasonable. See the screen grab here: http://flic.kr/p/auDtYC
As you can see this isn't incredibly practical right from SketchUp. While it can be done it does require some gymnastics. In the time it took me to type this reply, Tim will have made your pattern for you in LayOut and sent it back to you. If you are going to do much of this, you might find that purchasing the pro version of SketchUp is worthwhile. If your time is worth anything, it wouldn't take much to recover the cost.
The Context menu is accessed through right clicking the mouse. If you haven't got a right mouse button, you should get a new mouse.
Dave, thank you so much. I got it!!! In fact you can get two components on six pages full size. I made a version 1/2 the length of both the top rail and mid rail which are symmetrical and bundled them close together. I did it. Very cool. You are right though about the fiddling but as I'm just making this for me and have lots of time it is hard to justify the cost of the Pro version. And yes, Tim's pdf came back to me almost before I sent it.
Glad that worked. You might also consider that it could work to nest multiple patterns so you might be able to put some smaller pieces "inside" others with no trouble at all and it would save you paper.
I understand the just for me thing and as long as it works for you, it's alright.
-Dave
Log in or create an account to post a comment.
Sign up Log in