


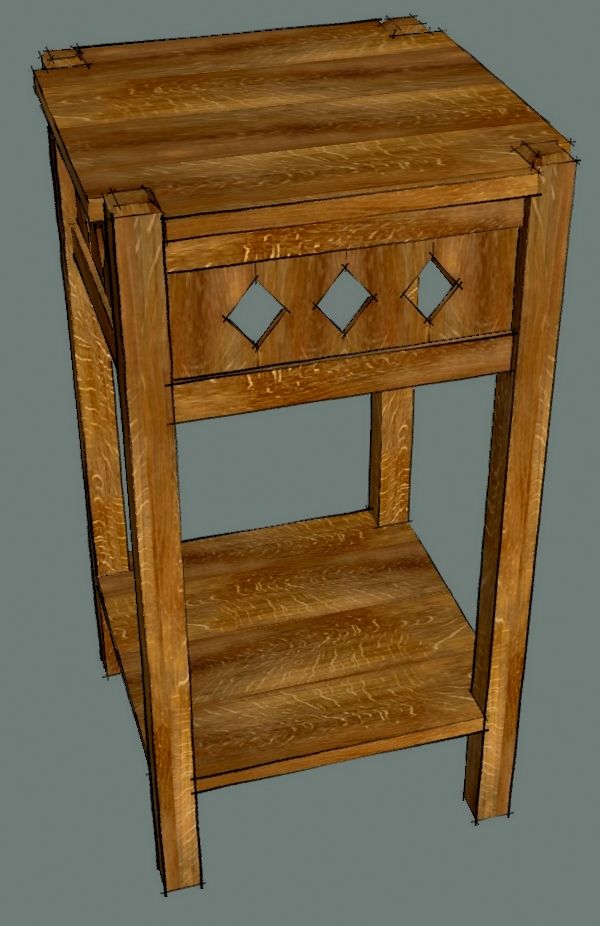
A few weeks ago I demonstrated my process for drawing a piece of furniture using this fern stand based on a drawing in a book called Mission furniture: How To Make It. Now I’d like to show you how I added some wood grain material to the model.
There are a couple of key things to remember when adding materials.
1. Apply the material to the faces in the component and not to the component itself. If you apply the material to the component, you’ll have no control over its orientation. Applying the material to faces gives you that control. Since you’ll be editing the component, all other instances will get edited at the same time.
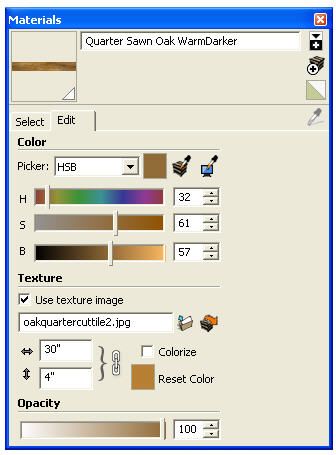
2. Highly figured wood grain images generally don’t work so well because the image will be repeated. this is especially problematic with knots and burled grain. Even the material I’ve used in this example is too small to use for the entire fern stand. the distinctive ray fleck pattern is repeated enough to be noticeable.
3. Usually high resolution images of materials are not needed. Image file sizes of no more than 500 Kb generally work just fine. The image file size will get added to the model file size so a couple of 1 or 2 Mb images can bloat the file dramatically and potentially lower computer performance while you are working.
If you find good wood grain images, save them to your computer. Then, bring them into SketchUp by clicking on File>Import. Set the file type to match the image you’ve saved. Tick the radio button for Use as Texture and apply the material to a face within the model. You can edit the dimensions of the material after you’ve imported it by selecting the material’s thumbnail in the Materials browser and then clicking on the Edit tab.

After you’ve got the material into the In Model library, go back to Select and open the secondary pane by clicking on the plus icon under the down-pointing arrow in the top right corner of the dialog box. Set the secondary pane to the desired library, probably Wood in this case, then click and drag the thumbnail image from the In Model pane to the Wood pane.
If you want to play with that, here’s an image of a similar wood grain that I used for the fern stand. the blog forces a small image size but this should work for experimentation anyway.


Comments
Dave - very enlightening! Thanks. Where does one "find" wood grain and colors for different woods?
Randy
Hi Randy,
You can do image searches on Google for various wood species. Once in awhile you'll find usable materials. Here's an interesting website that has photographs of veneers. http://www.veneeronline.com/species.aspx?category=lwdbdl
Unfortunately many of the existing wood grain SketchUp libraries are not very good because the images are of too small an area which makes the pattern repeat too frequently to be believable.
Dave- excellent! Thank you.
Dave
I know you are aware of this but for those who aren't, here are some links related to using textures in Sketchup.
A couple of members of Lumberjocks have made Sketchup Woodworking Textures libraries and posted links where you can download them:
http://lumberjocks.com/projects/5652
http://lumberjocks.com/jbertelson/blog/12477
Here is a tutorial on creating tileable textures for Sketchup (a good tileable texture won't show a repeating pattern and while this video doesn't use wood it does give someone a primer on how to avoid repeats, which is admittedly a challenge when creating wood textures)
http://www.wonderhowto.com/how-to/video/how-to-create-tileable-textures-in-imagesynth-sketchup-257043/
Also another member posted a link to software that can be used to modify textures. I haven't tried this yet but it looks like it could be useful if you don't already have an image editing program.
http://lumberjocks.com/topics/3267
I actually have a question regarding swapping out color/texture maps either wholesale or in part. Is there a way to substitute one or more texture assignments in a model. For example if I have a design that is currently using an oak texture is it possible to substitute the oak for another texture without directly editing the oak material definition in the material editing form or having to reassign the faces to another texture? Also, is it possible to substitute a particular material in the model without a direct editing of the material? For example if a design had multiple materials and I wanted to study various combinations of materials (or present various combinations to a client), does Sketchup have an easy way of doing this? If not could a ruby script be developed that could do it? (my research into this hasn't found any existing ruby scripts that do it)?
Thanks
jlsmith
It seems to me there is a plugin to swap materials but I don't see it at the moment. I need to check my collection at home.
As far as creating views of a model with different materials, I guess you could do a couple of things. You could create copies of the components and paste them in place with each copy having a different layer association. Then make scenes for each version. You'd have to make each set of components unique from the others so that you could apply the materials to one without affecting the others. You would end up with something like this: Layers: Maple, Oak, Cherry, etc. and Scenes: Maple, Oak, Cherry, etc. I don't think that is a particularly elegant solution but it would work.
The other option would be to make image exports with the components painted with different materials. This is also not elegant but would work.
I'll report back after checking my Plugins folders at home.
Dave
Regarding the making of seamless or tileable images, I have a freeware application that doesn't require PhotoShop that does a respectable job with many materials. Still, if you have a distinctive feature in a material image; a knot or flame, for example, even a seamless texture will look pretty bad.
All it takes is a little "think, think, think" as Winnie the Pooh would say. there is indeed a plugin which will replace one material with another. It is called Global_Material_Changer.rb. when activated it asks you to choose the material you want to replace from a drop down list. Then it asks you to choose the new material from a drop down list. The new material already needs to be in the In Model material library to be included in the list. If you haven't already used the desired new material, you can right click on its thumbnail and choose Add to model which will add it to the In model library without actually applying it to any faces in the model.
The material changer will impact anything painted with the material you wish to swap out so it probably wouldn't be very useful for making the layered scenes I was describing. On the other hand, it would make it rather quick to change the model for image exports.
You can download the plugin here: http://www.crai.archi.fr/RubyLibraryDepot/Ruby/Global_Material_Change_13.rb
Dave
Dave
I have considered both options you suggest and agree they aren't particularly elegant workarounds and are actually not what I want to be able to do. I involve my clients in the design proceed and as a result there many times where I am showing the Sketchup model live (in addition to using scenes), we discuss various materials option and I would like to be able to change a material in the model 'on the fly'. These substitutions don't need to be completely resolved (for example like you demonstrated in finessing the top table). They are more along the lines of the client asking 'what would it look like if the dark wood was light?'
At least now I know that the capability isn't readily available and I just can't find it... I hate when that happens.
Thanks for looking into this.
jlsmith
I was thinking of what you do if you are working with the client looking at your SketchUp screen. One of the draw backs of my suggestion with making different scenes is that you need to make the components unique to be able to paint the different materials. If you do that, and you later need to edit the model to change dimensions, you have to do the same editing for each copy because the components are no longer related. This would not be an ideal situation either.
This might be a case where you opt to paint the component rather than the faces inside the component. You lose the ability to control the grain orientation so you would probably need to make horizontal and vertical versions of the materials and in some cases perhaps angled versions. At least the component relationships would be maintained so if you needed to change dimensions, you'd only need edit a single instance of the affected components.
Out of curiosity, have you ever just used colors to represent different woods? Do your clients 'buy' that? If you can do that, it eliminates any need to orient the grain direction and makes painting much easier.
My process varies due to the nature of the client and the actual project. I am an architect that also designs and builds furniture. Many of the furniture projects are directly related an architectural project (usually because the client can't find what they want or there is some custom cabinetry or built-ins as part of the design). The models typically start out rudimentary and lacking details. I typically don't introduce color right away since it is easy to get bogged down regarding color choice. But a typical process would be a basic model with gray tones, which develops into a model with some details and color without texture and finally lots of detail with colors and textures as specific as possible. What can happen is that after the model is highly developed the client decides they want to see what it would look like if the wood was changed light to dark. At this point the model typically has a vast array of components each that could be embed with more components and the material they want to change can be in various parts of the model (ie cabinets, window trim, built-ins free standing furniture). So the the quickest way to change the material is in the material editor. What I have been doing is to make a copy of the material using the new material function (to save a version of the material I am about to change so I can so I don't lose any customization of the existing material) and then editing the current material. But typically these interactions have multiple changes (one change leads to another). I would like to develop a better way of managing this process but I haven't yet.
Dave
I completely missed your Winnie the Pooh post. This sounds like it is on point. I have now downloaded the script and will do some testing. I did attempt to search the site when I was researching the issue but failed to find it. Thanks for help.
jlsmith
Glad to help. I've asked a Ruby guru I know if it is possible to make the plugin work on only those components in a selection that contain the material you want to replace. That would give a little better control to the plugin. I'll let you know what I hear back.
FWIW, I did a quick test and the plugin seems to retain the editing one might do to the original material so that when the material is replaced, the new one has the same orientation as the old one.
Dave
Dave
I have had a little time to examine the script and it works as advertised. The only real problem I have is the non-intuitive naming conventions of the basic color palette. When I use the default colors I have to use the sampler to figure out which color is what number. I will probably develop the habit of making new materials when I add existing colors so I can use names i can recognize.
Thanks again for the help.
I think your idea of renaming the colors you've used and creating a new library is a good one. It would certainly make it easier to figure out which color is supposed to represent walnut and which represents wenge.
If you are editing simple colors to represent various wood species, you could use a color sampling application to get the RGB values from photographs of the species. I use a freeware program called Hex Color Finder that works very nicely for that.
I found out that the plugin does work on only a selection. You could make copies of the model and paint each one differently but the requirement for Make Unique is still not appealing.
Dave another great video. How about doing a video on finding and making material, like the nice QSWO you used on this and the A & C clock. I've read about how it is done but seeing it done would be a lot clearer. Again thanks for all the info!
Paul
Is this software worthwhile for taking photos and turning the photos into seamless textures? I use Chief Architect software, and someone posted this link in their user forum.
http://www.spiralgraphics.biz/ww_overview.htm
Paul, I'll see what I can do about your request.
Gene, it has been awhile since I played with Wood Workshop but my understanding is that it creates pseudo-wood grain images without a photograph. I never had much luck with getting what I consider believable wood grain images but they were seamless. It may be that the program will accept imported images, though.
If you want to use images of real wood, take photos under very even lighting conditions of the largest pieces you can get. you want to make sure the camera's image plane is parallel to the surface of the board. If you want to try making a seamless image, you can use Photoshop or other image editing software or, I've had decent success with a freeware application called TextureViewer which may still be available through some of those freeware repository sites. The link in the Help file points to http://www.bricksntiles.com/ which offers a not free application to make seamless materials from images.
Hopefully that helps.
Dave
Log in or create an account to post a comment.
Sign up Log in