This past week I attended the “Working Wood in the 18th Century” conference in Williamsburg, VA, as I have done for the past five years. Each year the conference has a special theme, and this year it was all about Thomas Jefferson, his furniture, and Monticello. As usual the Williamsburg cabinetmakers and joiners displayed their special talents in reconstructing several pieces of Jefferson furniture and Monticello architectural treatments.
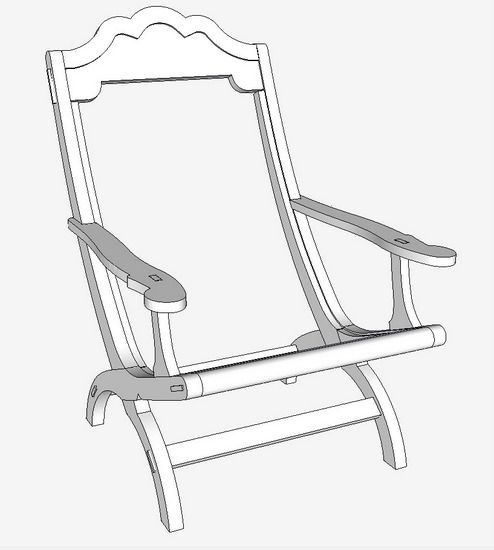
For me, the specimens of furniture were quite unusual – e.g., writing tables with adjustable ratcheting mechanisms and split legs that pull apart. But the chair was especially striking as it seemed an anachronism in 18th C. Monticello. It is a Campeche chair which to Jefferson, was the most comfortable in the mansion.
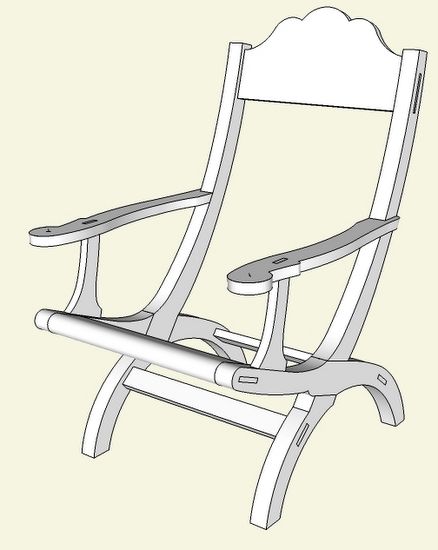
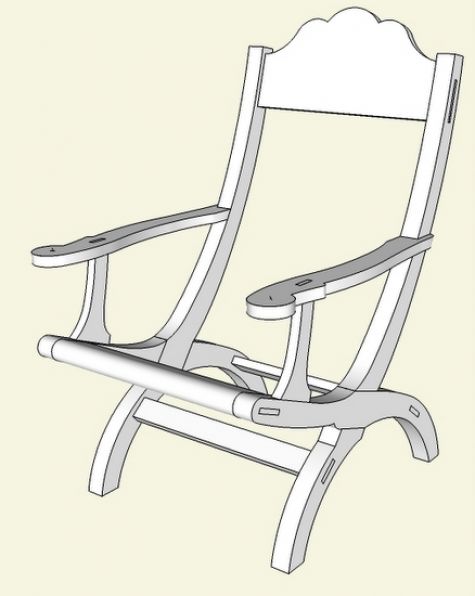
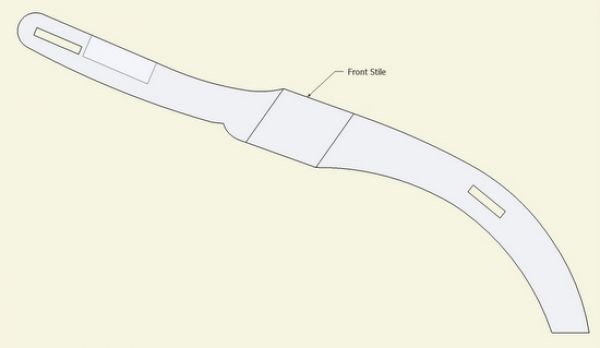
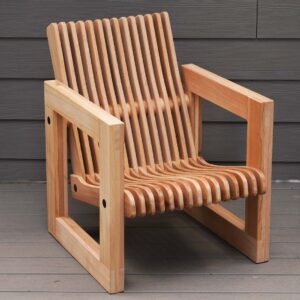
Here is the overall assembled view in SketchUp.
Not shown is a thick leather sling which is tacked on to the stiles and seat rails. This sling, typically without underlying upholstery, forms a comfortable lounging surface.
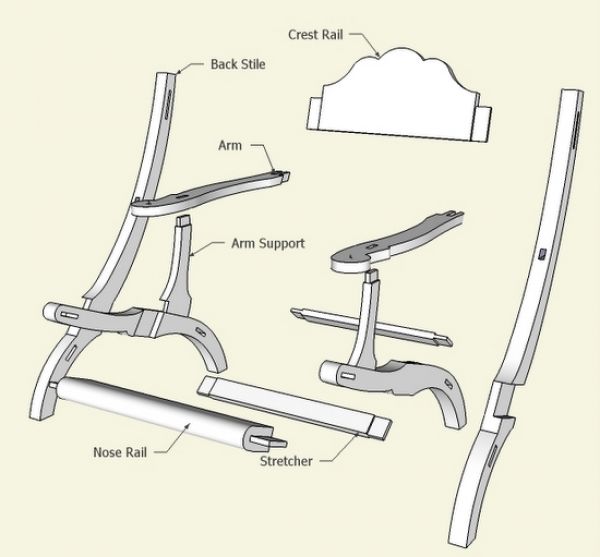
The joinery is straightforward with through mortise and tenons, and a lapped joint for ‘X’ bracing of the stiles and seat rails.
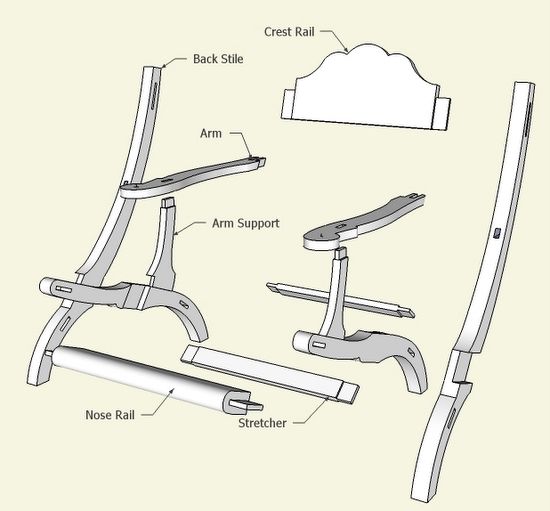
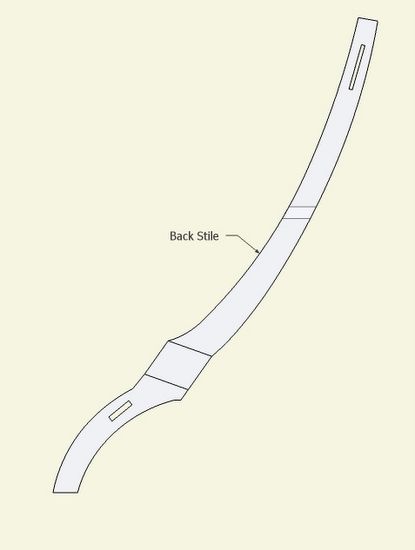
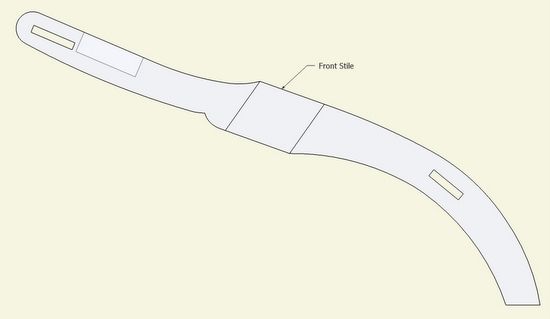
Here is the exploded view in SketchUp.
I created the SketchUp model from a side view picture. Here were steps I used to create the model.
1. Import the picture as an “Image”
2. Scale the picture to full size
3. Use the Line and Arc Tools to reproduce the shape of the back stiles, arm supports, and seat rails
4. Add thickness to these shaped parts with the Push/Pull Tool
5. Assemble the parts which are all SketchUp components
6. Create the lap joint with the Line and Push/Pull Tools
7. Add tenons to the rails, arms, and arm supports
8. Use the tenons to mark out the mortises (with X-ray views)
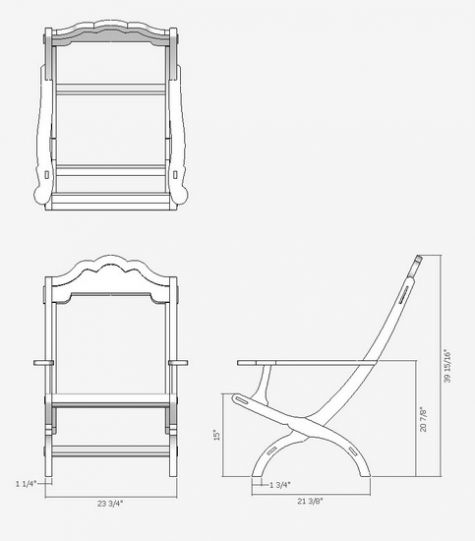
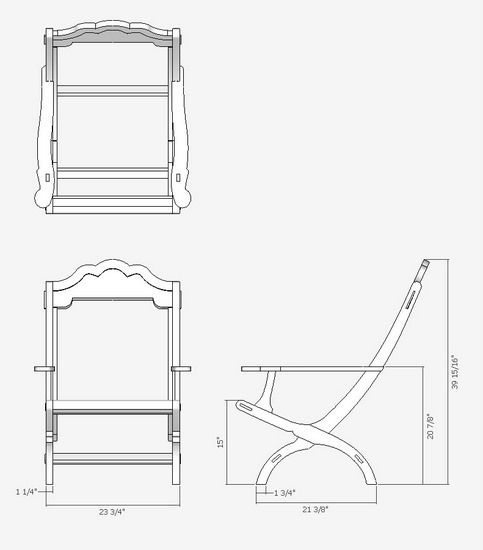
After creating the model, I made various Scenes showing details of all the components and also the orthographic views as follows:

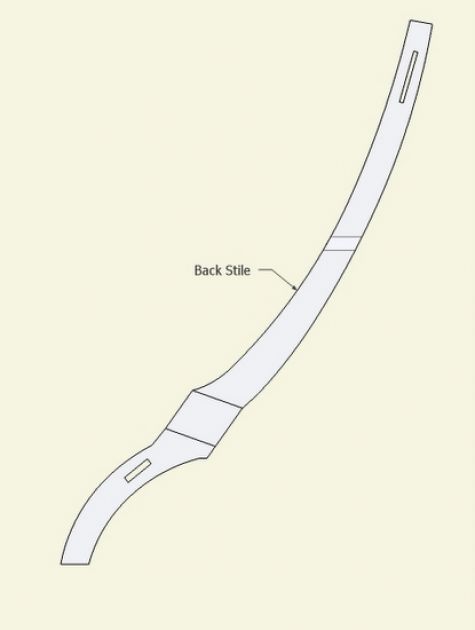
I created full-size templates in X-ray mode to help with layout of all the joinery on the back stiles and seat rails.
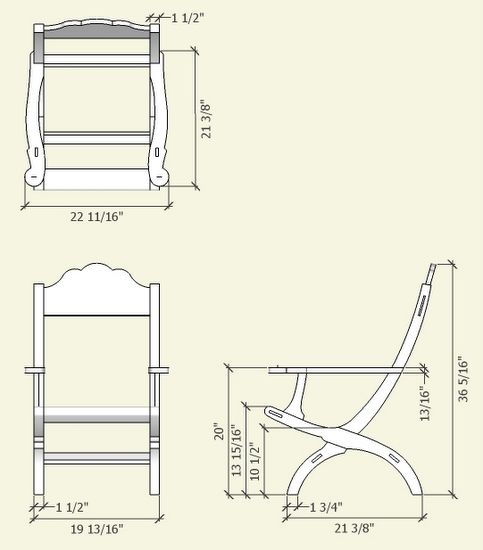
Revision Note of January 2011: In reference to the dimensions shown above, I would now recommend adding about 2 to 4-in. to the width as looking at the front view. Also, I would extend the upper section of the back leg about 4-in. in length. This will move the crest rail upwards and increase the overall height of the back about 4-in.
Also, pleaae refer to later blog posts that show cleats for fastening the leather sling, and show a routed-out shape in the crest rail for the positioning of the leather. See https://www.finewoodworking.com/share/html/30840
And here is the X-ray template for the seat rails. These will be extremely effective in laying out the joinery on the ash lumber I will use.
This conference, in demonstrating the high-end skills of the Williamsburg artisans, continues to be an annual inspiration for me.
P.S. This note and addendum I’m adding one year later in January 2011. I want to share a revised model and ortho of a larger version – it is about 4 inches taller and also substantially wider. It also has a more inclined back angle. I believe this may be closer to the chair size owned by Jefferson.


Comments
Thanks for putting this up. I saw the cabinetmakers building this in the Hay shop when I was down in Williamsburg in October and was hoping to get a better look at it. I hope you share your build with us.
What a great project this would be. I sure would like to see the actual .skp for this. I think I would learn more from deconstructing the file.
Tim, you stated you started this project from a picture. I have tried to do this, but have not been able to get things to proper scale. Could you please do a session on how to use a picture and get to proper scale.
Thanks, I have learned a great deal from the site.
To Steverd: There is an entry just a few weeks ago at this link
https://www.finewoodworking.com/item/22931/replicating-a-maloof-design-from-pictures
After importing the JPG, I use the Scale Tool to make the photo full size. I place a line of known dimension over a component in the picture of known dimension. I compare the two lengths and Scale by this factor.
The picture must be first aligned with the axes using the Rotate Tool.
Also, the above notes apply to a picture imported as an image and being roughly a standard view, such as Top, Side, or Front.
Tim
This is unbelievable, I have wanted to build a reproduction of this chair for over 15 years, but could never find plans of any type. I just recently put a post in Knots about it. I am very new to this forum, only started to visit it about 3 weeks ago. I also just sent an E-Mail to Jefferson's Monticello this past weekend, no reply at this time. I have no experience with sketch up. Would you be willing to share measured drawings.
Thank you
Oh, I'm sorry I might be asking to much. :>(
Years ago I made a variation of this chair. In fact I have two. They are probably 20 years old and still very usable today. My kids and grandkids loved them because I made them so that they sat lower to the ground. Perfect for them. Comfort is great. You can sit in them for hours and never have to move. I am looking forward to building this version. Hopefully it will last as long as the first did.
Where can I get 1 : 1 templates for this marvel?
How and where are the leather back and seat attached? What grade and type and size of leather?
What are the lumber dimensions?
Temple Porter
To all at FW:
I cannot say "thank you" enough; I've searched for a side-view of this chair for years, of course to copy it. Suffice it to say, I will get to building it ASAP.
Thanks again:
JM
This looks like a great project and the plan could easily be modified to change the style of the finished piece. I'm already modifying it in my head toward a craftsman style and picturing it with dark green leather. How about a photo or a Web address so we can get a look at the original chair.
I'll try to answer your questions..... The Campeche Chair is new to me and I was not aware of this until the conference in Williamsburg. I have not made this chair yet, and there are still details I need to work out - such as the cleat and rabbet details for fastening the leather.
Williamsburg told me of a paper titled "The Campeche Chair in the Metropolitan Museum of Art". After retrieving from the internet, I found this very helpful in creating the model.
Tim
For scale you can save the picture of back stile in your pictures and then print it out on 8.5 x 11 paper and take it to a copy place and blow it up 350%. You can also save and print the the front stile and have it blown up 250%. These can be cut to be used as patterns. If that does not make sense to you then take your printout and keep exploding it until the bottom of the chair stiles are 1.75 inches. It won't be exact but should be within an eighth of an inch of plan. There are pictures available of the chair on the internet that show the leather on the chair just google campeche chair and look at the images
Is someone going to make up a full size pattern of this remarkable chair and sell it to us cyber-challenged doofusses who love Old Tom of the Little Mountain?? There is a fellow down in Georgia who did this for us re Mr. Maloof's rocker. Thank you. Hadley
Hadley, no offense, but this is a sign of how lazy we Americans are becoming. We are proud to be the old guy in overalls with a wad of cash in his pocket who just figured out this internet thing. And if he asks enough forums someone else will do the work. I am enjoying Killen's angle on this-- intended or not. Don't wait until a video, set of plans, and a free issue of Finewoodworking has to accompany an article. Strike while the excitement is there. In 2 weeks someone will have a plan made up and it just won't seem worth doing. Do you buy puzzles preput together?
How ironic you should come up with this now. I was in a big search for some plans a few months ago. Ended up coming up with my own, using a few measurements I got off a repro chair sold at Montecello. Photos of a finished chair are available on their website. I did my joinery a little differently than you so will be interested in hearing how you build yours. You say "simple" mortise and tennon joints, but those are not easy on a curved surface or one that joins at an angle as several of these do with the arm and supports. Cutting the angled overlap "X" joint will be a challenge to. I'll also be real interested in how you attach the leather. I ended up upholstering mine. Thanks for doing this. It's a great chair; elegant and comfortable.
Has anyone found full-scale drawings for the Campeche chair?
Tim,
Your chair article is interesting for two reasons. First, it looks easy to build. Secondly, it is a great project to better learn sketchup. I consider myself a novice with SU; but every time that I can find a way to apply a new technique, it helps me learn. I was able to apply three new techniques for this project. First, how to import images. Second, how to scale. Third, how to use the plug-in "bezierspline.rb".
The SU model that I made comes out to exactly your dimensions. With a handheld calculator, just divide the "known" dimension by the "SU start" dimension. The answer will be either so many times larger or a fractional times smaller.
From member comments, I see attaching the leather and drilling the actual mortise holes may still be a problem. Nontheless, thank you for your article.
To astronomz: Thank you for the feedback. I think you are right about an easy construction. But without full-size templates from SketchUp, I think it would be difficult. I haven't built the chair yet, nor have I detailed the leather attachment method.
I am glad that you were able to be successful in the SketchUp model with so little information provided in the blog. It's good to know that readers are making headway from this information.
I see that you used the bspline plug-in. I am sure this is superior to my method of using several connected arcs. But I've used arcs so much that these things go very quickly, therefore I don't reach for the plug-in.
Tim
Tim,
Thanks so much for posting this. I really liked the Campeche chair from seeing it on visits to Monticello and Madison's home too. The host at Madison's home let me sit in their reproduction, and that just made me determined to build one. I used your sketch up article to scale up full size templates. I just used your drawings and put them on a grid. I'm really happy with the chair that resulted.... mahogany with a leather seat. There are a couple of small details I would improve on my construction.. where the arms join the back rest, and the detail of where the leather sling fits at the top. But those are due to my impatience, and need to grow in skill as a woodworker. Thanks for helping me make this happen!
To Etwin: Good that you were able to use the unfinished drawings. I ended up making one in ash. I did rabbet out the crest for the thickness of the leather- 3/16", and added cleats on the inside faces of the legs for attaching the sling. Also, I increased the width of the chair (looking at the front view).
Tim
My brother and I made one of these chairs before Christmas, we left off the arm rest and enstead of the leather we srcewed wood slats to the back and seat.A very comfortable chair ,frist chair I ever made.Also I made the chair alittle wide and higher and I took the plans ,same plans as you see here and made my ouwn with out sketch up.We made the chair from western cedar not the best wood but it is what I had availeble.He took the chair home with him to VA he plans to make and offer them for sale.
To 1stWoodstone: I believe the wider and taller version is appropriate. I would now add 2-in. to the width (in front view), and extend the upper end of the back leg 4-in. higher. However, I would leave the existing height of the lap joint, and the lower structure as shown above.
Tim
Log in or create an account to post a comment.
Sign up Log in