
In SketchUp you can interact different model shapes and find their “intersections”. The feature is called “Intersect” and comes in handy for furniture design. A popular example of its use, is the making of a cabriole leg where you interact a shape with a copy of that shape rotated 90 degrees. It involves erasing quite a bit of waste, but underneath the waste is a clean cabriole leg.
Basically, the Intersect command takes faces you’ve selected and creates edges at their intersections. Sounds simple but sometimes it does not produce expected results. Below I’ll show a case where Intersect doesn’t seem to work as you would expect.
In my last blog entry I showed the process used to create a breadboard for a table top. A reader asked why my method did not use Intersect to create the mortise locations in the breadboard piece. Perhaps my explanation below will answer that question.
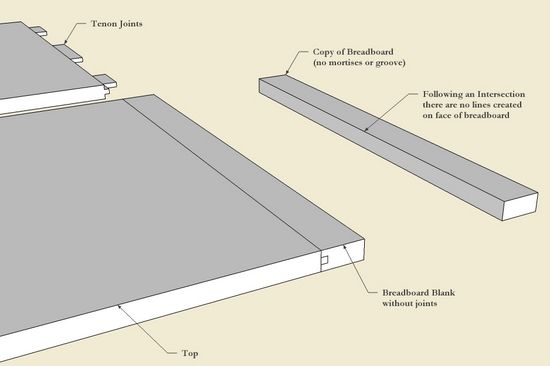
In the arrangement below, both the Top and the Breadboard are components. I made a copy of the Breadboard blank and moved it to the right. In this way, I could watch what happens to the Breadboard as I performed Intersections.
Step 1: The Breadboard blank is precisely connected to the table Top. I executed an Intersection on the arrangement below and, although the tenons protrude through the edge of the Breadboard, there was no change . Here’s the procedure used:
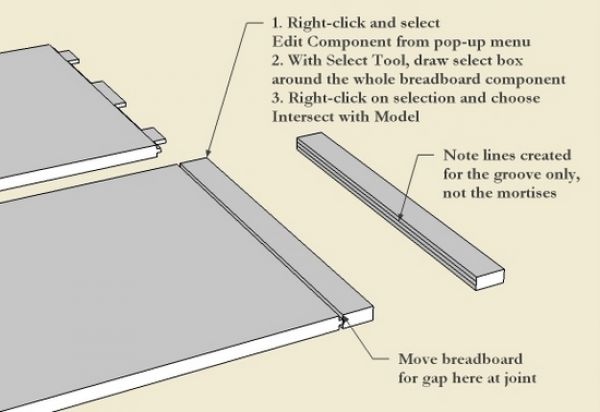
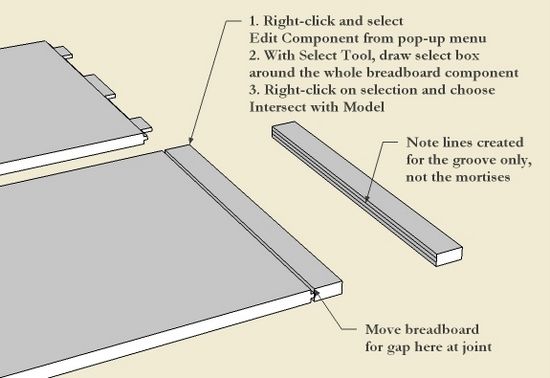
1. Right-click on the Breadboard and choose Edit Component from the pop-up menu
2. With Select Tool, draw a select box (left-to-right) around all of the Breadboard to select all faces and edges. An alternate is to “triple-click”.
3. Right-click on the Breadboard and choose Intersect with Model
You can see in the copied Breadboard to the right that there was no effect of the Intersection, that is no lines show up on the face of the Breadboard.

Step 2: With the Move/Copy Tool, move the Breadboard component less than 1/4-in. along the red axis to create a gap at the joint with the table Top. Then perform the same Intersect steps as done previously. Notice that this procedure creates intersecting lines on the breadboard face. The two lines were made by the intersection of the tongue on the table Top which is 1/4-in. long. Unfortunately, the lines do not show the location of the deep mortises.
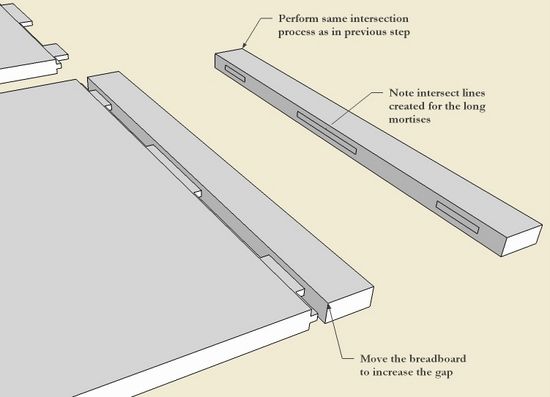
Step 3: Increase the gap at the joint by moving the Breadboard another 1/4-in. or so on red axis. Perform the same Intersect operation. Notice the resulting intersecting lines for the three longer tenons. This is a helpful intersection and could be used effectively in lieu of the X-ray process showed last week.

If you aren’t getting the expected results in executing “Intersect” check the relative position of the components. A slight movement away from flush and co-planer may improve results.


Comments
Thank you very much for addressing my question Tim. Your method described here makes a lot of sense if we realize that sketchup is treating the breadboard as a hollow "skin" instead of a solid board.
Tim, I have done a few breadboard table tops recently and discovered the quickest and simplest way I have seen for doing the mortises.
Before making components out of the top or the BB, simply draw the tenons on the top and copy them and the shoulder onto the BB after deleting the BB face. No flipping, no intersecting - you're done!
Croc, that should work.....
Tim
Log in or create an account to post a comment.
Sign up Log in