How to Build a Swing-Out Drawer
Add a twist to your furniture with a swing-out drawer
Synopsis: A spin-out drawer is one of Garrett Hack’s favorite ways to add a bit of whimsy to his tables. Drawers that swing out are fun, but they are also useful in situations where traditional slides and guides would be cumbersome, such as in curved cabinets. Using a small table as an example, Hack demonstrates how to lay out the drawer plan and drill a precise pivot point, which is key to making this type of drawer successfully. He then shows you how to bend and laminate wood for the curved drawer side, and cut the angled dovetail joint that joins the curved side and the front.
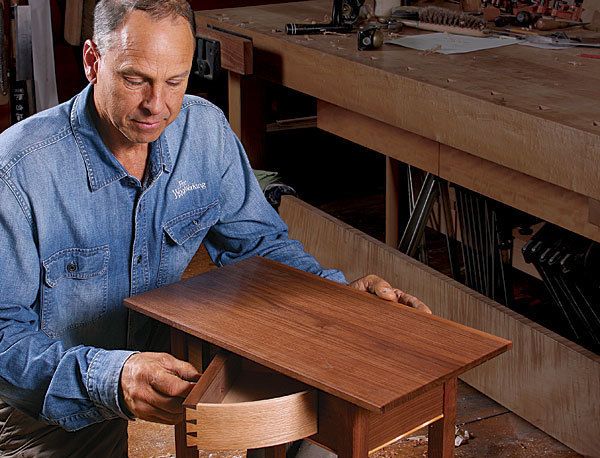
I’m always trying to find amusing and different ways to incorporate drawers into my furniture. I’ve even made a drawer within a drawer. But one of my favorites is a drawer that spins out. Its surprising opening action is simply fun. spinout drawers work well in a square opening, as I’ll demonstrate here, but they’re also useful in situations where traditional slides and guides would be cumbersome, such as in a curved cabinet, where the pocket isn’t rectangular. However, because the single pivot point replaces traditional runners, this drawer design is meant for light-duty work.
The challenges in building a spin-out drawer are drilling a precise pivot hole in the drawer front, laminating the curved Different spin on Drawers Add a twist to your furniture with a swing-out drawer BY GARRETT HACK side to the right shape so that the drawer opens without binding, and cutting joints for a non-rectangular drawer. I enjoy the process. I’ll illustrate it from start to finish using a small table as an example.
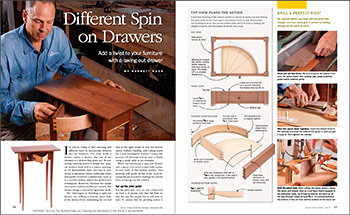
When incorporating a spin-out drawer into a piece, you need to start with a plan, or top, view of the drawer pocket. this drawing will guide all the work, from locating the pivot point to making the curved form to laying out the joinery.
Set up the pivot point
For the pivot pin, you can use a brass rod or even a 16-penny nail. size the hole so that the pin fits snugly but is still able to turn. to ensure that the pivoting action is smooth, the hole must be perfectly vertical and centered in the thickness of the apron. to do that, I drill through all the parts at the same time, clamping the assembly to a fence on my drill press (see photos, p. 57). Now it’s time for the curve.
Laminate the curved side
To make the curved side, you’ll need to make a small bending form, based on the plan view. When laying out the arc for the form, I tighten the bend at least 3⁄16 in. on each end to allow for springback (when the arc of the laminations flattens out after unclamping from the form). trace the arc, exaggerating the bend as mentioned, and attach the drawing to the blank. Cut it to shape on the bandsaw and fair the shape with a block plane. Be sure to keep the form’s sides perpendicular to the top and bottom as you fair it; otherwise, you’ll introduce twist in the lamination. Once you have the outside curve nice and smooth, cut away the inside of the form, roughly parallel to the outside, to give a solid registration point for the clamps.
I resaw the 1⁄8-in.-thick plies on the bandsaw. to laminate the side I use yellow glue, which has a limited open time. But with such a small lamination, the short open time isn’t an issue.
From Fine Woodworking #234
To view the entire article, please click the View PDF button below:


Comments
How would you make the hinge structure stronger or more stable to carry a bit of a load?
I saw some blogs about a box casing with ball bearings. Do you have any experience with this?
Another suggestion involved using a threaded Rod acting as the hinge to give more stability
Log in or create an account to post a comment.
Sign up Log in