A Better Way to Fit Mitered Trim
 Dec 07, 2011

On a recent built-in project, I decided to dress up the flat-panel doors with mitered trim along the inside edge of the door frames. That meant lots of miters to cut and fit.
Maybe everyone already fits trim this way and I’m just late to the party, but I finally came up with a technique that leads to fast, accurate corner joints.
In the past, when fitting mitered trim, I’ve always started by mitering one end of a length of molding. Then I’d fit it in place, mark the opposite end and miter it. It was always tricky to cut the miter in exactly the right place. Because I didn’t want a gap, I’d invariably leave it a little long and spend a lot of time with a handplane and shooting board getting the fit just right.
On a recent project I was faced with trimming out four double-paneled doors. That’s 32 pieces of molding and 64 miters to get just right. I gave it some thought and decided to steal a box-making trick from Matt Kenney and put it to use on my trim.
When Matt makes a mitered box, he starts by cutting the pieces to exact length first, then miters the ends. I figure the same process might work for my challenge.
I started by marking the trim on each door for length. The I ganged them up and cut them on chopsaw. It wasn’t hard to get a nice tight fit.
Then I moved to the table saw to cut the miters. I installed a miter jig to my cross-cut sled then it was just a matter of aligning the end of the trim piece to the kerf in the sled and making the cut. I was able to make really accurate cuts this way and it was a lot less scary than mitering narrow trim stock on my chopsaw.
I still needed to fine-tune a few ends with a handplane, but overall, the job went a lot faster and I’m happy with the results.
-
On a recent built-in project, I decided to dress up the flat-panel doors with mitered trim along the inside edge of the door frames. That meant lots of miters to cut and fit.
-
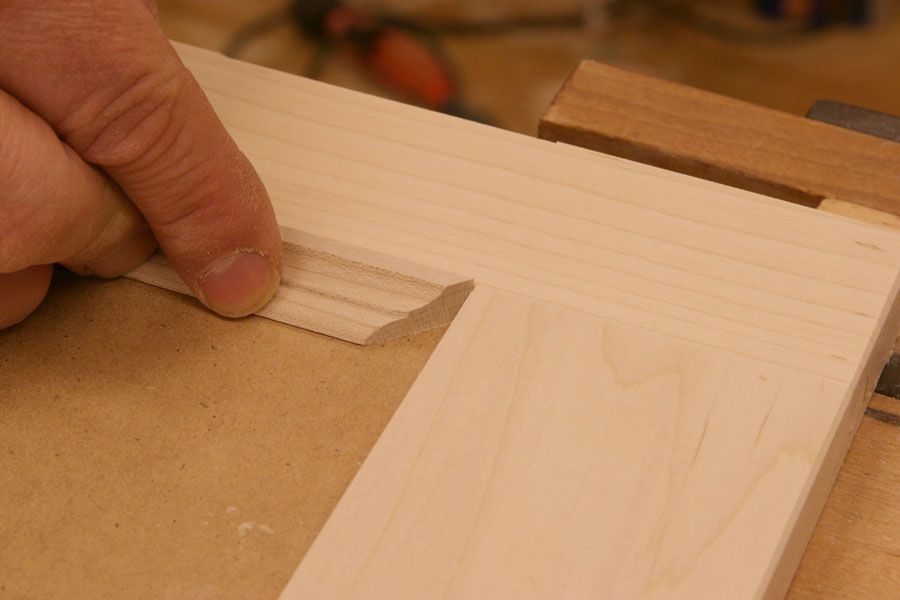
I simplified the process by first cutting the trim to length on the chopsaw. This made it much easier to get a precise cut than if I had started by mitering the ends.
-
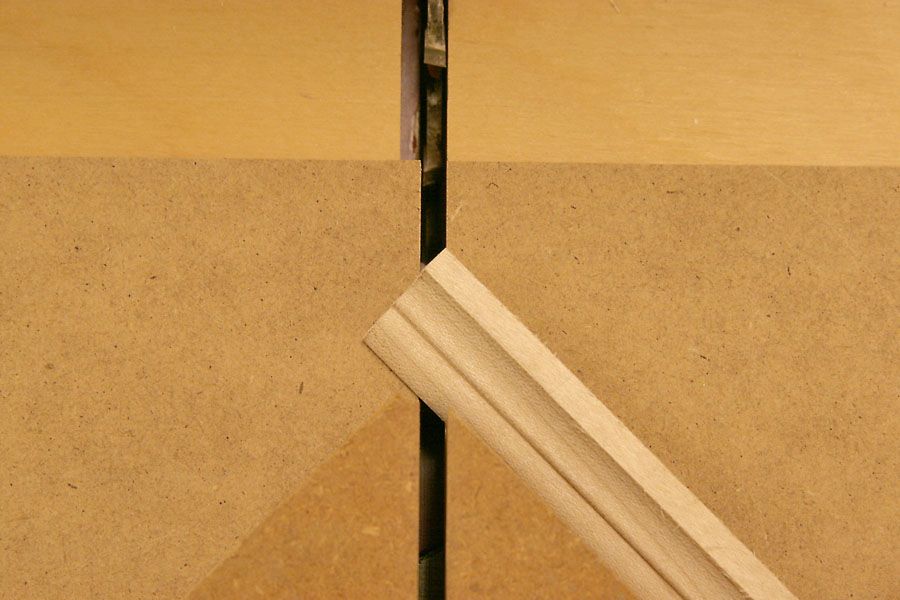
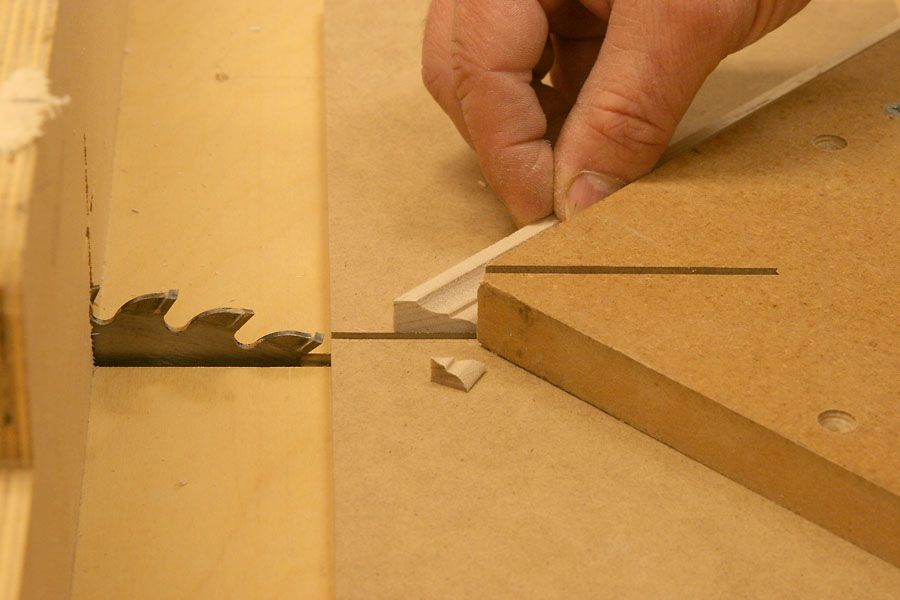
It was easy to cut a precise miter by aligning the end of the stock with the kerf in the cross cut sled.
-
With the trim cut to final length, I moved to the tablesaw to miter the ends.
-
The result is a tight fit requiring little fine-tuning.


Comments
Hi Michael
Faced with a similar problem I also cut to size then mitred as you describe - saved a lot of time. A few years earlier I had bough a cheap picture framing guillotine to make some picture frames. Eventually the grey matter kicked in and I used the guillotine to make the final creeps up to a perfect fit.
The one I have is set to cut either 90 or 45 degree cuts - both left and right and can be adjusted to any angle in between. They are not expensive (mine is not professional quality) and it is amazing how many jobs I have done with it.
Cheers
Peter
I can't believe I never thought of this
Awesome idea- I have to install framed panels in built-ins etc. on construction sites and I use your "old" method- gives air-tight fits. I use an auxiliary table on miter saw so I have a zero clearance cut. This saves a lot of sharp little projectiles ! I hope to try your system next time. Thanks for sharing..
I think many people make cuttig mitres too complicated. I use O.D. dimensions only, whether I am doing picture framing or door/window trim. Ascertain the dimension desired for lets say a picture frame by using the picture dimension (example 14" x 20"),add fit tolerance (example 1/16") to each dimension and now here is the most important difference: measure the width of the frame moulding from the rabbet to the outside edge. (Lets use 1" as that example) Now simply add the dimensions to get the O.D.s.
14" sides are: 14"+1/16"+1"+1" = 16 1/16"
20" sides are: 20"+1/16"+1"+1" = 22 1/16"
Now, simply set a stop on the mitre guage fence to get the correct length of the sides. Cut all same length cuts at one stoppd setting. This is very important because proper fitting mitres are contingent on parallel sides being exactly the same length! Cut raw stock pieces to slightly oversize and mitre one end. Then use the stopped method above to cut the other mitre on the opposite end. This is both fast and very accurate, assuming user has an accurate method of cutting a 45 degree mitre. Why does this work? If we break this down, a mitred cut on the end of any stock is simply adding an icosolese triangle to the length of the stock. An icosolese triangle has a 90 degree angle and two 45 degree angles. The length of the two sides adjacent to the 90 degrees are exactly the same length!This works equall well on door or window trim. Just use the full trim width to add to the I.D. of trim size desired, instead of the rabbet to edge used for picture framing.
Bolection would be a whole other kettle of knish, I presume?
Anyone have any experience with that stuff?
Good stuff for flush inset moldings though. I've already hard coded that one into the skull putty. Sweet.
always,
I agree with Peter.
Fifteen years ago I bought a Grizzly miter trimmer (G1690). Out of the box, it did not perform as well as I expected. I had the blades professionally resharpened and the results have been excellent.
If you are doing inset moldings why go through the trouble of trying to get perfect miters? Wouldn't using a trim carpenter's method of coping corners work? The coping would also cover up any issues that would occur with less than perfect miter cuts.
There are many ways to do this. I made a jig for my 12 inch dewalt miter saw. This saw is not the kind that slides, I found that it is much more accurate than the sliding type. The jig is a simple assembly ,I used two pieces of 5 qtr poplar about 4 inches wide.I joined them at 90 degrees and set the saw at 45 and cut down into the jig but not all the way thru. I shut the saw off and measured the space under the motor housing. I then removed the jig from the saw and drill a hole for a dowel. Then I cut the dowel to stop the saw from going all the way throw the jig. reinstal the gig carefully so that the saw does not re-cut the kerf and you end up with a zero clearance cut and the cut off piece does not fly off. When you want to cut just put the mark on the edge oft he saw kerf of the jig and you will get a nice smooth accurate cut every time. I also added a piece off 2 inch by 2 inch poplar that I wrapped with some fine sandpaper ,that I use to keep the molding from sliding on the jig. Make the jig long enough to be able to clamp it in place with the clamp that comes with the saw.
Thanks for the great advice! I'm currently in carpentry school and this is very helpful with what I'm studying. The pictures are a nice touch so thank you.
Log in or create an account to post a comment.
Sign up Log in