How to Cut Tenons on the Bandsaw
 Jul 13, 2011

I’ve cut tenons in all manner of ways. I learned by doing it with a handsaw. Time-consuming, but it worked. Then I tried a tenoning jig, but it was fussy to set up and was too unwieldy for longer workpieces. Finally, I settled on using a dado set, a quick and easy method that allowed me to bang out a bunch of tenons in no time, no matter what the length of the workpiece.
I thought it was the best way. But recently I tried the job with a bandsaw, and I think I’m a convert.
You see, I’ve been building a trestle table, doing the work here in the FWW shop during my lunch hour. It’s not a complicated piece by any means, but with only an hour to spare for woodwork, I needed to be as efficient as possible.
The FWW shop has a SawStop tablesaw. It’s a great saw, but installing the dado set on it requires changing out the blade-stopping cartridge and recalibrating the system a bit. Not a big deal if you do the job regularly, but it was a time-waster for the short period I have to work. I soon realized that my preferred method of cutting tenons wasn’t going to cut it.
I’d seen people do the job on the bandsaw, and it looked simple, so I decided to give it a whirl. Turns out, the job was easy, quick and precise, and I’m not sure I’ll ever use a dado set again to cut tenons. I used our shop’s behemoth bandsaw for the job, but the technique will work with any bandsaw, even a benchtop one if your workpieces are small enough. Try it. I think you’ll like it.
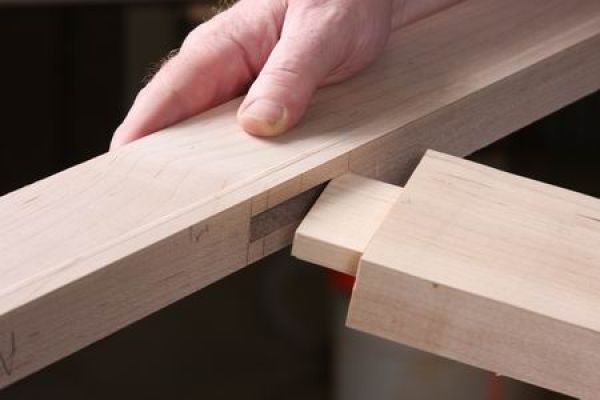
Here’s the process.
First cut the shoulders using the tablesaw.

1. I dialed in the blade height with the help of a test piece. Once that was set, use the fence and a miter gauge to cut the shoulders along the cheeks on all the pieces.
 2. Then, with the fence in the same position, adjust the blade height to cut the top and bottom shoulders.
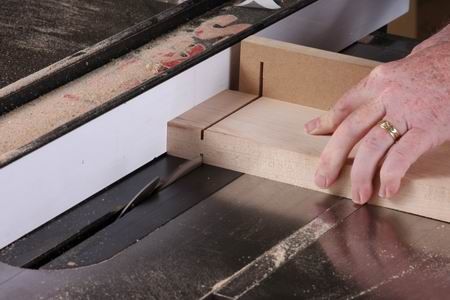
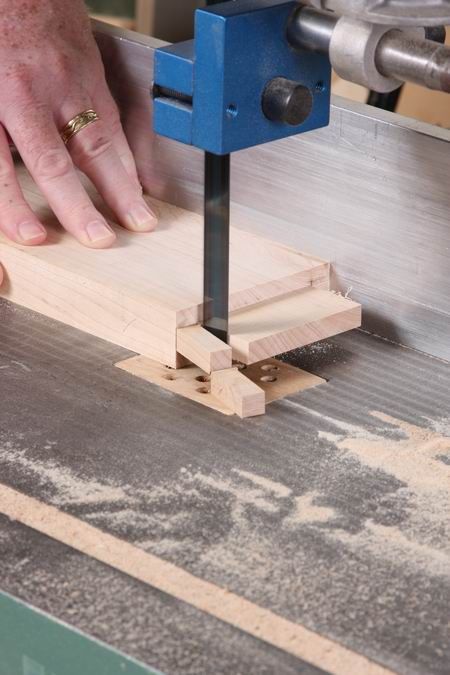
Now it’s off to the bandsaw.
You’ll need one with a good fence so you don’t cut tapered tenons by accident, and it’s a good idea to use a test piece to set up the fence. I do the cheek cuts first, but I don’t think it matters.
 3. Scribe a line from the bottom of the each shoulder to the end of the workpiece and set the fence so that you’re cutting a hair outside the line. Cut the first cheek, flip the workpiece and cut the opposite face.
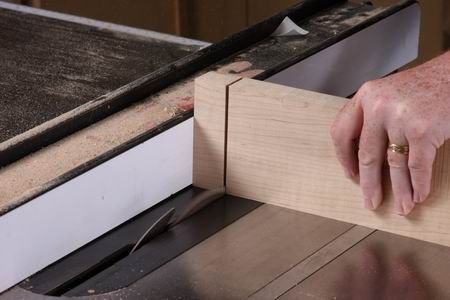
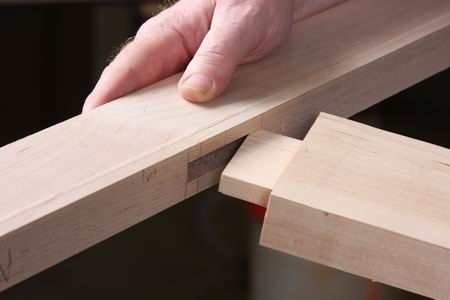
 4. When all the cheek cuts are finished, follow the same process to trim the tenons to width.
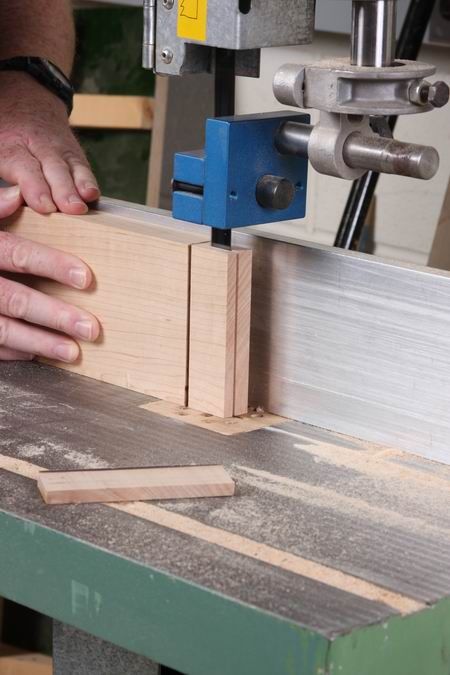
 5. All it takes is some light cleanup work with a shoulder plane and chisels to get a perfect-fitting tenon.


Comments
Great post. Just one question: Why not cut the inside edge, i.e. the edge closer to the fence. Then if the shoulders and cheeks are the same width, you will not need to move the fence -- just rotate the workpiece 90 degrees.
Dr, I think that would work, but in this case the cheek and top and bottom shoulders were different widths.
NIce approach, and one I will certainly try, although probably without the rip fence. I've always been told using a rip fence for crosscutting solid stock--when placing stock directly against the fence--is a surefire recipe for kickback.
I went thru the same growth curve as you and ended up at my bandsaw - but what made my bandsaw a success was when my friend Jack was at my shop and he started grabbing the wrong knob of the fence - I started to tell him to stop and then realized what a great idea.
What we do now is cut the tenon on the out side as you do - but my bandsaw has a Driftmaster fence from Laguna on it. what I do is use the fence with the lever engaged that allows for micro adjustments and that way I am am able hone in on a perfect fit that is repeatable. I had only been using that feature for re-sawing and cutting veneer pieces - it was a lucky find that my friend still teases me about!
I guess I should add this - using the DriftMaster Fence does allow me to do as Dr CJ suggests - just - flip the piece and use one setting - I don't have to reset it - in this way it doesn't matter which side you set it up for - and kickback isn't a real concern on a bandsaw with a fence - as you should be compensating for drift in any case and even if you aren't - its a straight blade - isn't it?
I use this method also and would add one more recommendation. When you make the tenon cut on the table saw be sure to locate the rear of the board in the exact same location against the fence. My fence is set to allow a small amount of additional clearance for ripping. And if the starting location against the fence is not the same the cheeks of the tenons are not flush.
When one is cutting multiple tenons, it is paramount importance using the above technique that the lumber is milled to the same thickness. The reason is as one flips the board, and if the thickness is different one would get a thin or thick tenons.
The second important point while cutting on the table saw, is to keep a consistence point of reference. Suppose the piece is not exactly cut at 90 degrees. Then when one flips the piece the error is propagated and the shoulder would not look right. So to compensate for this use a minimal contact point of reference. This is achieved by putting a small flat head screw into an auxiliary fence, and use this as a reference. There is more then one way to achieve this , and this happens to be one of the ways.
I don't think there is much danger of kickback with this method as the tenon is so close to the end of the board. I like this as it gives clean edge to fit into the mortise. The only caveat, as was mentioned, is to get repeatability when butting up to the rip fence and make sure you are firmly agains the crosscut guide.
I use this method with some small changes. 1. - I use a miter sled to cut to length and then the tenon cheeks which is quick, fast, accurate and safe. 2. - I cut the tenons on the band saw using a removable block so the reference edge of the piece is always up against the fence. Works flawlessly. See Timothy Rousseau's video. Thanks Timothy.
I need a bandsaw ...
Great method, thanks for the suggestion.
Regarding the earlier kickback comment - there is no kickback on a bandsaw. The blade pushes down only - generally a good thing.
I am not sure that the kickback question ON THE TABLE SAW was adequately addressed.
What about adding an auxiliary fence that does not extend as far as the blade? That way, you have repeatability but not a kickback problem as the piece does not jam between the blade and fence.
No worries. There should be no problem with kickback on the tablesaw when cutting the shoulders, as long as the workpiece is held firmly against the miter gauge. All the leverage is in your favor and the workpiece will slide along just fine. But I wouldn't drag it back through the blade. Slide it sideways once it is clear of the blade, and get it out of the way before you pull the miter gauge back.
Great blog, Tom. You've got me convinced, and I was a diehard dado set guy!
If your cut on a table saw is not through the material using a miter gauge with stock against the fence should not result in a kickback.
Ahhhh. The bandsaw!! My all time favorite power tool. An old Delta 20" variable speed.
Since my bandsaw is a benchtop model and not a good one at that, I use the tablesaw for tenons. I don't use the dado set. I cut the shoulders, then make repeated cuts moving the piece slightly each time until the tenon is complete. A small side effect of this of course is that the sides of the tenon are a bit rough, and that works well as far as I'm concerned. it gives the glue a nice rought surface to bond to.
My methos must work alright, I have never had a kickback, joints look great, and never have any of them become loose. For extemely long pieces, say when building a queen size headboard, tenons can be trickier, but my router serves pretty well on pieces too large for my small tablesaw.
Far too tedious.
I renovated a whole house, including new windows and custom doors, using just my radial arm saw but now I have more space and more saws so I leave a dado blade on the old Sears RA saw. It also has a stop block screwed down on the RH side.
Adjust stop block for tenon depth, try a couple of scrap ends to set up tenon thickness and then we are away.
Snap down a rail, run the saw over it, roll the rail with the left hand and pull the saw again. Stack the pieces. After they are all done raise the saw for the shoulders and repeat. If the saw is recently set up I can even do the shoulders in batches of four or six.
Just to answer a couple of the questions below, mostly matters of good practice.
Dr CJ. Why not cut the inside next to the fence? Because then you don't have a loose block sculling around in a confined space between the blade and the fence.
Why you don't get kickback. Cut on the table saw first, then there is no loose piece to jamb and the weight and leverage of the jig prevents it. If using a mitre gauge make sure it is big and strong, you will only get a jamb if the workpiece can get out of line. Better, of course, is to use a full width sliding tray which runs in both slots.
I use the Bandsaw to do the whole job and it works a treat for me. No table saw needed. A little cleanup and bingo...
I have tried this method on and off depending on time pressure and frankly - the ultimate tolerance demands of the joint at hand. I find that the band saw technique varies a lot with the quality, tension, and condition of the blade - particularly when cutting hard woods like white oak. Rays and rings can contribute to blade drift - though I see you used a wide blade. Good for you.
My most reliable, fastest and "productionable" method of cutting tenons though is to use a radial arm saw... There. I said the banished words. You could have installed a dado set, or a wobble blade on an RA saw and simply set a stop on the table. Where I have a lot of tenons to cut and the shoulders are different cut depths or (heights) off the table, I simply set up two RA saws and pass the work from one to the other... I did say "production" ... Or do the batch in two "passes". I have even used dado sets and wobble blades on chop and sliding compound mitre saws. It works quickly and safely, in my opinion. Fingers and hands no where near the blade...
Yes: they throw a huge amount of debris and eye and ear protection are a must. But nothing... no machine I have... can beat the cadence and speed you can fall -SAFELY- into with a Radial Arm saw: particularly when you weight the saw so you are pulling against an auto-return device, and have a vacuum assist to keep the stops and table clean.
I have cut my share of hand-cut tenons, and dove tails, and lap joints... But the RA saw will also cut the mortise. Yes: it will. Deep as you want, as fast as you dare (or have the HP for) in a finger-free, controlled a manner as any shaper, router or other jig I have tried. Maybe even more controlled because you can "see" the slot develop before your eyes and control depth in small jabs "in" and subtle shifts of the work Left or Right against stops.
The band saw cannot do that. But when you are making picnic tables with wedged-tenoned joints... Or something equally "pretty" but not needing glue-mil-thickness precission... I am there beside you at the bandsaw in fir, cedar, or some other soft wood any day. Thanks for thinking "out of the box" to help us all build better ones, et al... VC
VC240W
I dont get this - how?
But the RA saw will also cut the mortise. Yes: it will. Deep as you want, as fast as you dare
Jock
(We have a NEW RA saw)
I suspect what VC240West is referring to is something similar to mortise attachment at http://woodworker.com/cgi-bin/FULLPRES.exe?PARTNUM=889-372.
Not sure how much time saved and accuracy gained over something like a mortising machine.
If it's not a through mortise, you will have to deal with the rounded bottom of the mortise that the bar leaves.
I still love the band saw for tenons - But, you will never get a CONSISTANT tight fit using this technique. As a prior message noted the wood would have to be exactly the same width, which when measuring thousands, it usually is not. Tenon fit does depend on thousands measurements. An alternative technique is to spend the time to make a spacer board equal to the width of the tenon and the kerf. Using this the tenon can be cut using the reference surface of the piece against the fence for one cut then the second cut with the reference surface against the spacer (and fence).
[url=http://www.pillarsantiques.com/Connections/con_tag.asp?id=646]miumiu 長財布 ピンク[/url]
and Sewer Rate Information.txt
[url=http://www.pillarsantiques.com/Connections/con_tag.asp?id=58]miu miu 財布 激安[/url]
and road closures for June 7.txt
[url=http://www.pillarsantiques.com/Connections/con_tag.asp?id=673]miumiu myumyu バッグ[/url]
hits North Dakota oil workers camp.txt
Log in or create an account to post a comment.
Sign up Log in