I’m planning on building my own shuffleboard table and I am looking for suggestions on the best way to construct/glue up the playing surface. Basically, I need to glue up a bunch of boards (faces glued together) that are approx 3″ wide, 3/4″ thick and some length. The playing surface will be longer than any single board so my question concerns gluing the boards together.
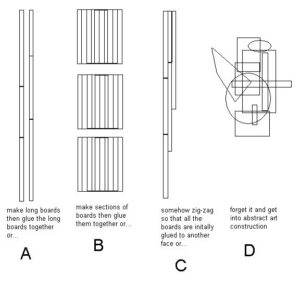
I wonder if I should try to glue a few boards together on their ends (my concern lies with endgrain gluing this small surface) to make boards the length of the playing surface, and then glue these together (A in picture). Or should I glue up sections of the surface, then glue them together (I don’t really want a hard line across the table) like B? Or should I try to do it like a floor and piece it together one board at a time like C?
If anyone has built one of these before please let me know how it went!
Thanks
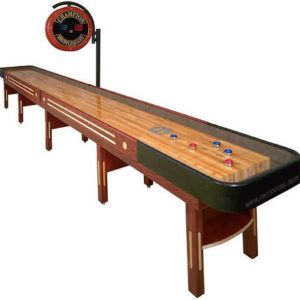
I have included a picture if you are not familiar with shuffleboard.


Replies
Option C looks to be your best bet to me. Bowling alleys are built in a similiar manner. How do you plan to flatten the surface after glue up. That looks like it would be a very heavy top. Dimensions?
Tom
Douglasville, GA
The dimensions are in the end going to be 20" x 3" x anywhere from 12-22 feet (depending on how big I want to make it). I was thinking about taking it to a woodshop and paying someone to run it through a big sander to flatten it out. And yes, it is going to be heavy!
Question number 2: What do you think the best way to flatten the surface would be?
Edited 6/15/2004 4:38 pm ET by ehrichweiss
Ehrichweiss,
I would think you'd need to rent a floor sander to level that top. I can't see you hauling a 20"x3"x22' top anywhere.
If you selected 'A' design...you could divide the project up into six segments and stagger the lengths in a complimentary fashion, such that, the final assembly would mesh together and look a bit like 'C'. Then you could run the sub assemblies through your planer to flatten...and a final sanding...
At 22' long you will have a heck of a time transporting it and you may have trouble finding a shop with enough infeed and oufeed to run it through a sander not to mention supporting it at either end. A floor sander seems like a reasonable solution. I built my bench top from an old bowling alley and at 10' long X 20 wide the slab was a bear to handle but I did it alone.
I would check with some shops in your area to see what their machines can handle before making a final decision on size if you decide to try to have it machine sanded. Tom
Douglasville, GA
I have made tops using plan C. They worked fine. Nothing over 2" thick, though. Plans A & B will be weak, probably break when you move it, and possibly give you bumps where the boards meet. When doing Plan C, don't butt join boards at 90*, but cut and join at 45*. If you do the 45 from top to bottom, when glued up it looks like a 90* butt joint from the top.
3" x 20" x 22' is 9 cubic feet or about 350 lbs of hard maple. About 10 yrs back, I made a wall hung "desktop" 2" x 48" x24' which we finished with a floor sander. This didn't get it dead flat, but it was close enough for the intended purpose.
If I had to make your top (being limited to a 6" thick planing capacity) I'd make it in 4 22 foot sections, flatten the bottoms pretty well with a 22" jointer plane and use the planer for the top surfaces and to clean up the bottoms and sides. Then glue them together in pairs, a final glue in the middle, then sand or scrape the glue lines.
The pucks(?) in the picture look like they've got steel in them. If so this a great chance to bury a few electromagnets in the wood, operated by concealed buttons, to mystify the other players when the puck non-predictably slows down or speeds up.
Edited 6/15/2004 6:52 pm ET by rob
First of all: hahahahahahhahaha the magnets are a wonderful idea! Yes rob, shuffleboard pucks (or weights) are usually solid stainless steel or chrome plated. I may have to consider doing that just for the fun of it.
To everyone else: thanks for your replies. Regarding the floor sander...I have never operated one of them before. I can picture myself grabbing on and having it fling around the room. So, are they easy to use? How big are they? And how do the sanding disks work...can you change them/what grit are they/will I finish with a hand sander?
Another option for "planing" the final piece would be to attach a very large metal base to a router, put rails on the outside of the build-up, and use the router to plane down the wood. This would be somewhat tedious, but should work very well. Just my 2 cents ...
John
That's an excellent approach for planing big stuff in a small shop. In this case, the challenge will be to get the two rails exactly straight and parallel. If they're not, the playing surface could be twisted along the length, which'd probably be bad.
I suspect I could build 20 foot rails using, say, 6 inch strips of 3/4 plywood (8 footers), with the strips offset in the various layers. If you made the rail about 4 inches thick I think it'd probably do a better job than a floor sander. After glue-up, if I thought the rails weren't straight, I could run them through a jointer or rip them in my saw.
To really get it flat I'd opt for a large planer, with a very large infeed and a very large outfeed table. You'd need over 40 feet of shop space, and this is a no-go for all but the largest commercial shops.
John
Having made the "build a yacht in the basement" mistake enough times, I'd look for some way to build the thing in smaller chunks. If it is one monolithic big thing, it is difficult to move in the shop, difficult to build, difficult to transport, and difficult to move into the building where it will live. (Are there hallway corners or stairs at the eventual site?)
I'd start with something like B, and develop a method to join the pieces together on-site with zero height difference at the seams. I'd probably put a sub-table underneath the maple, and screw adjusters between the table and the maple to tweak the height of the maple. (This is a variation of the way counter-top guys install slab stone counters. They set separate slabs at exactly the same height. Their test to swipe a razor blade back and forth across the joint, adjusting until they can't hear or feel a knick as the blade passes over the joint. I'll bet they're good for less than a thousandth of an inch.)
Thanks for your suggestions Jamie. I will be putting it together in my shop (a garage) and it will travel out the garage door, around the house and into a basement door where it will live.
I definately will want some kind of fine tuning capability to make the table flat and level.
You could build it as in B, using dry dowels at the ends to get the sections to a common level, take it apart, and transport it in sections to the site of final "resting". Once together, with the dowels and section ends glued, you could apply the final finish coat or two to the whole, achieving a smooth transition between the sections.
If you use a floor sander, get the type that vibrates, not the type that rotates. Easier to achieve a flat surface that way.
-Bob
This forum post is now archived. Commenting has been disabled