Harlequin Box
Geometric marquetry gives this mitered black-and-white box an optical buzz.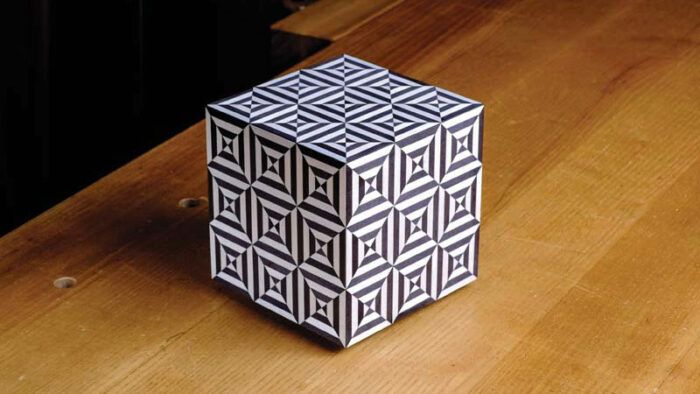
The design of this box is both simple and complex. At the core, it is a plain mitered cube. The bottom of the cube, sitting in dadoes in the sides, is placed higher than normal to create a hidden lower compartment. A small open-topped box, or tray, fits into that compartment from below and is held in place with magnets. It protrudes 1/4 in. or so from the bottom of the cube, which is just enough to create a little pedestal that visually separates the box from the surface it rests on.

The more complex aspect of the piece is the veneer work, particularly the bold geometric marquetry on the outside. The pattern begins with hundreds of small strips, and every component has to be as close to perfectly sized as possible, because any discrepancy across all the small bits would be compounded as the design is assembled.
Making marquetry

Although I could have sawn my own veneer for this project, I chose to use commercially produced dyed veneers because of the purity of their colors. I start the decorative veneer work by making scores of narrow veneer strips. They then get edge-glued into black-and-white bands four strips wide, and from those bands I cut dozens of small triangles. I edge-glue pairs of triangles, and then pairs of pairs, making squares. Finally, to create each marquetry panel, I glue nine squares together in a three-by-three grid.

To cut strips of uniform width with ready-to-glue edges, I used my sliding table saw. I cut strips from four sheets of veneer at a time. To immobilize the stacked veneers and achieve tearout-free results, I sandwiched them between two sacrificial pieces of 5/8-in. MDF and screwed the MDF boards together at the ends. You could use the same approach with a crosscut sled and a stop block on a regular table saw.

There is waste involved in this technique compared with cutting with a knife, as the blade’s kerf consumes some veneer with each pass, and every rip also produces two narrow MDF cutoffs that are difficult to repurpose. But I think the excellent results and the time and hassle saved justify the procedure.
Triangulation


When I’d cut all my strips, I edge-glued them into four-strip-wide bands. The next step, cutting small triangles from these black-and-white bands, is perhaps the most exacting part of making the veneer pattern. Perfect triangles are fundamental to getting matching squares later that can be assembled into the overall grid without distortions or misalignments.

I made a quick and simple jig that solves most of the problems. It’s just a solid-wood triangle block paired with an MDF base, a fence, and a toggle clamp. The important part is the triangle block, so I took my time to make it as perfect as possible, using a miter saw with a micro-adjustment fence. I cut the veneer using a wide chisel with its back against the triangular guide block.

After cutting each triangle, I flipped the band over before cutting the next; this generates an alternating color scheme. Because the chisel produces a slight bevel on the waste side of each cut, I trimmed off a tiny strip to remove the beveled edge before cutting the next triangle.
Assemblages
 |
 |
Next, I started joining all the triangles. I did the work on a small piece of MDF with a low fence, which helps with alignment. After gluing up all the pairs of triangles, and then joining those pairs into squares, I created the nine-square panels for the sides and lid of the box. Working with such small elements demands precision and delicacy. I found a pair of tweezers essential for lifting and positioning the triangles. The type of tape is also important: You want something that has enough holding power but doesn’t leave any residue or tear the veneer fibers when you take it off.


Veneering the cube

With the panels of veneer ready, I set them aside and made the box parts. The substrate is birch plywood, and the top and bottom edges of the sides and all four edges of the lid got lipped with solid ebony. After gluing that on, I trimmed it flush to the plywood at my router table. The panels, which were still slightly oversize at this point, were now ready to be veneered: geometric motif on the outside faces and black veneer on the inside ones. To press the veneer, I used F-clamps and 3/4-in. MDF cauls covered with clear plastic wrap to resist the glue.
|
|
|

With commercial thickness veneer, sanding is usually the best way to prepare marquetry panels for finish. But getting black dust into the pores of the white veneer would have turned the pristine white a dirty gray. So I opted to use a low-angle, bevel-up smoother sharpened just right. I made a planing stop that held the panels at a diagonal while I planed them; this way the grain direction of each little segment was presented at a 45° angle to the plane stroke, instead of having some parallel to it and some perpendicular. The flattening process worked flawlessly. Alternatively, you could use a sharp card scraper.

Once the marquetry panels were glued on, I applied the black veneer to all the parts of the cube and the tray. I ran the grain vertically on all the vertical surfaces. For the horizontal surfaces, I created an arrangement of triangles meeting in the center, each with its grain flowing toward the centerpoint.

Box building
|
|
|
With the veneering finished, I started constructing the box. I mitered the sides, beveled their top edge to receive the lid, and cut the dado for the box bottom. I rabbeted the bottom to make a tongue sized to the dado. I also cut a mortise into each edge of the bottom and glued in the magnets for holding the tray in place.

For assembly, I laid the four box sides outside face up and used a straightedge to align them. Then I taped them tightly together. After flipping them over, I used more tape to mask off about 1/8 in. along the inner edge of the miters to limit glue squeeze out. I used a little brush to spread the glue on one miter per corner. Then I quickly peeled the masking tape from the miters and folded the sides into a cube, capturing the bottom. Even pressure was provided by three strap clamps and MDF cauls that also protected the marquetry from damage.


When the box was cured, I adjusted the fit of the lid, which rests flush with the sides. It has no handle; the box is sized so your fingers span the lid, and you simply pinch it lightly and lift.

Next came the tray, which is built the same way as the cube—mitered sides and a bottom in a dado. Since all parts are veneered, it’s tricky to get a piston fit between the tray and the cube, so I postponed building the tray until the main box was complete. Then I could size the sides of the tray from a real measurement.

The very last step was to lightly chamfer all the sharp corners. They are beautiful and crisp but also fragile. I used a small sanding block made of MDF with a fine-grit paper glued on it.
Fine Woodworking Recommended Products

Whiteside 9500 Solid Brass Router Inlay Router Bit Set

Suizan Japanese Pull Saw
Bahco 6-Inch Card Scraper






Comments
Awesome. And humbling.
Log in or create an account to post a comment.
Sign up Log in