Make a wood shooting board plane
If you've made a wooden plane, all it takes is a few modifications to make your own shooting plane.
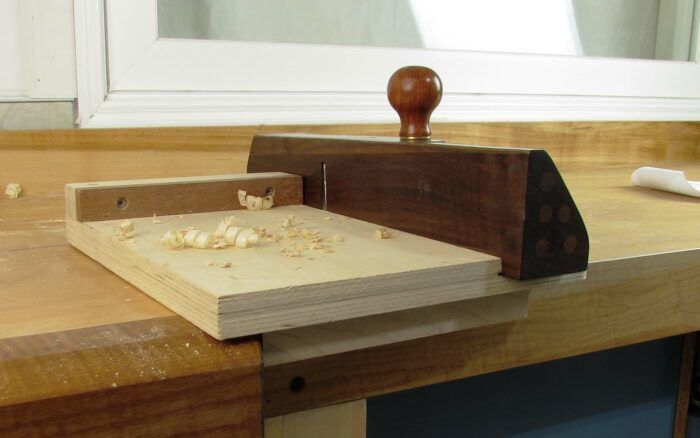
A dedicated shooting plane is on my “want” list, but these hefty specialized planes come with an even heftier price tag. So for now, I have decided to make my own wood shooting board plane. Like many woodworkers, I have made a number of wood planes. With some simple modifications it is very easy to make a wood shooting plane.
To do so, it is helpful to understand the four characteristics that distinguish a shooting board plane (as a dedicated single-purpose tool) from a regular plane.
- The shape of the plane, tote location, and positioning make it easier and more comfortable to use the plane on its side. A low-angle jack plane is quite often used for shooting. One typically grabs the plane body, but this is can be awkward and uncomfortable. As a work-around, you can buy an attachment handle (commonly referred to as a hot dog) that makes shooting with a low-angle jack more comfortable.
- The plane blade is typically skewed by 20°. This effectively lowers the cutting angle. It also creates a shearing action as the plane cuts through end grain. My wood shooting plane includes a skewed blade.
- The weight of the plane is increased to provide more momentum when cutting. The shooting planes from Lie-Nielsen and Veritas weigh 9 lb. and 7.75 lb. The weight is approximately double that of Lie-Nielsen and Veritas low-angle jack planes, which weigh 4.55 lb. and 5 lb. respectively. This extra weight increases momentum and improves cutting action, especially through end grain.
- A wide rectangular bearing surface is square to the cutting face. The center section of a standard plane is widest and then narrows down toward the front and back. At the beginning and end of the stroke there is a smaller bearing surface. If you are not careful, you can get some rocking of the plane. In comparison, a shooting plane has a wide bearing surface which provides stability throughout the whole stroke and helps prevent the plane from rocking. Also, since the bearing surface of a shooting plane is rectangular, a fence can be added to the outside of the shooting board. This provides a channel for the plane to slide in, and keeps it from wandering away from the shooting board.
I decided to use the Veritas plane blade kit which includes a Norris adjuster mechanism. The kit included instructions for making a wood-bodied plane. If you prefer a more traditional wood-bodied plane where blade adjustment is made by hammer taps, David Finck’s article “Wood Planes Made Easy” from FWW #196 takes you through the process of making this type of plane.
Either method can be used to make a shooting plane, so go with your own preference.
You will need to cut a blank of wood that once jointed and four-squared is 16 in. long by 2.5 in. tall by up to 3-15/16 in. wide, depending on the width of plane blade you decide to use.
Unfortunately, due to COVID-19, the larger plane kit is out of stock for some months so I used the smaller blade kit from my first prototype shooting plane.
Cutting the cheeks and the core
Since the plane is used on its side, it can be confusing to remember which face is the cutting face and which face is the bearing face. To help keep things in order, especially after you have cut the blank apart, mark a carpenter’s triangle on the cutting face (with the arrow pointing toward the front of the plane).
The blank is cut into three pieces: two cheeks and a center block. Saw off the top cheek side at 3/8 in. thick. The bottom cheek is cut at 1-1/4 in. thick. Joint the sawn faces. Joint and thickness the core so that it is 1/16 in. thicker than the width of the blade you have chosen to use. Once finally milled, the core should be 1/16 in. wider than the width of the blade you are using.
Preparing the front and back blocks
The core is divided into two pieces.
- The front block, which is milled to create the escapement.
- The back block, which is milled to create the 45° blade ramp and the slot for the cap screw (or the Norris adjuster mechanism if using a commercial wood plane kit).
The front block is cut at 6 in. long, the remaining back block at slightly less than 10 in. long.
Glue up the plane body and locate the cross pin
The two cheek pieces, front and back block are glued back together following the instructions to create the mouth opening for the blade. The carpenter’s triangle will assist you in getting the pieces back together. Following the instructions, locate the cross pin and drill the hole. Rather than make a wood cross pin with shoulder pins I prefer to use a ¼-in. brass pin. It simplifies the build since both cheeks can be glued up at the same time.
Mill the wedge. You now have a ready-to-use jack plane. The next few steps will turn it into a shooting board plane.
Cutting the wedge
Most commercially available shooting planes have the blade skewed at 20°. For ease of construction, I decided to skew my blade by 5° by cutting a wedge out of the bottom of the plane body. For all intents and purposes, this skews the whole plane 5°so I simply glue the offcut back onto the opposite side of the plane body.
The skew angle could be increased to 10° by using a 5° ramped shooting board.
Shaping the body
 The back portion of the plane body is shaped to make it more comfortable to hold when shooting. The shape was rough cut at the bandsaw then refined with a rasps and sandpaper. I also relieved the sharp edges of the blade opening to make it more comfortable to hold the plane when shooting.
Adding knobs
I added two knobs that I purchased from the “seconds bins” at my local woodworking store. They are screwed into the plane body with ¼-20 threaded inserts Alternatively, you can turn your own knobs or salvage the knobs from an old plane body.
The knob attached to the top of the plane body is located so that you can hook your thumb around the knob. Three fingers rest inside the blade opening and one along the top of the plane. I also added a chamfer to the front of the plane. This is an aesthetic item and is completely optional. I added a second optional knob to the side of the plane body at the front and a threaded insert at the back of the plane body. This way you can locate two knobs and use the plane as a regular jack or large smoothing plane.
Adding weight
 I wanted to make my shooting plane as heavy as possible. To do this I drilled a series of 13/32-in. holes into the front and back faces of the plane. I then cut and inserted steel rods into each hole. In total I inserted about 62 in. of 3/8-in.-dia. steel rod which added almost 2 lb. of additional weight to the plane.
After adding the steel rods my walnut bodied plane weighed in at 4.15 lb. Not as hefty as a metal bodied shooting plane but almost the same weight as a metal bodied low angle jack plane.
Wood Planes Made Easy
Make a smoothing plane to rival the best metal ones on the market
A Shooting Board in Action with David Finck
Essential hand-tool jigs for woodworkers
Fine Woodworking Recommended Products

Bahco 6-Inch Card Scraper

Starrett 4" Double Square

Lie-Nielsen No. 102 Low Angle Block Plane


Comments
I recently started making wooden planes with some success. Made a stab at a skewed shoulder plane, by milling an 18 degree angle on the blade edge and then a compensating angle on the plane bed to get the edge of the blade in line with the sole. Almost went crazy getting the angles right.
I have to say your method of cutting a wedge from the side of the plane is pure genius.
“[Deleted]”
Log in or create an account to post a comment.
Sign up Log in