Blanket Chest by Hand
Hand tools and white pine make it a treat to build this country classic
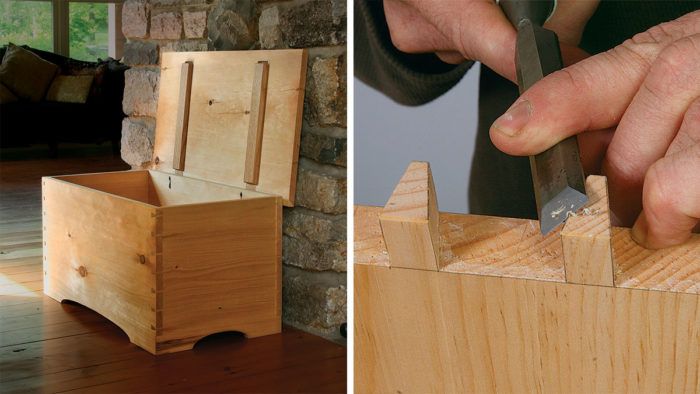
Synopsis: Country designs, like that of this blanket chest, fit into a wide variety of settings and are perfect projects to develop your hand-tool skills. This dovetailed chest is chock-full of challenging joinery but is not overwhelming. Andrew Hunter did everything by hand, including milling the lumber. But you could use a jointer and planer and begin the handwork later, starting with the grooves for the sides, adding the arches to the side pieces, cutting the dovetails and the rabbets, and doing the final smoothing before assembly. If you like, you can even create handmade hinges to attach the lid.
Trends in furniture come and go, but Early American country furniture endures. Country pieces, with their simplicity and practicality, can find a home in any setting, from an 18th-century farmhouse to a New York City loft. The clean, unpretentious designs, born of necessity, have an honesty that gives them lasting beauty.
But for a woodworker, the real beauty of country furniture is in the making. Everything from fine dovetails to clinched nails is appropriate as joinery, and eastern white pine—the wood of choice for so much Colonial furniture, and my choice for this chest—is a dream to work.
Country designs are ideal for building solely with hand tools, and the classic six-board chest is a great project for developing your skills. It is small enough not to overwhelm yet chock-full of enjoyable joinery. One can work without the pressure to be perfect. Imperfections and stray tool marks in a country piece only add to the feeling of authenticity. Although I’ll demonstrate using only hand tools, you can choose your battles depending on the skills you have or wish to develop.

Preparing the boards
My father and I sawed up a large white pine tree 10 years ago, and I’ve made a number of country pieces with those beautiful planks. But even though pine is my preference, any locally abundant, easily worked wood fits the bill for this project. And while I had the luxury of using full-width boards for my chest, you can always glue up narrower boards if wide boards are not available, matching two boards to look like one or simply using random boards for an uncalculated country look.
I milled all the stock for my chest with hand tools. Of course, you could mill your wood with a jointer and planer instead, and begin the hand-tool work after that. Once you have straight, flat boards, rip and crosscut the four main boards and the lid to their final dimensions. But leave the bottom boards and the lid cleats wide and long for now.
Construction work begins at the bottom
Start the joinery by laying out and cutting the grooves for the bottom boards and the cutouts that form the feet. Locate the grooves in the mitered section of the corner joints, so they can be through-grooves, which are much easier to cut. Plow these grooves before you make the cutouts so you still have the bottom edge of the sides to use as a reference surface. I used a grooving plane with a fence for this job. Alternately, you could use a panel saw with a guide block and a chisel.
For the full article, download the PDF below.
Fine Woodworking Recommended Products

Stanley Powerlock 16-ft. tape measure

Starrett 12-in. combination square

Get the Plan
CAD-drawn plans and a cutlist for this project are available in the Fine Woodworking store.


Log in or create an account to post a comment.
Sign up Log in