Skip to content
Fine Woodworking
Main Menu
Subscribe
GET THE MAGAZINE & MORE
Magazine Cover
  • Save 69% off the cover price
  • Or, get everything with UNLIMITED, including 40+ years of the online archive.
Subscribe Now!
Subscribe
  • Projects & Plans
  • How-To
  • Shop Tips
  • Tools & Materials
  • Videos
  • Magazine
  • Video Workshops
  • Members
  • Forum
  • Gallery
  • Blogs
  • More
    • Log In
    • Join
    Fine Woodworking Main Menu Subscribe
    Design. Click. Build

    A Little Iron Work — Some Quick Twisted Spindles

    Author Headshot By David Richards Jun 11, 2011
    Article Image

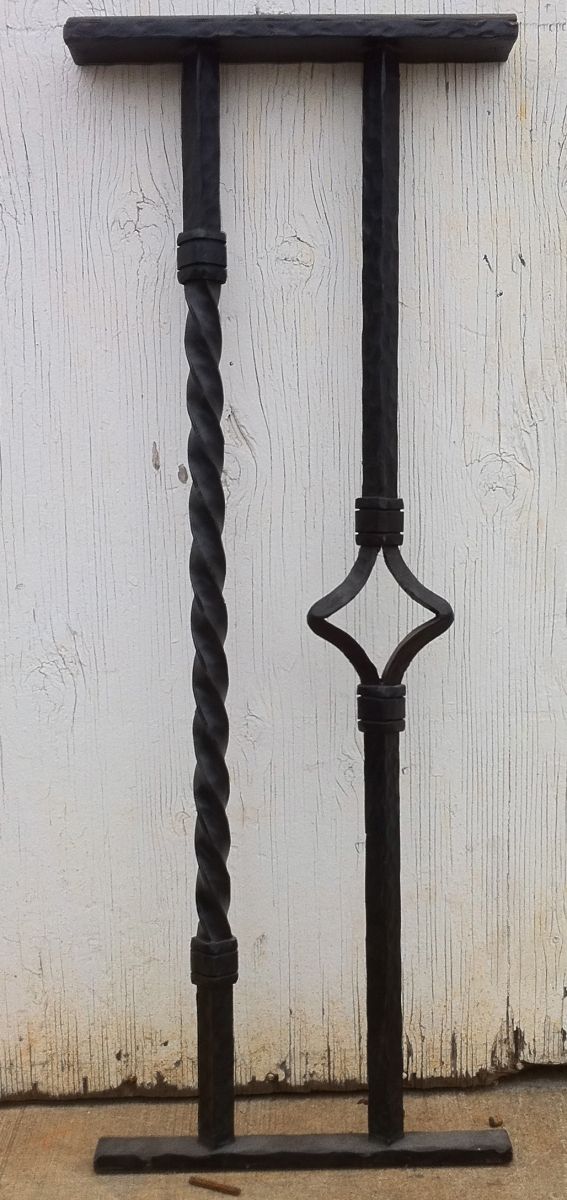
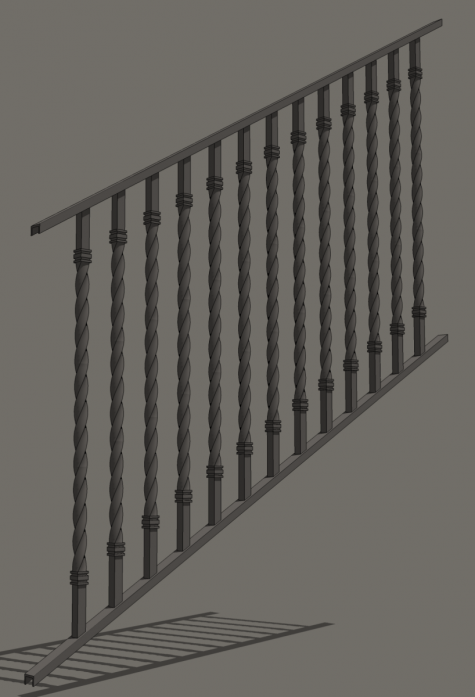
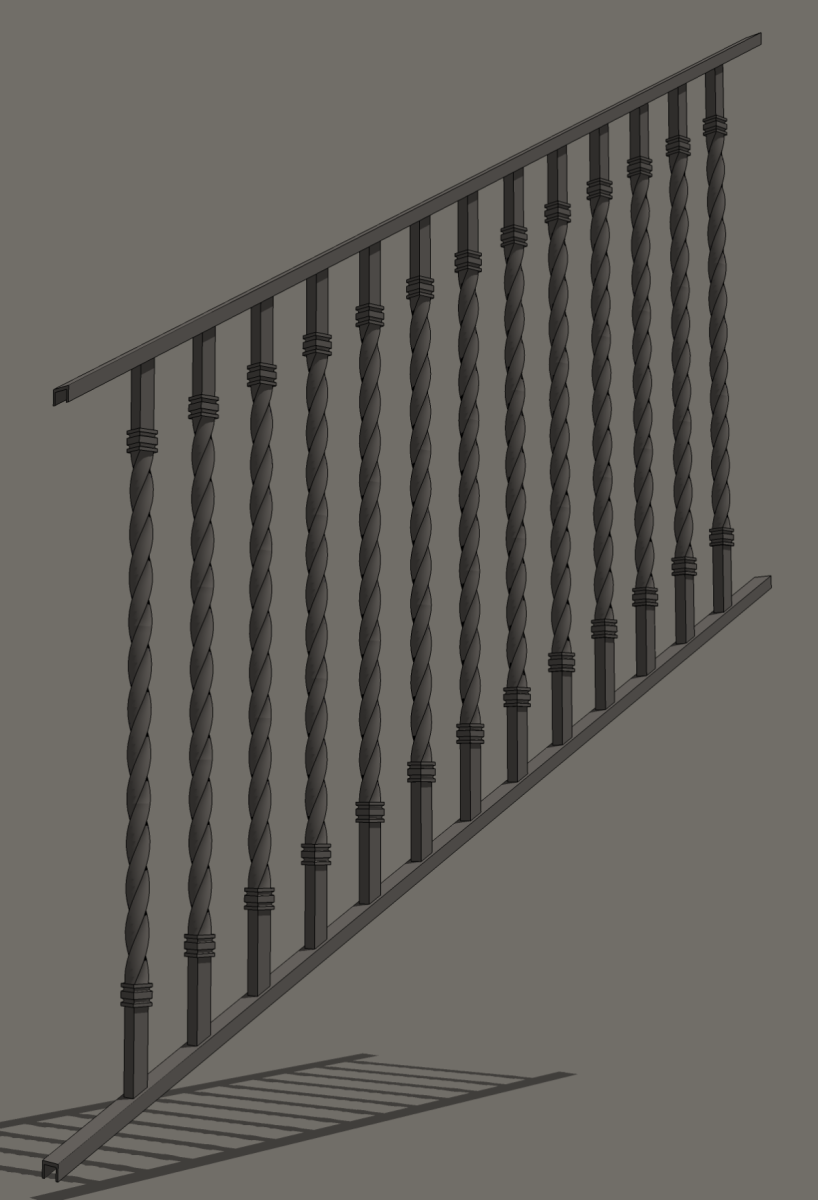
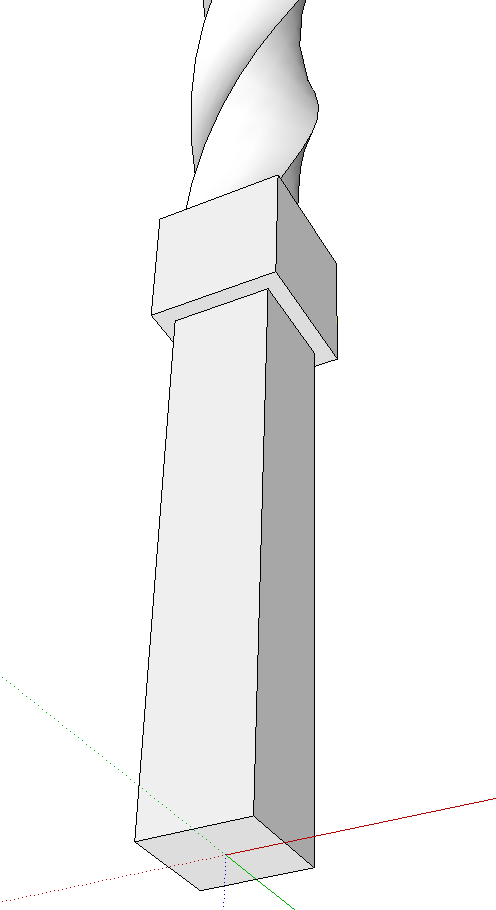
    This afternoon a friend asked me if I had a good way to draw twisted iron spindles similar to the one on the left in the photograph. I hadn’t really thought about drawing an iron railing before but I realized that drawing these twisted spindles could utilize a method similar to the finials I drew a little while back.

    Three plugins will help to make quick work of this. They are DrawHelix 1.4, Weld and Extrude Edges by Rails. I’m also going to divide the spindle into smaller components to keep the file size down. I think this is important since in a typical model, the spindle would only be a small part of the entire thing.

    In this example I am creating a spindle that is 3/4 inches square.

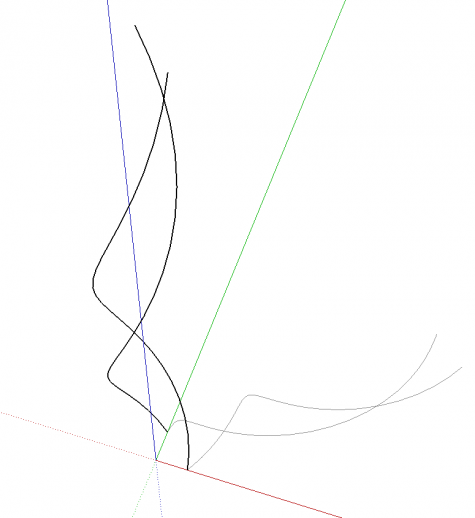
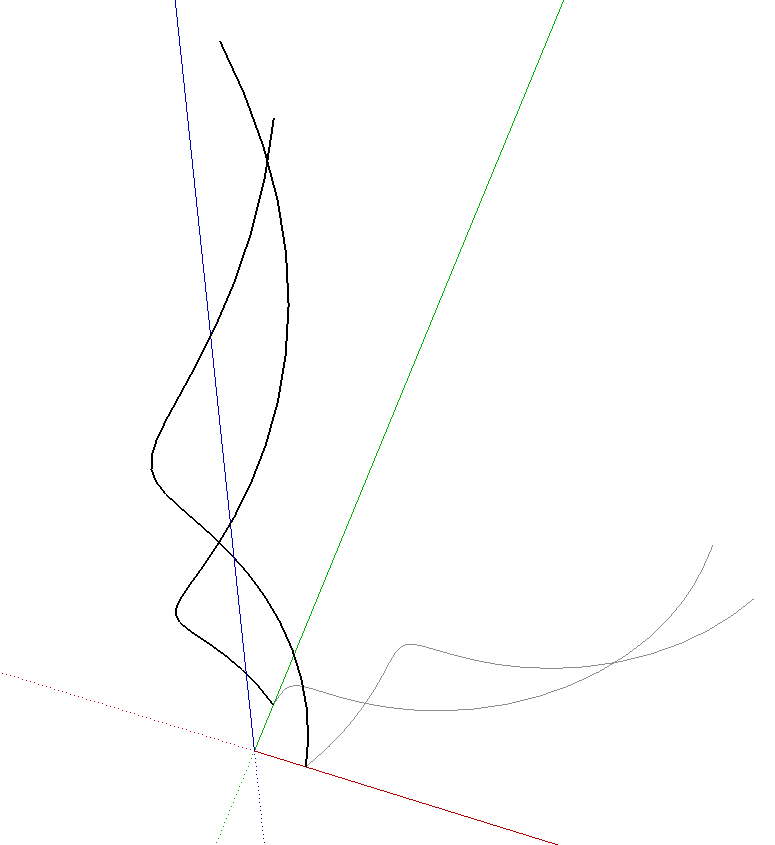
    The first step is to create the helixes for the twist. I activated DrawHelix from the Draw menu. The plugin asks for start and end radii, pitch and the number of turns. I calculated the radius by multiplying 3/4 by 0.707. I set Pitch to 8 inches and set the number of turns to 1. The helix is drawn as a group centered on the origin and starting on the red axis. Next I rotate/copied it through 90°.

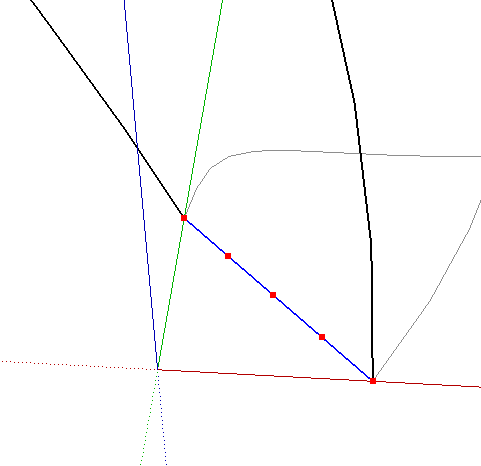
    Next, with the Line tool, I drew a line between the bottom ends of the two helixes. I then divided the line into four segments and immediately after, I welded the segments together. Although the line will look the same as before this divide and weld step is required for the Extruded Edges by Rails step coming up. I chose to divide the line into four but it could have been 2 or more. The more segments you choose, the smoother the twist will be but that comes at the cost of a larger file size.

    The helix groups were exploded and then the entire model was scaled up by a factor of 100. I drew a 1 inch long line off to the side a bit and measured that with the Tape Measure tool. I typed 100, hit Enter and clicked on Yes. Later, when it is time to scale back down, I just repeat the process but type 1.

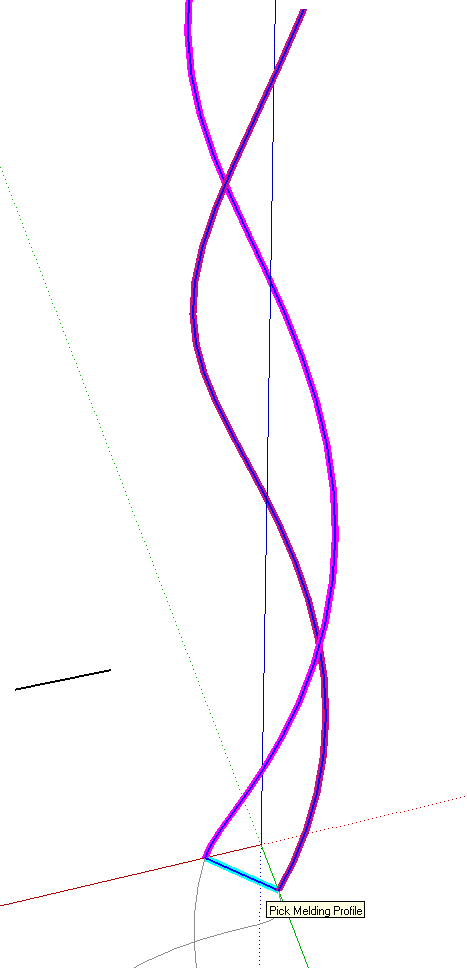
    Now it is time to start the extrusion. Activate Extrude Edges by Rails from the toolbar. The plugin directs you to first select the profile, then the first rail followed by the second rail and finally it asks for a melding profile. The line at the bottom is the profile. After it is selected it shows in cyan. The helixes are the rails and show in two shades of magenta after they are selected. For this profile, we’ll click on the profile line for the melding profile.

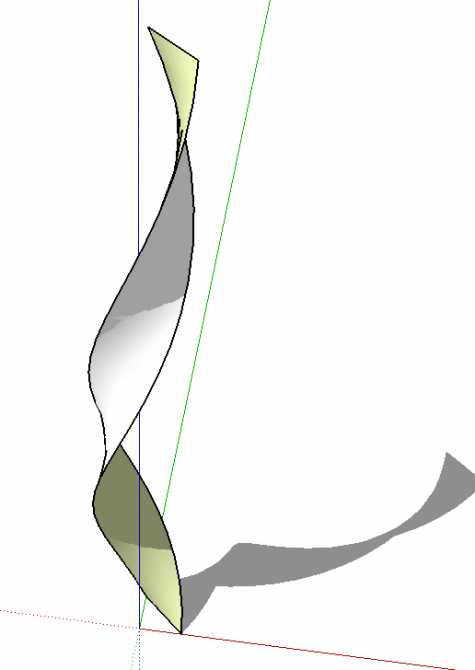
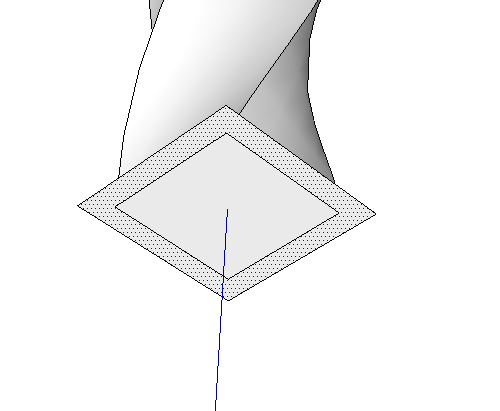
    After the extrusion is made you have to make some choices. Most of the answers will be no but you should answer Yes to deleting coplanar edges, reversing faces if the back face is on the outside, smoothing edges and deleting original lines as those are no longer needed. the extrusion is made as a group.

    Scale the model back down at this point. Then explode the group and make it a component. Doing this after scaling back down ensures that the component definition is set at the correct size.

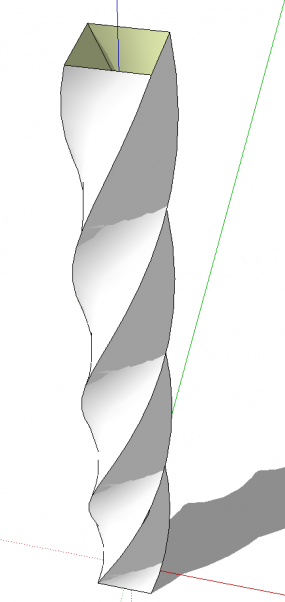
    Rotate/copy the component 90° and make three copies to complete the four-sided twist. We now have a twisted square section that is 8 inches long.

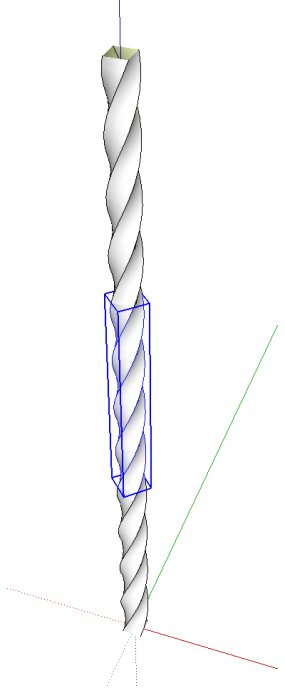
    Make a Move copy the four sides up 8 inches and make two additional copies. Now we have a 24 inch long twist with three turns. The spindles overall length is to be 34 inches so I moved the twist components up 5 inches.

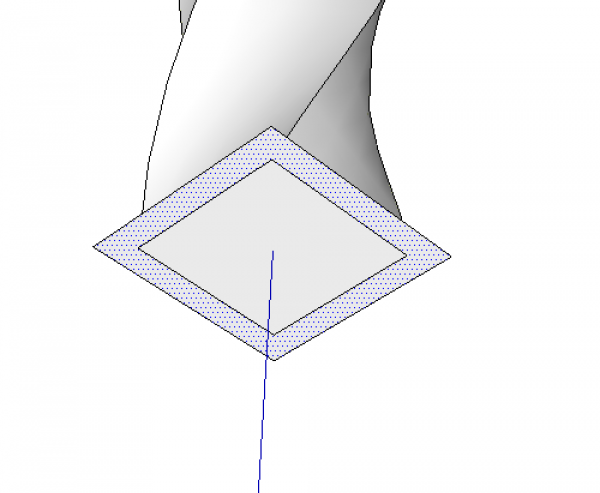
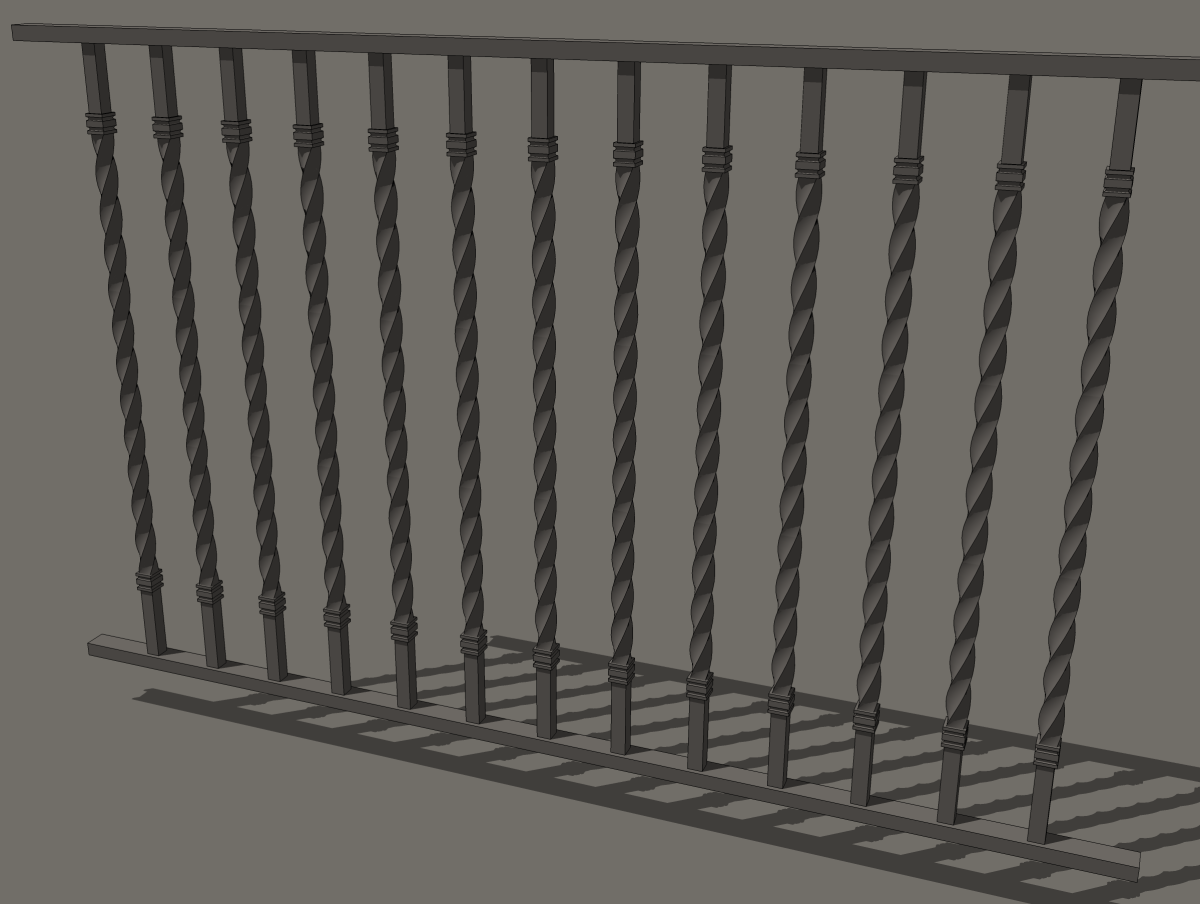
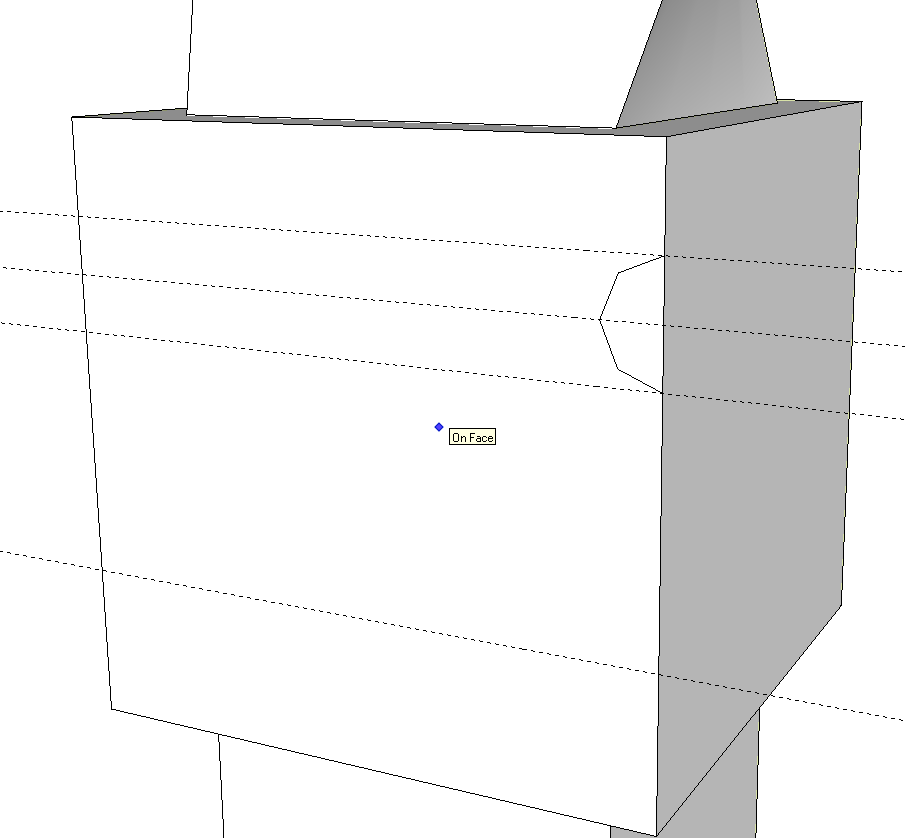
    For the ends of the spindle I drew a square across the end of the twisted portion. Then I made a 1/8 inch Offset to the outside.

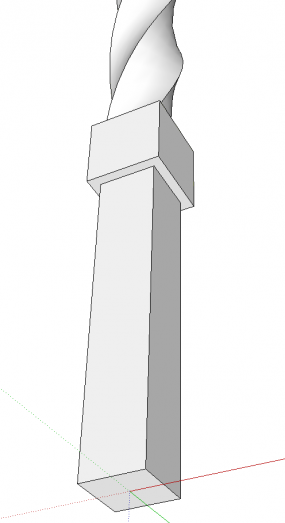
    I used Push/Pull to pull the outside down 1 inch and the center down 5″.

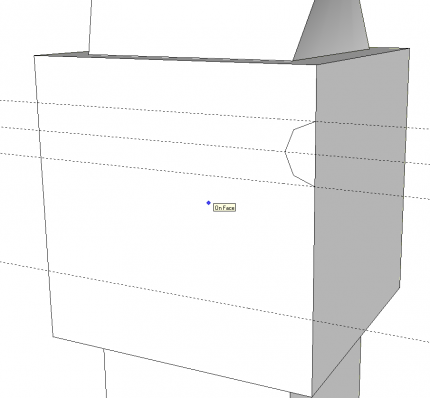
    To create the grooves around the square block I drew an arc to create a profile for Follow Me. Note the arc only has 4 side instead of the default 12. the grooves are very tiny details and don’t need a lot of segments to read correctly in the drawing. Reducing the segment count here helpd to keep file size down.

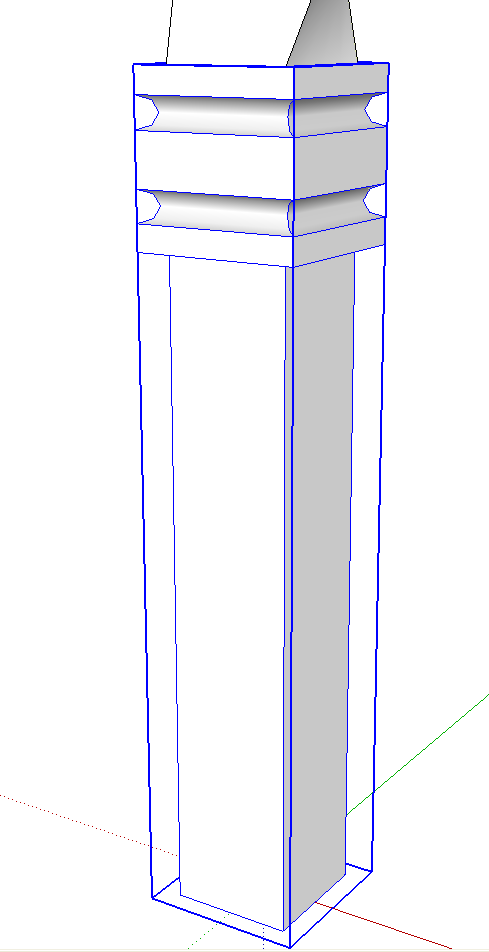
    The arc is copied down for the second groove. Follow Me is run around the block to create both grooves and the spindle end is made into a component.

    The spindle end is copied to the top and flipped along the component’s blue axis. Then all of the components are selected and a nested component is created. This component is then saved for later use.

    The spindle component drawn as I have done here makes a component that is only about 47 Kb. If it were drawn without using components for sub-assemblies, it saves out at over 450 Kb. By itself that’s not all that large but when combined with other parts in a larger model, the total file size could get to be quite large. A component of less than 50 Kb will have miniimal effect on the overall file size.

    Dave

    Sign up for eletters today and get the latest techniques and how-to from Fine Woodworking, plus special offers.

    Sign Up

    Get woodworking tips, expert advice and special offers in your inbox

    Sign Up
    ×
    X
    X

    New Feature

    Fine Woodworking Forums

    Ask questions, offer advice, and share your work

    Get It All!

    UNLIMITED Membership is like taking a master class in woodworking for less than $10 a month.

    Start Your Free Trial

    Subscribe to Fine Woodworking

    Save up to 56%

    Subscribe

    Comments

    1. mrossk | Jun 11, 2011 02:03pm | #1

      Very elegant Dave, thanks! Quick question- what is the ".707" you used when calculating the radii? My trig is very dusty...
      Thanks again,
      Michael

    2. DaveRichards | Jun 11, 2011 02:27pm | #2

      Thank you Mchael.

      And you thought that trig uyou learned in high school would never be used for anything. :)

      If the square section is 1", the distance between the center and the corners is 0.707". See http://flic.kr/p/9SnEbZ for reference. So for any square, the center to corner distances is the length of a side multiplied by 0.707.

      Dave

    3. strofe | Jul 21, 2011 12:55am | #3

      Dave, I can't thank you and Tim enough for all that you have taught me about SketchUp. I work with metal for a living. BTW, I'm in Minnesota also.I was able to draw a 'twist' with your instructions. I was wondering if you could take the metal baluster one step farther and draw a classic 'basket', the kind of egg-shaped cages that are often used as baluster accents. Scott

    4. DaveRichards | Jul 21, 2011 01:25am | #4

      Hi Scott, it's good to know we've helped. Thank you for letting us know.

      As to your question about the basket, would you be able to send me an image of something like you have in mind. I have several thoughts about an approach for that sort of thing.

      -Dave

    5. DaveRichards | Jul 21, 2011 01:54am | #5

      Scott, would this sort of thing be what you have in mind? http://flic.kr/p/a5Bzcx

    6. strofe | Jul 22, 2011 11:27am | #6

      Dave, Your example is the general idea but I'm trying to draw one made with square stock. I have created a marginal helix, but when I use the follow me tool to extrude it the orientation of the far end does not come out parallel (square not indexed to the start plane). I also tried Shape Bender, but it was completely confused. I have a scanned image from a catalog of what I am trying to create, what is the best way to get it to you? Thanks, Scott

    7. DaveRichards | Jul 22, 2011 11:52am | #7

      Scott, you could e-mail the image to me. click on my name at the end of any blog post.

    Log in or create an account to post a comment.

    Sign up Log in

    More Design. Click. Build

    View All
    • Custom toolbars in SketchUp

    • SketchUp to shop: Coopered container

    • Working with nested SketchUp components

    • An inside-out turning

    View All

    Up Next

    Featured Workshop

    Shaker candle stand with Christian Beckvoort

    He’s built dozens of round Shaker stands over four decades, so there is no one more qualified than Christian Becksvoort to demonstrate making this classic. In this seven-part video series,…

    Featured Projects & Plans

    Build a Contemporary Sideboard

    Chris Gochnour's sideboard combines usefulness, strength, and beauty in a contemporary case piece

    Related Stories

    • Milling parts for perfect drawers

    • Webinar: Systematic handplaning with Bob Van Dyke

    • Custom toolbars in SketchUp

    • How to Make a Tabletop Float

    Discussion Forum

    Recent Posts and Replies

    • |
    • |
    • |
    • |
    • |
    • |
    View More Create Post

    Member Exclusives

    More Member Exclusives
    • How to Make a Tabletop Float

      Simple and sturdy joinery allows the top of David Welter's table to float without overshadowing the rest of the design or blocking the flow of light between base and top.

    • tune up block plane

      How to tune up your block plane

      Whether your block plane is new or vintage, follow these steps to get it running at full capacity.

    • Simple dovetailed Box

      Milling Stock for a Dovetailed Box

      How to mill parts for a box that are straight, flat, and square.

    • wiping varnish finish

      How to brush on a varnish finish

      A wiping varnish goes on easily and creates a tough surface ready for rubbing out.

    Highlights

    • Shape Your Skills

      when you sign up for our emails

      Plus tips, advice, and special offers from Fine Woodworking.

      Sign Up
    • Shop Talk Live Podcast

      Shop Talk Live Podcast

      Our biweekly podcast allows editors, authors, and special guests to answer your woodworking questions and connect with the online woodworking community.

    • Woodpecker Sweepstakes

      Woodpeckers Shop Upgrade Giveaway

      Enter now for your chance to win more than $2,000 worth of woodworking equipment from Woodpeckers. Click for full details.

    • Staff Picks Blog

      Our favorite articles and videos

      We have created these special content collections organized to give you a deep dive into a range of topics that matter.

    From the Store

    View More
    • Complete Illustrated Guide to Woodworking USB

      Buy Now
    • 52 Boxes in 52 Weeks

      Buy Now
    • The Why & How of Woodworking

      Buy Now
    • 2020 Fine Woodworking Archive

      Buy Now
    View More

    Get the latest from Fine Woodworking Magazine

    • #289-May/June 2021

      • Arts and Crafts coffee table with story-book charm
      • Links from Fine Woodworking issue #289
      • Seven tasks for a block plane
    • #288-Mar/Apr 2021

      • Phil Lowe: A craftsman and gentleman
      • Online Extras from FWW Issue #288
      • Phil Lowe: craftsman, teacher, friend
    • #287-Jan/Feb 2021

      • Simple, handsome 17th-century box
      • Online extras from FWW issue #287
      • Editor's letter: Finding sanctuary in the shop
    • #286-Tools & Shops 2021

      • Shoulder plane setup and use
      • Online extras from FWW issue #286
      • From the editor: A shop to call home
    • #285-Nov/Dec 2020

      • Make a dovetailed desktop organizer
      • Online Extras from FWW Issue #285
      • Announcing FWW ambassadors

    UNLIMITED membership - Get access to it all

    Start Free Trial Upgrade Membership

    Fine WoodWorking

    Follow

    Newsletter

    Get woodworking tips, expert advice and special offers in your inbox

    Sign Up

    Membership & Magazine

    • Members
    • Digital Libraries
    • Join Unlimited
    • Magazine Subscription
    • Magazine Renewal
    • Gift a Subscription
    • Customer Support
    • Manage Preferences

    Taunton Network

    • Fine Homebuilding
    • Green Building Advisor
    • Fine Gardening
    • Threads
    • About
    • Contact
    • Advertise
    • Privacy Policy
    • Careers
    • Copyright
    • Terms of Use
    • Accessibility
    • California Privacy Rights

    © 2021 The Taunton Press, Inc. All rights reserved.

    Get instant access to over 100 digital plans available only to UNLIMITED members. Start your 14-day FREE trial - and get building!

      Main Menu

    • Projects and Plans
    • How-To
    • Shop Tips
    • Tools & Materials
    • Videos
    • Gallery
    • Magazine
    • Video Workshops
    • Members
    • Forum

      Popular Topics

    • Design
    • Small Projects
    • Beds
    • Chairs, Benches And Stools
    • Built-ins
    • Storage And Shelves
    • Cabinets
    • Carving
    • Casework
    • Desks
    • Tables
    • Shop Storage And Furniture
    • Woodturning Projects
    • Workbenches
    • Surface Prep

      More

    • TV
    • Forum
    • Blogs
    • Webinars
    • Podcasts
    • Customer Support

      Account

    • Log In
    • Join

      Magazine

    • Current Issue
    • Past Issues
    • Digital Libraries
    • Magazine Index
    • Subscribe

      Membership

    • Member Home
    • Start Free Trial
    • Gift Unlimited
    • Log In

      Shop the Store

    • Books
    • DVDs
    • Taunton Workshops

      Events

    • Fine Woodworking Live
    • Fine Woodworking HANDS ON

      Account

    • Log In
    • Sign Up

    Newsletter

    Get woodworking tips, offers, and expert advice in your inbox

    Sign Up

    Follow

    UNLIMITED

    Become an UNLIMITED member and get it all: searchable online archive of every issue, how-to videos, Complete Illustrated Guide to Woodworking digital series, print magazine, e-newsletter, and more.

    Start Your Free Trial

    Upgrade Membership