Cutting Small Parts on the Table Saw
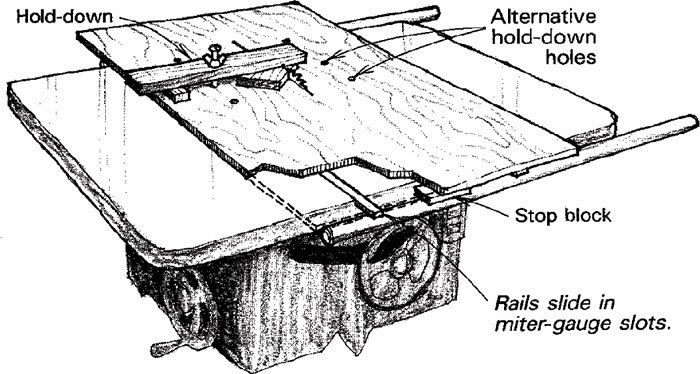
I made this fixture to cut parts for small models and miniature furniture. It works so accurately and safely that I cut even conventional-size parts with it instead of using the miter gauge.
The fixture is made from a piece of plywood that is 8 in. to 14 in. longer than the table, depending on the length of cuts you plan to make. Screw hardwood runners underneath the plywood to slide in the miter-gauge slots, and screw stop blocks at both ends of the underside to prevent accidentally cutting the fixture in two. With the fixture in place, raise the blade through it to cut the blade slot.
Drill several hold-down anchor holes through the plywood and install 3/8-in. T-nuts underneath. I have various anchor locations on my fixture to suit my individual operations. A small wood scrap will serve as a hold-down. Bore a hole through it for a 3/8-in. bolt, and thread a wing nut over the bolt before putting it through the wood block. Place the workpiece under the hold-down near the blade and place a block the same thickness as the workpiece at the other end of the hold-down just tighten down on the wing nut to hold the workpiece in place.
I’ve found the hold-down applies enough force to lock the workpiece in place in just about any cutting operation, and my hands never come near the moving blade.
Fine Woodworking Magazine, June 1988 No. 70

Fine Woodworking Recommended Products
Makita SP6000J1 Track Saw
Craftsman Random Orbit Sander

Suizan Japanese Pull Saw




Log in or create an account to post a comment.
Sign up Log in