Shopmade Tenoning Jig
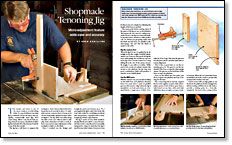
Micro-adjustment feature adds ease and accuracy
Synopsis: Brad Schilling built a tenoning jig that included all the features found on many store-bought models. The jig he explains here has a tall fence, a heavy hold-down, and a threaded rod with a crank to allow easy and accurate adjusting of the workpiece relative to the blade. Along the way he share tips for minimizing tearout and creating a smooth-gliding action, all for about $40. Use his detailed project plans to build your own.
The mortise and tenon is one of the most common woodworking joints. So a good tablesaw tenoning jig is a valuable tool for the shop. But topquality, commercially made jigs don’t come cheap. When I was faced with cutting a bunch of tenons, I decided to build a jig that included all of the features found in a top-of-the-line model.
The jig has a tall fence to support the workpiece. And a heavy-duty hold-down keeps the stock securely in place. To minimize tearout, a narrow piece of scrap stock can be temporarily clamped in front of the workpiece. The jig slides smoothly along the table of the saw without side-to-side play. And a threaded rod with a crank allows easy and accurate adjustment of the workpiece relative to the blade.
Once I worked out the design and bought the parts (see Sources on p. 75), I put together the jig in only a few hours. My total cash outlay for everything was about $40, inexpensive compared with a storebought jig with the same features.
The jig is made of 3 ⁄4-in.-thick mediumdensity fiberboard (MDF), a smooth material that tends to stay flat and is reasonably inexpensive. Keep in mind that the jig is sized for my Delta Unisaw. However, it can fit almost any saw simply by adjusting the length of the base as needed.
One more point before starting. Most of the parts of this jig are cut on the tablesaw. That means the saw must be cutting accurately. If it isn’t, the jig won’t have the builtin precision that’s needed to make perfect cuts. So, before you get going, make sure the blade and rip fence are parallel to the miter-gauge slot and that the blade is square to the table.
Rip the runners first
When the jig is in use, it’s guided by an ultrahigh molecular weight (UHMW) plastic runner (see Sources) that travels along the saw’s miter-gauge slot and fits in a groove in the jig’s base. Cut the runner for a snug sliding fit in the slot. If the runner doesn’t fit snugly, it can shift as it slides. While you’re at it, cut the two plastic runners that mount to the platform. By the way, any good combination blade will produce a smooth cut in UHMW plastic.
From Fine Woodworking #154
For the full article, download the PDF below:
Fine Woodworking Recommended Products

Blackwing Pencils

Bessey EKH Trigger Clamps

MicroJig Matchfit dovetail clamps


Log in or create an account to post a comment.
Sign up Log in