Shopmade Marking Gauge
Simple but clever design makes this wide-fenced tool accurate and easy to use
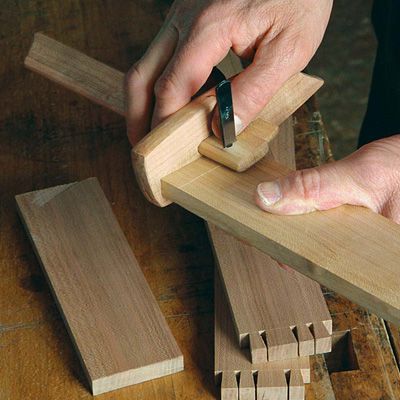
Synopsis: John Nesset shares his experiences with a variety of marking gauges and reveals why some work well and others do not. He explains how to make his favorite, a kebiki, or a type of Japanese marking gauge, out of hardwood and a steel blade. Adjusting the gauge with one hand is a snap. He offers tips on how to safely sharpen the blade and replace the wedge.
When I set out as a woodworker, a marking gauge was one of the first tools I bought. A straight line parallel to a straight edge is— along with a perfect right angle—the foundation of woodworking. No matter how you eventually shape a piece, if your layout lines aren’t true, that table will not stand level, that drawer will not open smoothly, and those joints will be sloppy. After examining several marking gauges, I chose one made of rosewood with brass hardware, inlaid brass wear plates and graceful scrolling on its faces. It was a handsome tool that came in a nice box. However, I found it difficult to use.
For one thing, making adjustments required tightening and loosening a thumbscrew, an awkward procedure when I also had to hold the fence in place. In use, it was difficult to keep the short fence running snug against the edge of the board. Hard or soft spots in the wood and diverging grain patterns grabbed the pin and made it skip or go off track. I usually had to go over lines several times, with miscues marring the stock.
About that time, back in the mid-1970s, Japanese tools began to appear in the popular woodworking catalogs. I marveled at their simple but clever designs, but I didn’t find many of them adaptable to my Western woodworking techniques. There were, however, two notable exceptions. The first was those wonderful, precise pull saws, and the other was the kebiki, a Japanese marking gauge. My first pass with it was a spiritual moment.
Easy adjustment and no skipping
The kebiki is a perfect piece of engineering. A wedge holds the fence in place on the arm. Precise adjustments are made by tapping one end of the arm or the other on the workbench while holding the kebiki in one hand and checking against a measuring device or workpiece held in your other hand. And the marking process is troublefree, thanks to the long fence and the design of the pin.
The pin is actually a small knife that is beveled on one side—away from the fence—and set in the arm at a slight angle. The result of this design is that the blade wants to pull away from the fence, drawing the gauge snugly against the workpiece. Irregularities in the wood will not divert the sharp blade, and it leaves a clean mark.
From Fine Woodworking #150
For the full article, download the PDF below:
Fine Woodworking Recommended Products

Starrett 12-in. combination square


Veritas Precision Square


Log in or create an account to post a comment.
Sign up Log in