TLC for Spray Guns
Simple cleaning and lubrication keep a spray gun in top form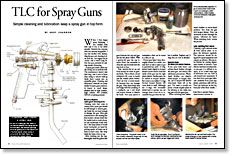
Synopsis: Without careful maintenance, it won’t be long before a spray gun starts spitting. Andy Charron explains here how to maintain your sprayer equipment, be it high pressure, high volume (HVLP), low pressure, or turbine-powered. He uses old toothbrushes and fresh toothpicks to remove gummy finish without damaging the gun. You need to take special steps for when you switch finishes, and lubricate anything that moves. He also shows how to clean the gasket, clear the air passages, and remove the air cap and fluid nozzle.
When I first began spray finishing, I was thrilled with how easy it was to lay down smooth, blemish-free topcoats with any material imaginable. I was less thrilled with dismantling the gun and cleaning it after each use. I let neglect run its course, and it wasn’t long before the gun protested by spitting instead of spraying.
A spray gun needs a little tender, loving care to perform well. The maintenance doesn’t take that long, and it sure is faster than trying to remove built-up finish that’s turned into an epoxy like glaze. Cleaning and lubrication methods are pretty similar for spray guns commonly found in small shops, whether they be high pressure, high volume low pressure (HVLP) or turbine powered.
Wood toothpicks make good cleaning tools
Cleaning tools that come in contact with a spray gun should be stiff enough to remove gummy finish but not hard enough to damage the gun. Most gun manufacturers sell cleaning kits that include a skinny brush that fits inside hard-to-reach places. An old toothbrush works well, too. I also keep plenty of round wood toothpicks on hand for picking specks of finish out of hard-to-reach areas, like deep inside the horns of an air cap.
After washing out the cup, thoroughly clean the gasket that goes between the cup and gun. With a gravity-fed gun, the cup remains fixed; just remember to clean the cap and make sure the vent hole is clear.
Next, unscrew the air cap and look around for dried or gummy finish. This is where a wood toothpick will come in handy (see the middle photo below). Don’t use wire or metal materials because they can damage the gun. If the dried finish does not budge with the prodding of a toothpick, use a soft brush and lacquer thinner to dissolve the finish. Poor spray pattern or atomization often can be traced to a dirty air cap.
If your gun hasn’t been thoroughly cleaned in a while, you may have to take it apart to get at gummed-up parts. A long, skinny brush dipped in lacquer thinner can be used to clean the inside of the gun. Smaller parts can be soaked in lacquer thinner. But remove any rubber O-rings because lacquer thinner will cause them to swell. Although the O-rings will eventually shrink back to normal, you can damage them if you try to reassemble the gun when the rubber is swollen. Replace any O-rings that are torn or abraded.
From Fine Woodworking #136
For the full article, download the PDF below:
Fine Woodworking Recommended Products
Bosch 12V Trim Router
Bumblechutes Bee’Nooba Wax
Fein Turbo II HEPA Wet/Dry Dust Extractor




Log in or create an account to post a comment.
Sign up Log in