
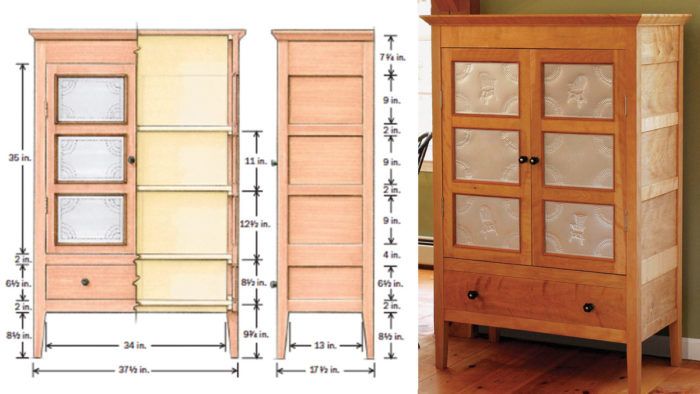
This piece is called a pie safe, but you won’t find a combination tumbler or padlock on it. It is a free-standing cupboard based on ones that 19th century families used to keep little critters out of their pastries and other treats. The form stuck around even after refrigerators showed up because it looks good and works well as a sort of pantry. Folks nowadays use them to keep dishes, dry goods and other useful kitchen items. You could still put a pie in there, if you wanted to.
Either way, it’s a handsome piece, with frame-and-panel construction for the doors and case and a bit of tablesaw genius to cut the crown molding.
The free download includes an exploded drawing of the piece, with dimensions, plus Mike Dunbar’s full article explaining how to build it. Also included are detail drawings of the joinery and the cutting sequence for the unique tablesawn crown molding, plus a sidebar on creating the punched tin panels for the doors….Pies not included.


Comments
Free plans won't download.
They downloaded fine for me. I owe my wife a pie-safe. I have another set of plans, but may make this one instead.
The link works for me.
worked for me
If you are interested in seeing a collection of pie safes, the Museum of the Shenandoah Valley has a special exhibition. They may inspire your own adaptation of the design. They are located in Winchester, VA
Are the free plans shown in the PDF article? If so, they are really more sketches and missing some much needed detail. Is there perhaps, another file to be downloaded. I have the PDF with the text and included sketches but haven't found any other files. If you know where they are, please advise. Also, I'm building Sketchup drawing from the information provided in the PDF. I'm willing to share.
Hi Johnny, I'm also planning to build this and would appreciate any advice/help. Like you, I'm trying to draw it in Sketchup first. If you have a rendering I would much appreciate a copy. Also, trying to figure out why he used 1/4" tenons vs 1/2" that would also match the rabbits that capture the panels.
Dave
I did a search in the Taunton Store for plans and didn't turn up anything. If I were going to build this I would do the same thing you are doing and model it in detail in SketchUp. Not only will that help you confirm the dimensions that are given, you'll be able to infer the dimensions that are explicitly called out and by the time you get to the shop, you'll know the project inside and out and you should find it much easier to build.
Dave
Log in or create an account to post a comment.
Sign up Log in