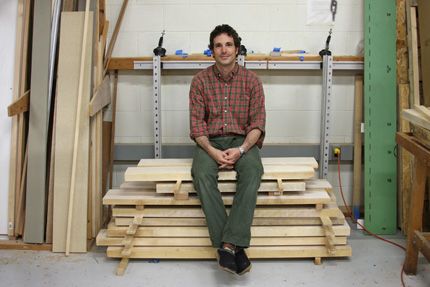
Look closely. I'm seated atop a new workbench.
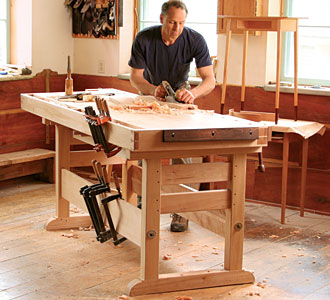
New Video Workshop in Production: Intermediate Workbench
It’s not easy to come up with a new workbench Video Workshop project each and every year. Fact is, reinventing the basic tried-and-true form of the traditional cabinetmaker’s bench is a real head-scratcher. Why fix something that ain’t broke?
 This year, I decided to lay out a specific set of criteria for a workbench, and really stick to it. You can see one of the early rough sketches at left. Here are the four main objectives used to come up with this year’s project:
Price: I didn’t want to build a “break the bank” type of bench, costing upwards of $2,000. Rather, I set my sites on coming in at under $1,000, while still coming away with a dead-serious workbench that will last for generations.
Size: When it came to size, I took into account the fact that a lot of us hobbyist woodworkers don’t have gobs of extra space floating around our homes. While a six-foot bench might be a wee bit long, a four-footer would most certainly be too small for serious work. In the end, I came out in-between.
Storage: Again, space (at least for me) is at a premium, and I didn’t want to waste the open area between upper and lower stretchers, so I’ve opted to incorporate some sort of tool storage down below, with a couple of additional “funky” storage techniques yet-to-be announced.
Materials: I broke the materials up between benchtop and trestle assembly. On the top, I decided I wasn’t willing to sacrifice one bit. Hard maple was the way to go. That said, down below I was able to save a few bucks by opting for soft maple, which is still hard as nails, yet a wee bit cheaper at my hardwood dealer. Bottom line: you don’t need to construct a bench entirely out of hard maple.
Look for this project in late August/early September
Shooting of the Intermediate Workbench Video Workshop is set for mid-June. After that, you’ll have to give us a couple of months for editing. You can expect the series to air at the end of this summer.
 |
More on Workbench-Tech |


Comments
I look forward to it. I'm a rookie woodworker, who built my bench last year and unfortunately let a non-woodworking Home Depot lumber guy convince me I didn't have to follow the woodworking plan I'd brought with me (he didn't know how to read the cut list). It didn't take long for me to find out my bench was greatly lacking in a few key areas.
I don't have a lot of $ either, so I'm hoping I'll be able to afford the lumber to build your bench.
Thanks!
I just finished my new workbench, 8' long, 26" wide, 37" tall and built from German Beech. The total cost was less than $700. I'm convinced you don't have to spend huge dollars for a great bench.
ctsr: Beech is an awesome choice, and one that I considered. I very nearly built the base out of that species. Not only is it reasonably priced, but quite frankly, it's got a really interesting grain to it!
Cheers,
Ed
It's a very practical design. Never understood why more makers didn't install cabinets in the base, as they make good use of otherwise wasted space and keep frequently used tools and supplies conveniently at hand. I built a similarly configured, though somewhat larger (2' x 6'), bench over 20 years ago. Tight budget so used leftovers: laminated layers of 3/4" maple plywood for the top (edged with 3/4" maple), and glued up recycled 2x material from a former deck for legs and stretchers. Two banks of four drawers each greatly expanded storage in my small shop. Deep drawers on the bottom row for hand-held power tools, a pair of shallow drawers on top for pencils, rasps, small parts (also serve as tool trays when needed), and four mid-size drawers in the middle for sandpaper, saw blades, hand tools. Has a bench vise, no end vise or tool tray, but there's room for bench dogs and small tools between cabinet and top. Shallow mortises under the top register over short tenons on the legs, making it a little easier to relocate--movers still complained about the heft during its two moves. Always figured I'd get around to making a proper solid maple top, but this one's still holding up well.
Timing is everything (sigh). just putting oil on my new bench lol.
Well, cramped shop and an even tighter budget.
left me with a 2.5x24x60 hard maple top,and I used selected framing lumber from the borg to make 3" square legs/feet for the base. total cost was $340.
Now just have to wait a bit to save for the vise hardware, should bring the whole thing in for 500.
used the same idea to space top and bottom stretchers so eventually can make some storage.
Loook forward to this article !
E
ejc: Nice! You should be able to find a decent deal on a cast iron vise. For about $100, you ought to be well-outfitted!
I assume the "borg" is a big box store? Never heard anyone refer to them in that manner before - that's hilarious!
Still....please don't get "assimilated."
Cheers,
-E
Hi Ed, This is exactly what I have been looking for. I've been doing the workbench shuffle for about a year now unable to settle on one design. This preliminary looks perfect. Once you have the plan finalized, think you could put it on the web site for sale without waiting for the filming to be completed?
Thanks, Ron
Hi Ron:
Argh! I would if I could, my friend. Trouble is, as we film these video workshops, often-times there are details that change midway through filming (happens organically). Because of that, we wait till the end of filming to check all the measurements and begin the plan production process - meaning, you've got to wait till it comes out around the same time as the video.
My latest problem is that the bench project, and work I'm doing right now on another Video Workshop project with Mike Pekovich (tool cabinet) has inspired me to build a "Tool Cabinet." My wife's response when I told her: "sigh, and where are you going to put that?"
We're looking for houses at the moment so all my woodworking gear is being stored - as will this bench and that future tool cabinet. I'm a sick, sick man. LOL
Cheers,
Ed
Any thought in posting the "cut list" so we can purchase the materials and begin to acclimate to our shops?
Jim
I'm looking forward to see what you come up with. I just settled on a similar design that I'll be building shortly from KD Doug fir. Btw, Ed -it's set your sights (as in gun sights) not sites. A site is a place. Sorry, but that stuff drives me crazy... :)
The sketch looks good, I'll be the barbarian at the gates now:
It's possible to get decent lumber from one of the borgs. Flat-cut Southern Yellow Pine can be ripped to produce rift-cut SYP; you'll just have to suck up the waste. Considering that the cheapest hard maple in this area (Roanoke,Virginia)is $280/100 BF and SYP can be had for <$0.50/bf, it's not going to hurt too badly. If one rips SYP to the thickness of the vice(s) then the rest is easy. Uprights can be glued up just as the top is. That takes the cash cost down to less than $200 at present borg prices for SYP 2x10s. I grant that it's not beech or maple, but the savings in lumber let one acquire more/better tools. I also suggest placing vices so that the bench can be used to cut lumber — mine has a centred vice on the front with support on the left leg, another vice on the left short side to use with bench dogs. This allows me to use the un-encumbered right side to cut wood to length. (I'm right-handed.) Ta.
Log in or create an account to post a comment.
Sign up Log in