
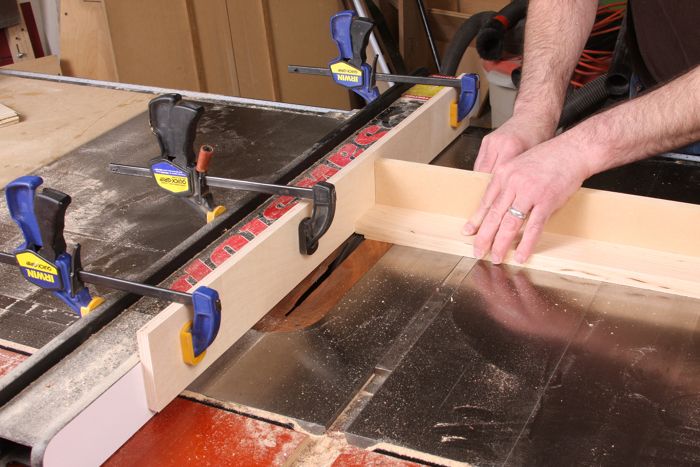
Bury the blades without ruining your fence. All you have to do is raise the sacrificial fence just a bit higher than the blades.
Like a lot of woodworkers, I use a dado set on my tablesaw. And like many of you, I learned (from Norm Abram) that when you cut a rabbet with a dado set, you make a stack that is wider than your rabbet, put a sacrificial fence on you rip fence and raise the blade into the sacrificial fence. Then you adjust the fence so the width of the blades exposed is equal to the width of your rabbet. Without the sacrificial fence, the dado set would cut into your rip fence–not good.
I often use the same trick when cutting tenons with a dado set. I set up the dado blades and sacrificial fence and guide the rail through the blades with a miter gauge. I use the sacrificial fence as a stop, too. (Some might gasp and wonder how I can do that, as you supposedly should never use the miter gauge and rip fence together like that. But, I’m not making a through cut, so there is no danger of an offcut getting traped between the blades and the fence and being thrown back at me. So, it’s safe and I’m comfortable doing it. If you’re not comfortable doing it, don’t.)
What I’ve always hated about the method is that you have to cut into the sacrifical fence. Eventually, it gets ragged out and needs to be replaced. And if you use the blade at a lower height than a previous cut,there will be a gap in front of the blade and behind it where the fence was cut away when the blade was higher. I don’t like that all.
Well, I won’t have that problem any longer. On a recent trip to Michael Fortune’s shop, I watched him set up to cut some tenon cheeks with a dado set on this tablesaw. But he didn’t bury the blades in the sacrificial fence. Instead, he raised the fence until it was just above the teeth. He could still “bury” the blade in the space beneath the fence, but didn’t need to cut into it. And, importantly, the space between the raised fence and the dado set is a place for dust to fall and be out of the way (instead of against the fence, which becomes a mess that you have to clean between every cut so that it doesn’t prevent you from pushing the workpiece against the fence.). Take a look at the photos to see how to do it. I’ll never go back to the other method.
PS: I’ve answered some questions/objections in the comments section below.
-
Bury the blades without ruining your fence. All you have to do is raise the sacrificial fence just a bit higher than the blades.
-
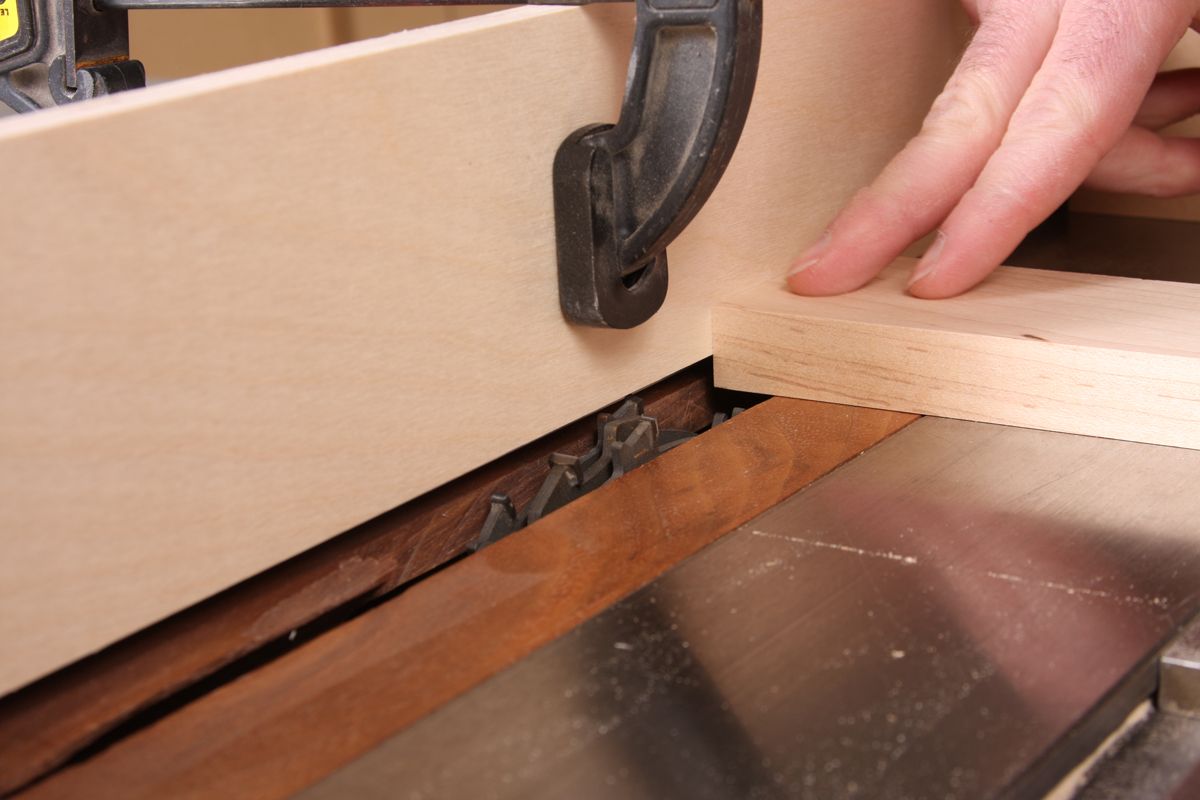
Set the fence height. The bottom edge should be just above the blades. That allows you to have the fence over them and so bury them, but it's not so high that you need worry about the workpiece falling into the gap between the blades and fence.
NOTE: This photos shows the relation between the blades, fence and workpiece. I am not actually cutting here and the TS power was disconnected. Do not make cuts with your fingers in this position!
-
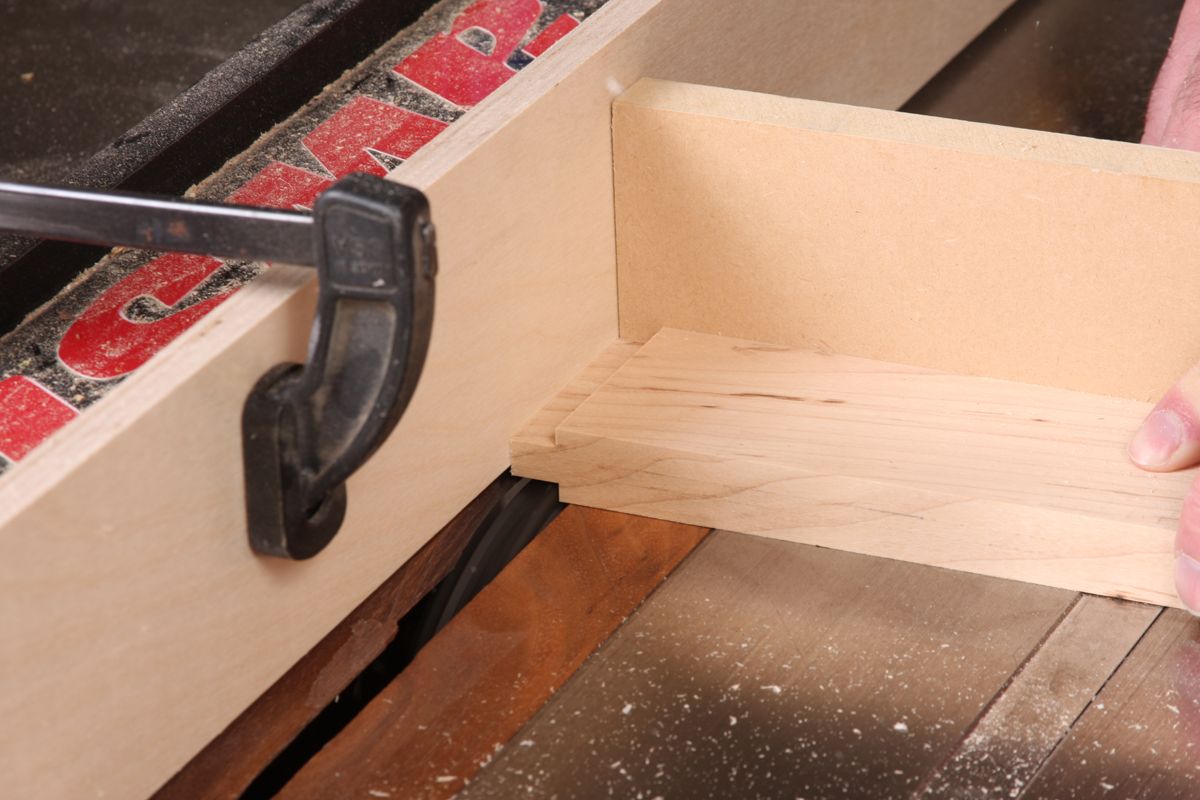
The tenon still rides on the fence. Here's another reason to have the fence just above the blades. After cutting the second cheek, the tenon left behind still has a surface to register against.


Comments
Also, I think this would be kinder to the blade itself, rather than having the teeth always rubbing against the fence. Great tip.
Strictly speaking, if it never wears out, then it's not really "sacrificial," is it?
-Steve
Smartie.
Hmm. Is the backer on the miter is going to make it through the cut?
John,
The backer board does get cut, but becomes a zero-clearance fence for that particular set up, so there's not tearout on the workpiece.
Steve,
Technically, I suppose you are right. But I thought that the term would clearly express what I was talking about as opposed to coming up with some other term.
For ease of setup how about a small block under each end
of the fence that rests on the table.
"Just about the teeth" or just above the teeth?
Matthew, Not to detract from the beauty in the simplicity of this fence, it goes to show that an editor needs an editor. Norm, the godfather of woodworkers, was misaddressed. It's a common mistake to call him Abrams but his surname is Abram.
That's a nice tip Matt.
@dlobbster - I was thinking some dowels, but blocks would work just as good.
Quote:" if you use the blade at a lower height than a previous cut,there will be a gap in front of the blade and behind it where the fence was cut away when the blade was higher. I don't like that all."
I don't see why you like this method better for this reason. With this method, there is ALWAYS a gap in front and behind the blade.
My sacrificial fence uses four edges- top and bottom on both faces for varying depths of cut and amount covering the blade. It hasn't worn out in over 4 years.
rupps rupps writes: That's a nice tip Matt.
@dlobbster - I was thinking some dowels, but blocks would work just as good.
If you do use this idea, what about drilling a set of holes in the back of the fence for dowel pins to register against the TOP of the rip fence?
Like this:
O O
O O
O O
etc
For the cut being demonstrated, a fence isn't required at all. He's using a miter gauge to push the stock through. If one wants to use the fence to register the work, then a short block clamped to the fence near the operator is all that is necessary, and it's safer.
Additionally, in setting up to make the cut shown one must be absolutely certain that all the stock is the same thickness. If there is any variation at all then the tennons will differ in thickness. Better to set up ones cuts with one side that always faces the fence or table top.
Sapwood...One should be absolutely sure one reads the article and fully understands the concept before one reaches for the keyboard.
To use a short stop block means another step in each cut as a clamp would be required to hold the workpiece against the miter gauge during each cut.
You must have invented another way of cutting tenons...not at all sure how you are able to cut a tenon with the one face against the table at all times as you suggest. Maybe you can enlighten us plebs.
Good tip. It is such a simple thing but solves a lot of problems - a much better way to do things.
I don't like the clamps hanging over. Rockwell has some clamps that can be inserted into holes drilled into the top of the sacrificial fence that keep them away from your hands. I use them with three fences 1) used as shown in the pictures, 2) a short one to use as a stop block when making offcuts, and 3) to securely hold a tall fence (the tall fence is glued to a shorter one with the holes for the clamps).
For the purposes of the blog, standard clamps make it a lot easier to see what is being done. Again, good tip!
Like Alashop, I don't like connecting auxiliary fences via clamps. I drill and tap the rip fence for machine screws, and use flathead machine screws to attach the auxiliary fences and other accessories. It will be better still with this non-sacrificial fence idea, which will last forever.
Folks,
Thanks for the comments. To answer a few questions:
1. Sorry about misspelling Norm's last name. And yes, it should be "above the teeth," not "about the teeth."
2. In response to MDCustom: Although there is always a space beneath this type of fence, it is not the same as the space cut by the blade. First of all, the fence is located vertically so that the workpiece is always in contact with it. If you raise the blade into a sacrificial fence and then lower it, there is a circular cutout in the fence that's bigger than the exposed blade and and among the dangers that creates is the possibility that the leading corner of the workpiece could create the lip of that circular space after it has passed through the blade, which would twist the workpiece and perhaps cause a kickback.
3. In response to Sapwood: I have never had a problem with this technique for cutting tenons. I simply mill my rails and stiles all at the same time. They all end up the same thickness. So, it's no problem to flip them to get a centered tenon and still have the parts line up. In just the past few months I've made 20+ kitchen cabinet doors and 2 large screen doors this way and they all came out flat, properly aligned and square.
4. In response to Sapwood: A fence may not be required here, but it sure does make everything easier.
That is a good technique.
We have been showing it to woodworkers at the woodworking shows for five years, ever since I started selling the HoleClamp.
Instead of using conventional clamps to clamp a board on a fence, the HoleClamp is attached into a vertical hole in the sub fence. -No more clamps hanging over the fence getting in the way of fingers and vertical boards.
Jerry Jaksha
Mesa Vista Design
http://www.grip-tite.com
"Hole Clamp". That was what I was getting at regarding the miter hitting the center clamp. Great idea though. I made one using the hole clamps on the each end of the sacrificial fence.
Would you do me a favor, Matt? Stop using your fingers to hold the work piece down, right above the dado blades? One slip, and guess what happens to those fingers. I'd hate for you to have to change your name to "Stubby". ;-)
Ralph,
I guess that second photo is a bit misleading. I would never have my hand there while cutting. That photo is meant to show the correct setup for the blade and fence. I'll add a note to the caption that goes along with it.
Matt
Log in or create an account to post a comment.
Sign up Log in