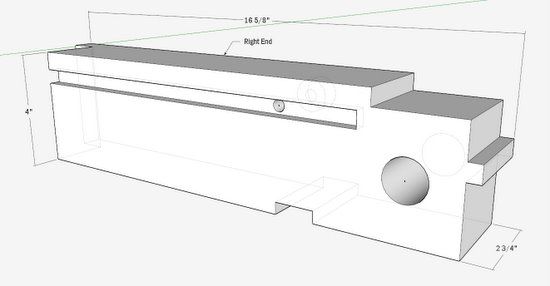
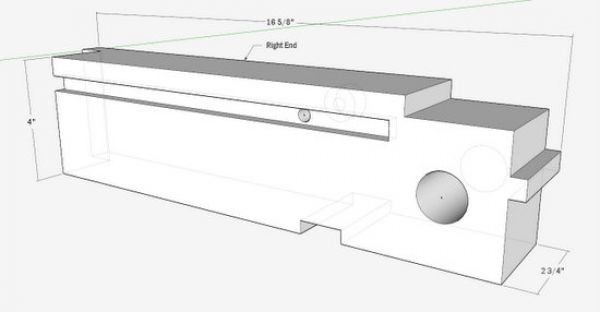
Chapter Five of my eBook on SketchUp illustrates the steps in “building” a Workbench End. I used this example as an exercise in drawing precisely using guidelines and the keyboard for entry of length values. (The Workbench End is a key part of the European style workbench by Tage Frid that closes in the right end of the top and holds the tail vice.)
To supplement the step-by-step procedure in the book, I’ve prepared this six-minute video.
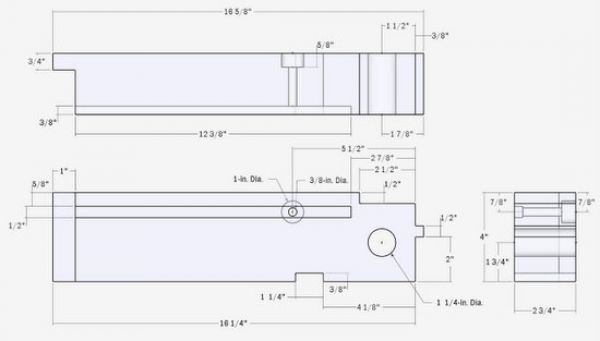
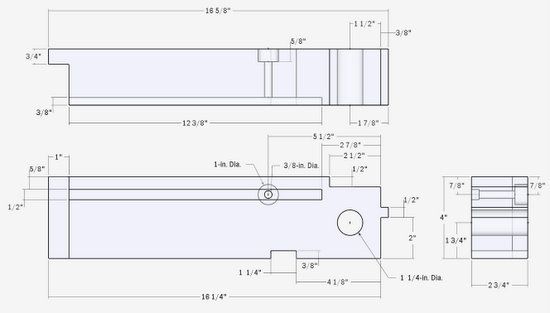
You can practice your own skills by using these reference drawings of the Workbench End.
This site is protected by reCAPTCHA and the Google
Privacy Policy and
Terms of Service apply.


Comments
I like these video tutorials. I pick up some handy tips every time I see one. This time it was using the push pull tool and then clicking on the back edge to stop this action.
I was wondering if you had a very basic introduction to sketchup. That would show how to draw basic cabinets. Say for a kitchen. New to sketchup, but have plenty of woodworking backround.
JeffP.
To cusoak: Thank you for the comment.
My eBook is for beginners, yet advances to more complex furniture. It is available right here at FineWoodworking at this link. I think the price is less than $ 13.00.
http://www.tauntonstore.com/sketchup-guide-for-woodworkers-tim-killen-ebook-077846.html
The first xix chapters are:
1. Introduction
2. How to set up SketchUp for Woodworking
3. The modeling environment and toolbars
4. How to use basic SketchUp tools
5. Learn to draw precisely
6. How to make, move, copy, edit, and connect components
There are a total of 16 chapters. But if you get through the first six, you can make kitchen cabinets.
Tim
So where do you get that center of circle option.. It doesn't show up for me..
Thanks
To gmfoster:
Yes, this feature is rather hidden within SketchUp.
In my eBook, I explain:
To create a guide point, right-click on the circumference of the circle. Choose Point at Center from the pop-up menu. (If that doesn’t work, click on Window in the Menu Bar and choose Preferences. On the Mac, click on SketchUp and Preferences. In the System Preferences dialog box, click on Extensions. Make sure that Ruby Script Examples is checked. Then try to place the guide point again.)
Tim
I am happy to find your distinguished way of writing the post. Now you make it easy for me to understand and implement the concept. Thank you for the post.
fitness equipment
Dear Mr Killen
I got your Sketchup book which is really excellent. I've learned a lot in two days of more or less immersion. Doing well.
But I have a problem I just can't solve. I followed your directions for creating a template. Looked fine. But when I close and reopen SU, I get (mostly) the default original image with the girl in jeans and a sweater looking to her right. It's clear that it's my template because some bits of it are there (the closed windows for Scenes, Materials, Styles, Layers, etc are there, but changed back to their defaults). The units are changed back to architectural, font size is changed back to 12; The layers I created are gone. On top of that, I can't find the .skp file anywhere.
It's clear I'm missing something here, but I really don't know what it is. In part, I am really mystified about where SketchUp puts files. There doesn't seem to be any rhyme or reason to it.
Any advise deeply appreciated.
Dan
Dan, thanks for the note, and glad that you are using the system to help with problems. Dave and I encourage readers to ask for assistance in resolving issues. Sometimes things don't work out right and it is hard to find the answer.
On your specific problem, you didn't mention that you indeed saved and named the template - under the File Tab and menu item "Save as Template". Not sure you took this action. Also, SketchUp not only asks that you Name the template, but you also need to add some description in the space provided in the dialog box.
You can check what template is currently being used (the default) by clicking on Window/Preferences/Template. The current default template will be highlighted in the dialog box. Also, you can scroll through your templates and see if you have a personal named template in the list. If your named template is not in the list, it was not properly saved as discussed above.
On where SketchUp saves files..... in that same Windows/Preferences dialog box, click on Files in the left hand column. There you will see the applicable default file locations.
Tim
Log in or create an account to post a comment.
Sign up Log in