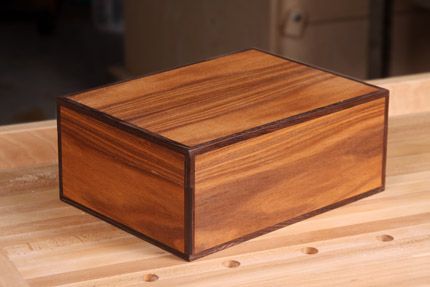
This rosewood veneer humidor had almost reached the finish process when I discovered an unsightly blemish.
UPDATE – February 2, 2012: Scroll down to the bottom of this post for a look at the final outcome of this repair.
I’ve got a hunch that plenty of other folks out there have had a similar experience to mine. Imagine, you’ve labored for weeks over a project, getting every detail just right. Every joint is perfect. Every corner is tack sharp. You’re just about to break out your finishing supplies when you notice….a blemish!
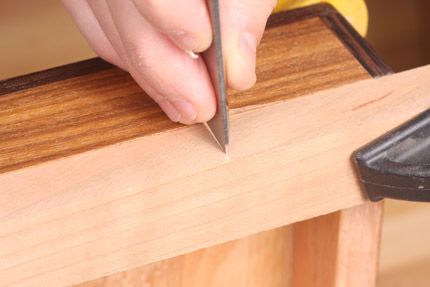
 In this case, I was applying a coat of de-waxed shellac as a sealer for a rosewood veneer humidor when I noticed a small chip in the veneer (click the photo to enlarge). Now, while I have performed veneer repairs on humidors in the past, I’ve never been confronted with a chip. I’ve got a plan of attack, but before I put a set of super-sharp chisels to my box, I’d like to run it past our readers for their input.
Here’s My Plan of Attack
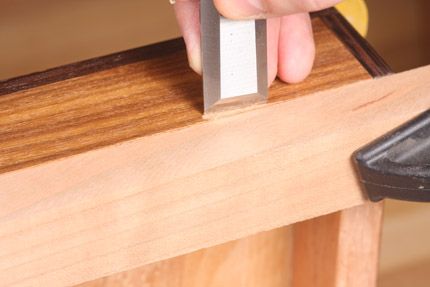
The chip appears in the side of the lid, where it mates with the box below. I’ll begin by clamping the lid in my bench vise and then clamping a square block of wood to the lid, to act as a chisel rest. The rest will be positioned in line with the seam of the veneer-to-base wood bond and will serve to ensure my chisel is square when I get ready to actually excise the material in step 3.
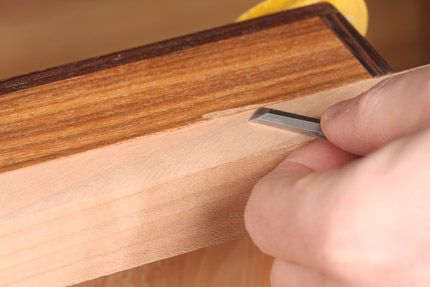
Now it’s just a matter of using a chisel to make two chopping cuts, defining the borders of the veneer I wish to cut out, and then paring out the waste material, using that block mentioned earlier as a guide and/or chisel rest. With the piece cut out, the next step will be to cut a piece of patch, using leftover scraps of the same veneer used on this particular box, gluing it into place, smoothing it, and finally beginning the finish process.
 Here you can see the chisel rest clamped against the lid. |
 A couple of taps with a sharp chisel outline the waste. |
 Now it’s just a matter of carefully paring away the waste. |
What Do You Think?
Let me know how you’d attack this pesky veneer problem.
Quite frankly, I’m a bit terrified to take a sharp chisel to a box covered in delicate veneer: a box that’s taken me many hours to build, I might add. Does my method sound right on, or perhaps a bit nanners? Let me know in the comments section below. I’ll be sure to update this post with photographs of the final product once the repair is done. And if you don’t hear from me again, it most likely means I wasn’t pleased with the end result.
UPDATE: A Successful Repair
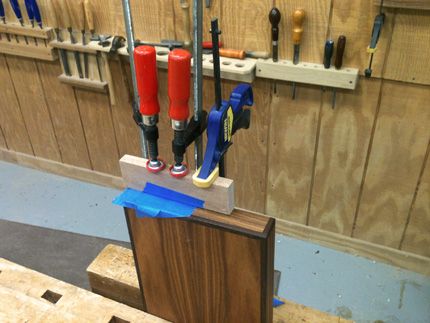
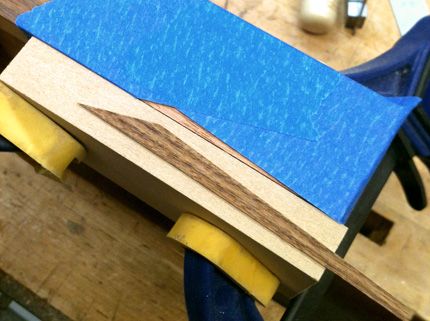
 The first step, however, was to cut the patch material. Using a homemade “leather chopper” I wrote about last year in a humidor-related blog post, I fashioned the patch piece, and then set it atop the offending area to locate and mark the material I needed to cut out. Next, I used blue painters tape to mask off the “good” material. The tape also doubled as the mark for my chisel’s edge. I cut the blemished material out, right along the edge of the tape, clamped a chisel rest (just a piece of scrap wood) to the bottom of the lid, and slowly pared away the waste material with a small, very sharp chisel. Click the photo at right to enlarge.
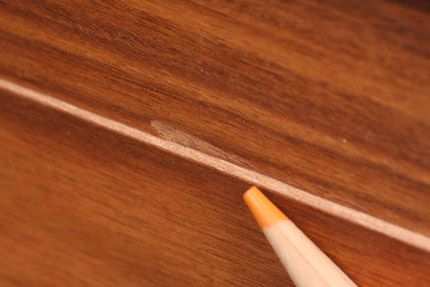
 Next, I simply glued the patch in, clamped it with the help of a simple caul, and allowed it to dry for a couple of hours (click the photo at left to enlarge). Now I just had to figure out a way to deal with the tiny gap left between my patch material, and the “good” veneer. I wasn’t quite able to but the two up as tight as I wanted. That resulted in a visible line that needed to be addressed.
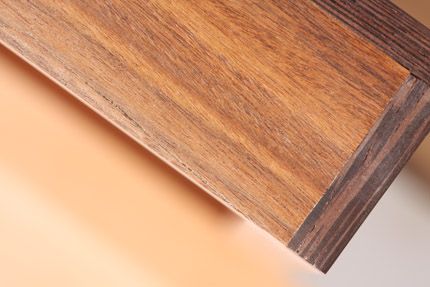
 Before. click to enlarge |
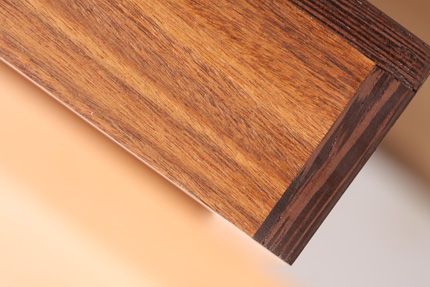
 After. click to enlarge |
-
This rosewood veneer humidor had almost reached the finish process when I discovered an unsightly blemish.
-
The first step will be to outline the material to be removed with the aid of a very sharp chisel.
-
The first step will be to outline the material to be removed with the aid of a very sharp chisel.
-
Now with a piece of scrap clamped to the lid as a chisel rest, I think I can safely pare away the waste material.
-
This small chip in the veneer stands out like a sore thumb.
-
-
-
-


Comments
Ed,
I'm afraid that now that you've aired your dirty laundry, so to speak, your only option is to start over from scratch. ;-)
-Steve
If it was me i would do the same as you but one thing different i would cut a slightly larger size out of the damaged area,particularly as it is on the edge as it will need that bit more strenghth.The increased glue surface and extra bearing will give you a bit more duarability,i wouldnt worry too much about it showing as long you match well with grain anf finish it as one.Also worth considering a sharp knife with a flat edge so you can cut in nice and tight with no worry of the bevel leaving a seam line ,nice box by the way good job.
saschafer: Damn You!!!
hammertime8: Yeah, that's the idea I'm shooting for - going a bit beyond the actual damage. I think the toughest part is going to be paring out the waste, keeping away from the base wood as much as possible. THAT is going to require an incredibly delicate touch. Thanks for the input!
Best,
Ed
I meant to make it clear that i wouldnt use a chisel to pair out the waste bacause when you tap it sometimes the bevel of the chisel will throw it off a fraction, so a razor sharp knife with a one flat edge and one bevelled edge works great,you just keep the flat edge against your straight edge for accuracy,that way you get a perfectly straight edge for the new bit to fit against,hope this helps good luck.
OOOO - even better. I've got a marking knife I could hone up a bit - beveled on only one side. I'll just need to make the tool rest a bit thinner- to that the knife's handle doesn't hit the rest and prevent the blade from penetrating as far into the lid as I need to go.
Good thoughts!
-Ed
That sounds like a good plan. You could use the chisel and it work fine. A marking knife is good bun in my shop I'd use a new sharp #11 xacto blade to do the cut (or a scalpel).
In any case it has to be a sharp blade.
I have fixed something similar before, and the way I did it was to use a really sharp precision knife to excise the material. I did not want to risk the impact of a chisel.
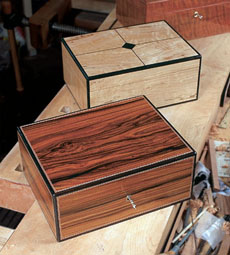
sounds like a good plan. From the pictures of the chisel in picture 2 it looks like you plan to make a vertical cut for the patch. This will be very noticeable being across the grain. If you make it tapered it will be a little more subtle.
Even more daring, place a strip of similar colour veneer the length of the box side over top of the chip and cut through both the new veneer and your boxes' veneer this should give you a nice patch that can be put on a little oversized so you have something to hold onto while lining up the critical new seam. The bottom will be easy to flush up because you can follow the bottom of the lid.
Having made a number of veneered boxes myself this is unfortunately an occupational hazard. I would suggest never to cut across the grain to form the patch. From your photo try extending the vertical cut out along the grain to form an elongated inverted "V" or even with a sharp,(xacto) knife, a semicircular or irregular patch and fine tune a piece of veneer to match. A number of books I have read on furniture restoration suggest that straight lines will always be more visible. Try to follow the grain as much as is possible. You could always practice on a piece of veneered scrap before trying the original to find the best shape.
Mac has the correct approach to fixing the problem. You don"'t want to cut cross grain because the patch will show.
Take the humidor apart and remove the hinge and simple cut a shallow rabbet in the edge wide enough to account for the chip out then either use your accent inlay or veneer. You need a place to grip the top to open it anyway. and a small groove would suffice.
Hi, that's a beautiful humidor. I would not cut out the chip but rather apply one more coat of shellac and repair it with a burn in. You have two colors at the repair. Match the darker one with stick shellac, apply burn in balm, use the lowest heat on your burn in knife that will melt the stick shellac and melt a small bit of the stick shellac. Quickly swipe it over the repair, wipe the knife clean, and swipe off the excess. Wipe off the burn in balm and lightly sand the area of the repair with 320 sandpaper. Then take a fine artist's brush and feather in the lighter color beside the dark grain stripe where you made the repair. The repair should be invisible. I have done this many times.
In summary be sure to use burn in balm to protect the adjoining veneer before you start and keep the heat of the burn in knife at a minimum so it does not burn the wood surrounding the repair. I would make a practice swipe on a piece of scrap first to be sure I had the color right. Melt different colors of stick shellac if you need to to match the wood color in the repair. The color is the key to the whole thing. This may sound complicated but it is not and the repair will take less than ten minutes once you get the hang of it.
I agree with johnogilvie. What ever you do try the different methods on samples a few times before tackling the repair.
I would just put and inlay there like a banding or to make it even saweeeeeeeeeeeter some MOP something that can go around the whole box or put the same wood u have on the corners, I know u want it to have the aperance of it being a solid box that doesn't open I love when my boxes come out like that. The top fits the base so perfect its seamless. anyway u look at it it's pretty good spot for a blemish to happen, just imagin if it was a little further down in either direction that would have been more trouble than it is now. GOOD LUCK! ; )
I've only done one or two of these projects and fine that the way that JOHNOGILVIE did his -- was the way to go to have the best results. I think the results will turn out really fine if you take your time and go real slowly.
My concerns with your method would be grain match at the cross-grain cut, and producing a flat bottom in the excised area for the new patch to rest on. Running the patch the full length of the side, along the grain, would normally seem like a less visible patch, but with the binding at the edges that seems like that approach would invite a cascade of issues. If it were me, I might try johnogilvie's method first. If that did not result in a satisfactory outcome, then maybe you could still try stevefell's suggestions to make the patch less visible, seeking to grain-match the patch as best as possible. Let us know what you do and how it comes out. It's great to have people who are willing to share their challenges or mistakes so the rest of us can learn how to solve our own problems creatively!
When we make similar restoration repairs on antique furniture, we (like "stevefell" suggests above) make an elongated diamond shaped patch. Do not cut perpendicular to the grain. It will show.
With such a small chip, we'd be most likely to use "johnogilvie's" approach. If you were willing to adjust the design, we'd take off the hinges and route a grove (on both pieces) along the seam for the lid and inlay the matching border wood (looks like walnut?).
Any veneer patching will show.
Lots of good tips and if you put the same care and effort into it that you used on the humidor it will come out fine. One thing I have noticed ( for myself at least) no matter how good the fix is and no matter whether nobody else can find it, it is always the first thing my eye is drawn to on my own projects.
I've learned to appreciate the fact that the fix( if nobody notices it without hints or a thorough inspection) is also a skill and a form of craftmanship itself.
The tip about cutting out the patch area like an inverted, elongated "V" in order to go with the grain, is a very good one. Thanks.
I am still considering doing a burn in, but if I do go with the "glue-in" route, I'll be attempting the "V" repair.
EXCELLENT points all around. Thank you very much.
Best,
-Ed
I would use an Exacto knife guided by a metal ruler to outline the waste piece. Then I would gently parry away out the damaged veneer piece with a sharp chisel held flat with the help of a rest clamped as shown in the pictures. gluing a matching piece just proud of the surface is then fairly easy. Sand level and refinish.
Hi folks,
Just took the clamps and cauls off the box lid. A perfect repair! I'll update the post with a few photos I snapped on my iPhone, later this week.
Many thanks for all your suggestions - they were spot on! Especially the one about the inverted, elongated "V" by stevefell.
Cheers,
-Ed
Hi Ed, Well done, the photo looks as good as new! I know taking a chisel to a nicely finished veneer is always scary. For future reference, one thing I didn't mention was the need to slightly undercut the edge on both the veneer patch AND the patch hole. If this is done carefully sliding the patch into place will leave virtually no need for any filling.
My mother had a card table with a veneered top from the early 30's. It had walnut, mahogany, maple in various patterns. It was stored in an attic (in Minnesota) cold heat humidity. some of the veneer lifted split etc. I used the same technique some 35 years ago. I used the wedge or v shape on many of the fixes and it turned out beautifully. Someday I should send a picture. I don't know if I can attach one to this message board.
Thanks guys:)
E
Log in or create an account to post a comment.
Sign up Log in