Gallery
Dovetailed bench
Mar 20, 2012
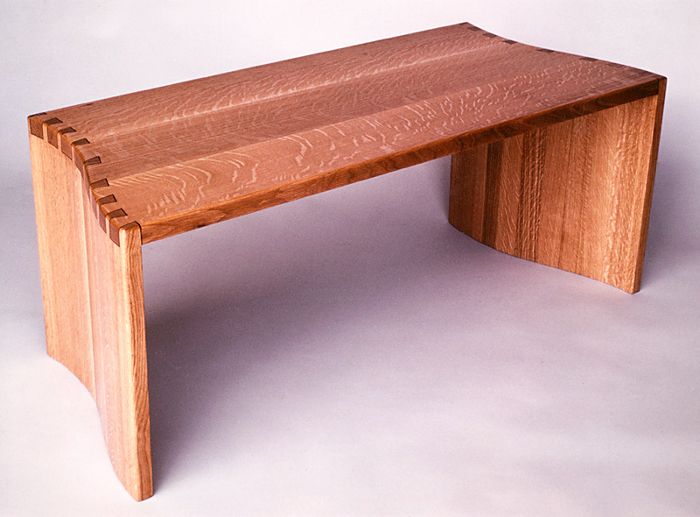
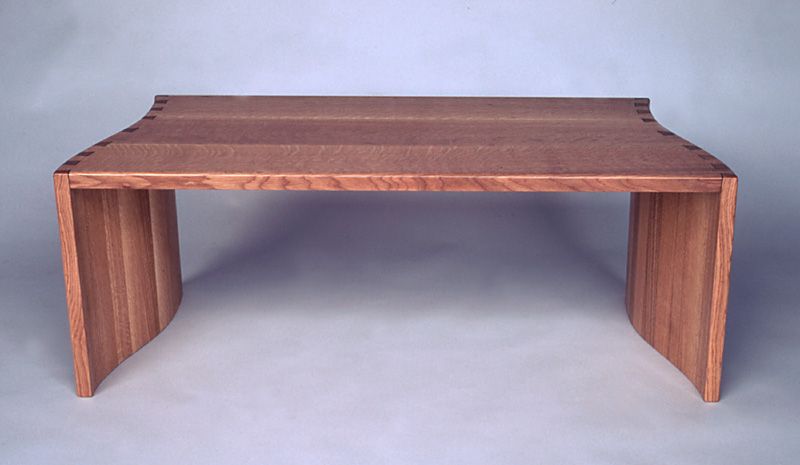
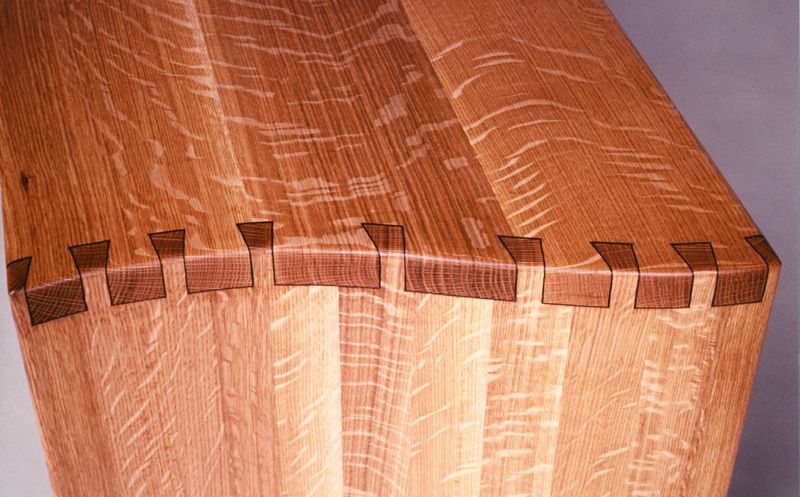
I built this back in the 70’s for a good friend of mine – a general contractor – who wanted to give it to a client of his as a housewarming gift for a custom home he had built in Keystone Ranch, Colorado. He told me that he wanted a bench that would be placed in the entryway of the home, but left the rest to me…my favorite kind of job! I believe I had recently read an article about outlining dovetail joints with contrasting wood in FWW magazine, and wanted to kick it up a notch, hence the curved hand cut dovetails. White oak and black walnut.
This site is protected by reCAPTCHA and the Google
Privacy Policy and
Terms of Service apply.


Comments
I like it. Can I ask, have you any pointers for putting in the contrasting wood around the joint. I'm doing something similar, not curved though! Thanks
Rich
Thanks Rich. I found the article I referred to - it was actually from FWW #35, p68: Three Decorative Joints by Tage Frid (so I guess I built the bench in the 80s, not the 70s - :P ). I'll quote from the article:
"The joint is laid out, cut and fit in the same way as a regular through dovetail. The veneer inlay that will outline the base of the pins and tails is glued onto the inside face of the mating pieces before the joint is cut. The rest of the outlining is done after the joint is glued together. Gauge the usual depth-lines around the ends of both pieces. To house the inlay, cut shallow rabbets up to the gauge line on the inside face of each piece. If you cut the rabbets on the table saw, set the blade as high as the gauge line (the thickness of the dovetailed pieces). Then set the fence to cut the rabbet slightly shallower than the thickness of the veneer.
"The grain of the veneer should run in the same direction as the grain in the pieces to be dovetailed. It's easier to trim the inlay flush after the glue has set than to finish it perfectly before. So cut the veneer slightly oversize. Before the joint is perfectly tight where the end grain of the veneer meets the solid wood, especially on the pin pieces because the veneer will be visible on both edges. Glue & tape the inlay in place & clamp it tight. When the glue has dried, lightly scrape and sand the inlay flush.
"Now cut & glue up the dovetails. The veneer will line the base of the pins & tails. To add the veneer that will complete the outlining of the joints, saw diagonally along the line of the joint between the tails & pins. Use a saw that cuts a little thinner than the thickness of the veneer inlay, & be sure the saw cut doesn't go below the gauge lines. Cut triangular pieces of veneer for the inlays. Orient the cuts so that when the pieces are glued in, their grain will run the same direction as that of the pins. To fit the inlay pieces in the thinner saw kerf, you need to compress them a little by hammering them or by squeezing them in a steel vise.
"Now put some glue in the kerf - not on the veneer. Rub it into the saw cut, using your finger to force it in deep. Slide the veneer into the kerf. It will pick up moisture from the glue and swell for a perfect fit. When all the inlays have been inserted and the glue has dried, cut off the veneer with a sharp chisel and finish-sand."
That's about it. If you can get a copy of the article somewhere (or have the DVD archive) there are some illustrations that will make the process crystal-clear.
Good luck, and hope this helps!
Rich,
BTW, the thickness of the veneer I cut was based on the width of the kerf of the backsaw I used to cut the diagonals.
Mark
Log in or create an account to post a comment.
Sign up Log in