Simplify your tabletop glue-ups
 Sep 28, 2011

Glue-ups frighten me. No matter how well a dry run goes, things happen as soon as I open the glue bottle.
Bad things.
That’s why I try to simplify any type of glue-up. If it’s a case piece, I assemble small sections at a time to reduce the number of parts I have to wrestle with once the glue is flowing. Working in sections like that makes it easier to glue-up the final piece.
|
More Great Glue-Up Tips Creating an Attractive Tabletop |
I apply the same idea to tabletops. Instead of fighting to keep four or more boards aligned, I break it down into smaller sections, which reduces stress and ultimately slows the rate at which I’m losing my hair.
I flatten and plane the smaller sections once the glue dries. By doing that, I don’t have to work as hard to flatten the entire top after it’s assembled. Here’s the process.
Glue up two boards at a time.

Work hard at keeping the pieces flush with one another.
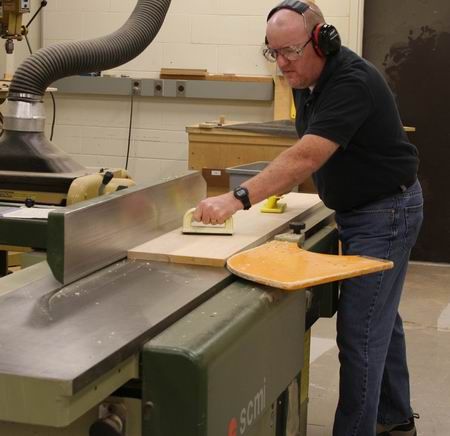
Flatten each section.

To avoid nicking blades, scrape away any leftover, hardened glue before running the pieces over your jointer.
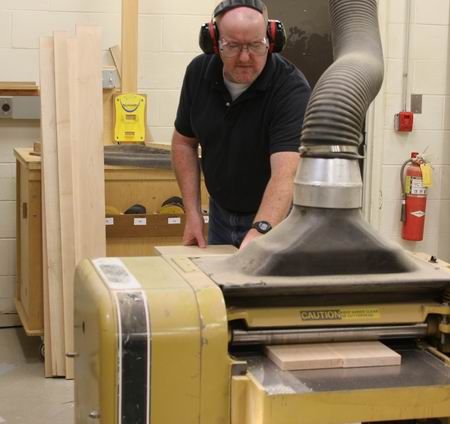
Plane to thickness.
 Be sure to plane all of the pieces that will make up the tabletop to ensure that everything remains the same thickness.
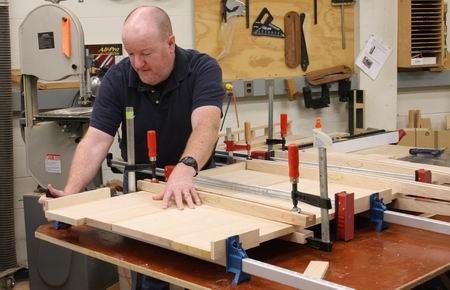
Put it all together.

Instead of aligning four wet joints while fumbling with the clamps and cauls, I can focus on just two. Alignment is a snap, and I’m less rushed during the job.


Comments
Good advice on the glue-ups Tom, but for the life of me I can't remember where I left my 16" jointer!
Mac, I dream of having a 16" jointer... Good tip though thanks Tom.
I dream of space in my shop to put a 16" jointer
For table tops or other wide panels I always break it into two or more panels each of which are composed of boards which have been flat planed and edge planed. I wide belt sand these panels. Then glue them into the final wide panel. I sand the final seam with a belt sander and orbital sander. How else would you do it.
If I use Titebond III glue, do I have to wait overnight for the glue to dry before glueing it to another section? - I'm wondering how long to let the glue dry. Seems like overnight is needed in order to put pressure on the joint that would occur with jointing and planing. So, I need to take my time, find something else to do while I allow a few days for this! Ah, yes, but a better job in the end. Thanks.
MacWoodworks, didnt you last have the 16" jointer, thought you got it from Larky. :)
Tom, I also have struggled with table top glue-ups and have resolved to try a different method next time. I was planning on using pairs of hardwood cauls, slightly curved, across the top as recommended in other places. I'm curious if you have tried this and (assuming you have) what you prefer about the method in your article. It seems reliable but time-consuming.
Just finished my first tabletop glue-up using this method last night. Much more relaxing gluing only one joint at a time and the results are the best I've ever had. Thanks for the tip.
Hey David, yeah I did have it but then I loaned it to Sandy and he loaned it to Karl. Karl said he left it on my doorstep. I'll bet my neighbor Detter borrowed it. Look out Detter, I'm coming for my jointer!!!!!!!!
On a more serious note - I have used a spring joint to get a nice tight fit on the ends with great results and no cracking over time. I also use c-clamps with cauls on the ends to make sure the two surfaces are flush. Tom is right that gluing only a couple joints at a time reduces the stress. I use Titebond II glue and let each joint dry for about two hours then glue up the next joint. When clamping subsequent joints I never worry that I have not left the clamps on long enough. I let the final clamping set overnight. Finally, I finish the top with a card scraper and then a smoothing plane. Works pretty well.
What about removing the glue? I usually wipe it up right away, resulting in a big mess to sand. Always regret doing it, but seldom remember not to. I should just let it drip, but for how long?
When you wipe it you force the glue into the grain and cause finishing problems if you don't scrape or plane down below the dried glue. Try just letting it bead up on the surface. If your getting huge runs of glue you are probably using too much glue. Instead, after it has been clamped for 2-3 hour the glue is still somewhat flexible, easily scraped away and it has not penetrated the grain. Much easier to deal with this way.
A few years ago I built a new workbench with a SA Pine tabletop, consisting of 4 identical boards measuring 6 feet by 9 inches by 1½ inches after jointing and planing. When it came to glue-up time, I did not do two boards at a time and then afterwards the remaining two wider boards, and consequently I was faced with the problem of aligning the four boards during glue-up and clamping.
My solution was to use biscuit joinery in the butt joints between the boards. Firstly I made a dry fit and after having satisfied myself that the joints lined up, I proceeded with the simultaneous glue-up and clamping of the four boards.
Maybe I was just lucky, but the tabletop (bench top) came out perfectly. There was also no need to plane the final product and after scraping away what little glue squeeze out there was, my random orbital sander left a beautiful finish with a even surface.
This is my first post on Fine Woodwerking. Not sur if I am in the right place or not. But here goes.
I want to build a table from plans that I downloaded from this site.It is the Tage Frid design dutch pull out ends on a dinning room table. The end slide out and the table top drops down. To get the ends back in you pick up the top and slide them back in. Me question is this. What hold the top in place? And how is the taper determined on the slides.
Any help
Thanks Jeff
Log in or create an account to post a comment.
Sign up Log in