Easy Tip for Tighter Mortise-and-Tenon Joints
 Aug 24, 2011
Want to have tighter-fitting mortise-and-tenon joints? The secret is in the shoulder.
When I first began cutting mortise-and-tenon joints, I followed a simple routine that worked well, but wasn’t quite up to the caliber of some of the furniture I was seeing on a regular basis in Fine Woodworking magazine or the shops of professional furniture maker friends. Here’s how I did it:
- Cut mortise
- Mark for tenon off mortise
- Cut tenon using dado set or box joint blade on the tablesaw
- Final fitting with shoulder and rabbet planes
Pretty standard stuff, right? Like I said, it worked well, but I never quite felt as though my joints were fitting quite as tightly as they could. The tenon shoulder-to mortise face connection always seemed to have just enough “schmootz” in it to allow for an “almost, but not quite” perfect fit. Then I discovered underbeveling.
By underbeveling the shoulders of my tenons just a wee bit, I quickly found my joints fitting so tight I’d be hard-pressed to fit even a cigarette paper in between. The process couldn’t be simpler, and it works pretty much every time. Best of all, it won’t effect the structural integrity of the joint if you use a light touch. Here’s how I do it:
 |
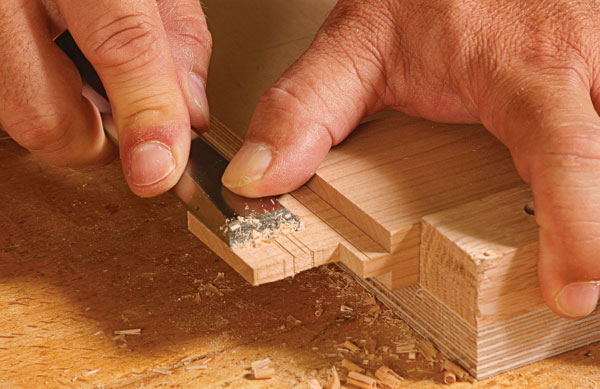
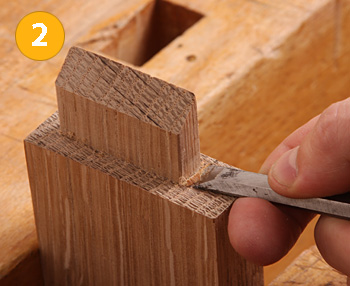
With my workpiece clamped into place, I begin by undercutting the shoulders that run along the wide faces of (in this case) my table apron. Remember, it doesn’t take much to make this a super-tight fit–just a few passes wtih a sharp chisel. You want to remove just a bit of material where the shoulder intersects the cheek. |
 |
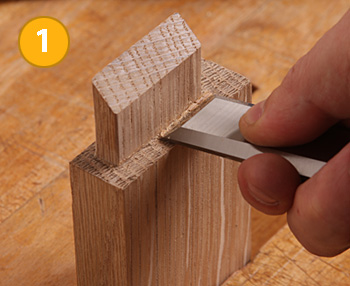
Reposition your workpiece and tackle the narrower area beneath the top and bottom edges of the apron. |
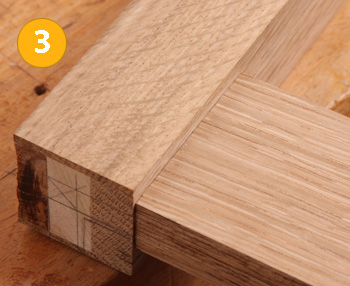 |
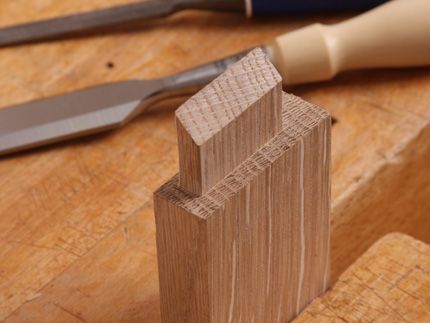
There you have it. This apron piece fits tightly against it’s mating leg. No space or gaps at all! |


Comments
Top tip,many thanks Ed.
Ed
Was the end of the tenon mitered to help the tight fit or to meet a second tenon?
Thanks
Bill Siegl
Teds Woodworking
Save Money Buying Furniture at High Priced Stores. Make Your Own Bedroom Set with These Woodworking Tools
http://nayed.tedsplans.hop.clickbank.net
I`ve been doing this for years. Ever since I saw how and why it was done on the antiques I repaired. To draw bore this method is like putting it in a vise. Info like this was hard to find. Thanks for sharing.
Yes, it is for allowing the meeting of another member at right angles, such as table leg stretchers... A lot of precision fitting going on with that type of joinery.... It doesn't take much to follow this tip. BUT the mortise and the tenion have to be a perfect fit or this trick will not be worth the time......Takes a super sharp chisel to pare away that tiny bit- well worth the effort..........
I have found the easier method is to just chisel a bevel around the top of the mortise. The requires less care, does not weaken the tenon and provides a good space for excess glue.
Mmm, is it just me? Why would I be bothered by an entry 'slipped' in to our considerations here.
Nayed posted what is really an advertisement.....I went there, was like a carnival barker plying me with his wares.
I for one wish you werent here, Nayed.
Log in or create an account to post a comment.
Sign up Log in