
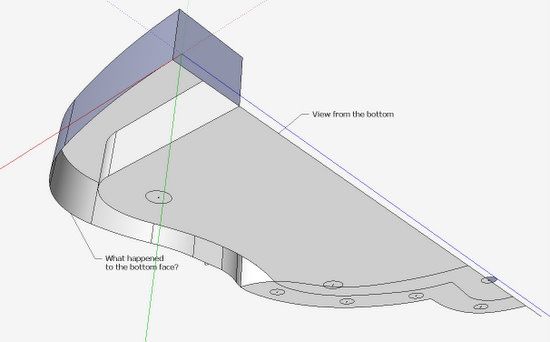
In Chapter 12 of my eBook, I show the “building” of a Windsor Chair. In Step 3, I say to use the Push/Pull Tool to give the shaped seat its thickness. Sounds easy enough, but you may have been surprised to lose faces on the bottom while creating the thickness.
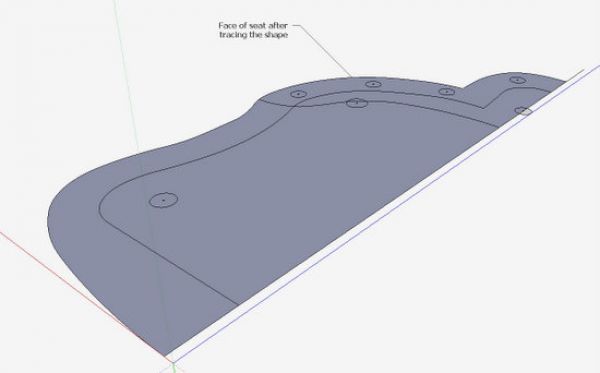
Here is the seat face after tracing over the shape. There are several lines and circles on the face, some of which pertain to the top of the seat, and others to the bottom face. Of course, the tracing however shows all of the lines on the one face.
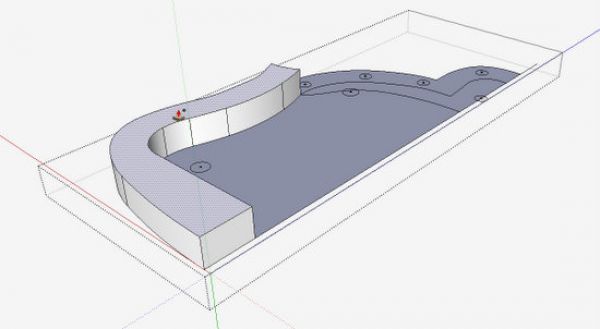
When creating the seat’s thickness, pick the Push/Pull Tool and pull up one of the segments as shown below.

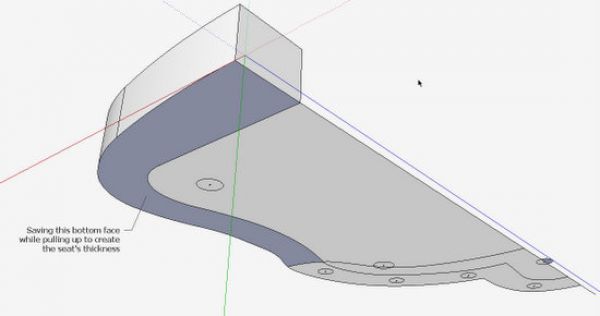
Now have a peek at the bottom of the seat, and you will see that the face that was pulled up, is now missing on the bottom.

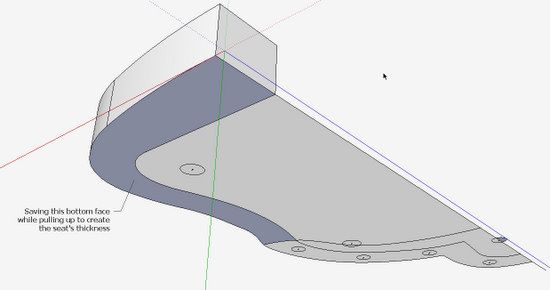
SketchUp assumes you are making a recess or hole, I suppose. To remedy this you need to tap the Cntrl Key (or Option Key on the Mac). This creates a new face, and saves the original one on the bottom surface. When tapping the Cntrl Key, note that the Push/Pull icon is accompanied with a + sign.
Now if we peek at the bottom of the seat, we see that the original face was retained.
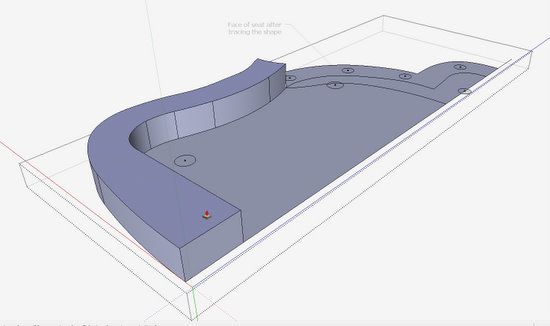
To complete the seat’s thickness, use the Push/Pull Tool (after tapping on Cntrl) on each of the other face segments.


Comments
Glad to see you addressing that since it has happened to me and wasn't sure how to get it to work. I also have had problems when tying to make a hole like the ones on the chair seat once the seat has been pulled to it's thickness or putting a placement for a window in a wall where the the push/pull action pushes it beyond the point in which you intended and pushes it out the other side when you can't find a surface to stop it at. Not sure if that's a very clear explanation.
Thanks for the blog entry I'm always looking to see if a new entry has been posted.
Walt
As Tim says, SketchUp thinks you are making a hole or recess because the surface is divided into smaller faces. An alternative to going around and hitting all the faces you need to extrude with Push/Pull is to make a box slightly larger than the seat and put the chair seat drawing on it. Then use Push/Pull on the perimeter. You could think of this in much the same way as if you were doing it in the shop out of wood and you are getting rid of the waste rather than creating the wood of the seat. This will also help you maintain proper face orientation.
Walt, as to stopping on the back face, it is often a case of your point of view. One thing to keep in mind is that the Push/Pull tool only operates perpendicular to the face you're pushing but the tool doesn't need to remain on that face. If you can see an edge on the back where you want the extrusion to stop, move the tool to that edge and click.
Using Tim's last image as an example, imagine the entire seat is extruded to thickness and you want to "drill" the holes. From this view, you could click on the face skinning the hole and start the extrusion. Then click on the top edge or a corner. to finish. If you knew the seat blank is 2" thick, you could also start the extrusion and enter 2 for the distance.
--Dave
My workaround is to always start with a solid object before creating any details. So, in this case, I'd create a rectangular block as the very first step, then cut into it with push/pull to form the outline, etc.
-Steve
So, we must be talking about SketchUp here?! :-)
I use SketchUp quite a bit.. but sometimes it can be frustrating and confusing.
I keep trying to make sense out of the Google vids and such but that too is often a bit confusing. A FREE class by an expert would be great... but that's probably NOT going to happen. So....let me share this with "Y'all"...
As a former subscriber to "Lynda.com" I got an interesting email promoting her online tutorial for SU8 the other day.. for $37.50/month USD I think it's something I am going to do.
In another life I bought the BIG package and had access to all of the stuff they offer and WOW... was it great!!! So, I highly recommend Lynda to everyone.
Although Google has their own free tutorials... Lynda's stuff is often more practical and easier to get your eye-teeth around.
Good luck to us all.
Thanks for bringing up this point. It explains some of the troubles I have had. After reading the foregoing discussion I am inclined to follow the standard advice: begin with a solid object and not with just a surface.
Dave
Great tip. I have used technique for other things but never connected the dots.
I use this technique where part of an object is recessed - for instance to make a reveal line in a rectangular form. Extrude the first portion, hold ctrl to extrude the reveal, then extrude the other side of the reveal. Push in at the new section to create the reveal.
I am working thru the e-book (Sketchup Guide for Woodworkers) which I think is great but in chapter 12 I am hitting some problems as yet I have been unable to navigate.
I am working on the Windsor Chair
So the first problem is step eleven I can't seem to get the guide points right. Just can't locate them. The second problem is the side stretchers seem to not fit properly. And third having difficulty in step 16 getting the ark shapes on the correct planes. I can accomplish this with drawing straight lines but the ark tool constantly goes off plane.
I would greatly appreciate if someone can give me some clarity on this.
To Winddncr:The guidepoints on the leg turnings should have been placed in Step 4 and Figure 27, page 87. This means the guide points should be a part of the final turning after doing the Follow Me. If they are not there, you can go back to Step 4. Or you need to find the center of that circle by placing two lines that intersect.
When you say that Side Stretchers don't fit, do you mean they are too short, too long, or are not aligned properly?
Here's a tip on arcs.... always make a plane or face first before using the Arc Tool. Don't try to draw an arc in space, rather on a flat surface. To make the flat surface, just draw a diagonal line to create a small triangle in that corner. Then pick your Arc Tool and place it on the triangle. After you have an arc, you can delete the diagonal line that created the triangle.
If more trouble, you may need to send your file to me.
Tim
Thank you Tim for the help with the guide points and the ark.
As for the stretchers the side stretcher appears too long and the middle too short.
Winddncr: send me your file and I'll see what is awry.
Tim
Log in or create an account to post a comment.
Sign up Log in