Clamping cauls: The secret to great glue-ups
The answer is not fancier clamps or specialized jigs; it is shopmade clamping cauls. Mar 08, 2011
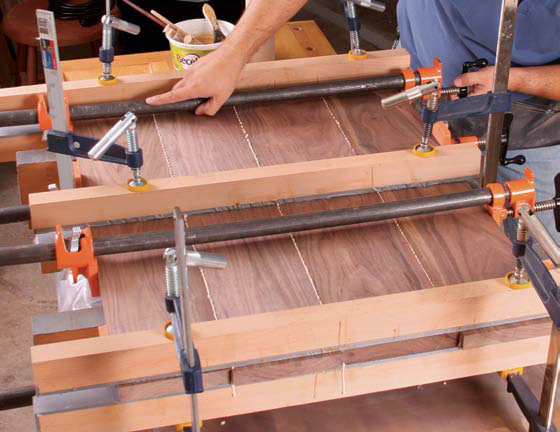
For more tips on using cauls, read Hendrik Varju’s article from FWW #218. In the article, he explains how to use them for gluing edge banding (pictured here), dado joints, dovetails, and through tenons.
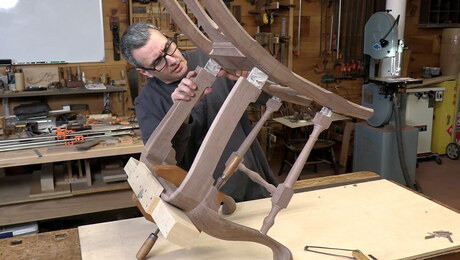
Woodworkers spend a lot of time cutting accurate joinery. Yet even the most accurately cut joint won’t be perfect if you glue it together incorrectly. Not only must you put the right amount of glue in the right places, but you also need to do the same with the clamping pressure. Some joints, such as dovetails, need pressure only in isolated spots, while others, such as thin edge-banding, need even pressure over the whole area. The answer is not fancier clamps or specialized jigs; it is shopmade clamping cauls. Quick to make and easy to use, cauls not only pull a joint tight and keep it at the correct angle, but they also protect the workpiece from direct contact with the clamp jaws.
Curved cauls spread pressure
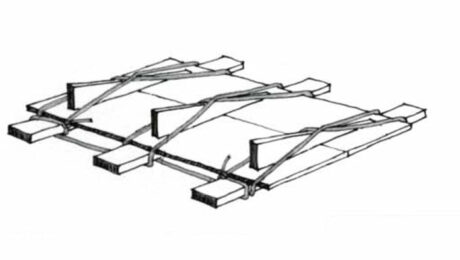
Everyone builds plywood boxes eventually. In some cases, you can use simple butt joints and biscuits to join the pieces. If the cabinet is going to be painted or if the sides won’t be exposed, you can use screws or nails to hold the biscuited assembly together while the glue dries. However, for maximum strength and clean looks, you probably will opt for rabbet and dado joints, and you’ll need clamps for the glue-up. In that case, you’ll have to plan the assembly more carefully. For deep cases, use convex curved cauls, which will extend pressure to the center of interior panels. Curved cauls also can distribute pressure along a long edge, bailing you out if you don’t have enough bar clamps. You can curve a caul with a few passes of your handplane or belt sander. Put glue in the rabbet and dado joints, with just a touch along the end grain of the horizontals. Excess glue will squeeze out into tight corners, causing problems later. After clamping, check the diagonals and make any necessary adjustments.
Some might ask how much curve cauls need to have in them to be effective. Straight shooter Gary Rogoswki puts it into perspective for us “I’ve found that tapering the cauls by 1/8 in. to 1/4 in. at their ends gives plenty of curvature, but don’t be afraid to experiment.Frankly, I spend more time thinking about the national debt than I do about making the curves symmetrical.” So don’t worry fret too much about making your curved cauls perfect.
Two ways to make curved clamping cauls
In this video Asa Christina demonstrates how he makes shopmade cauls on the jointer.
Ben Strano has found that his cauls all eventually wind up in the kindling pile, so he’d rather not spend much time or effort on them. When he needs a curved caul, he makes them with scrap 2x material and a few passes with a handplane. By taking overlapping passes starting near the end of the board and working your way towards the center with each pass. Considering the cauls made in this video take 12 seconds a piece, it’s hard to justify not taking the time to make cauls just for one glue up.
Flat tabletops start with clamping cauls
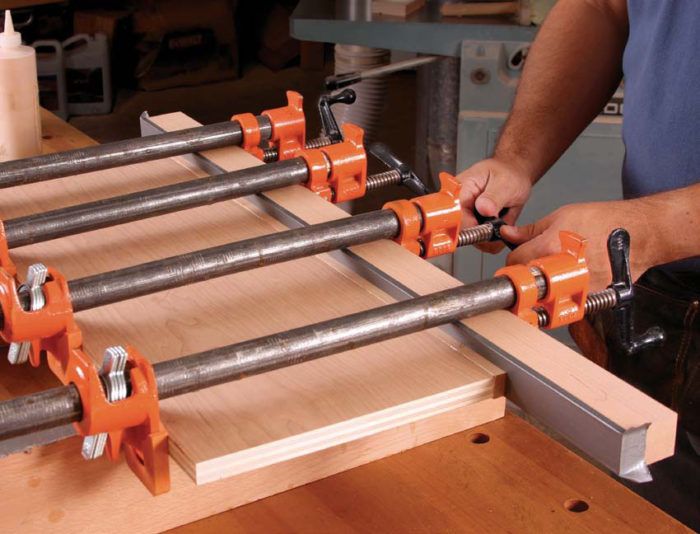
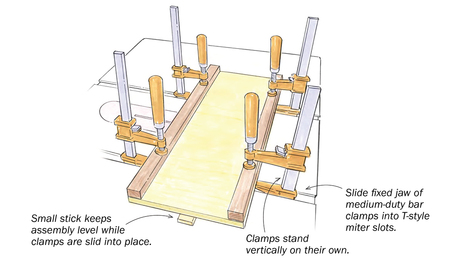
The simplest cauls are great for tabletop glue-ups. When edge-gluing boards to make a solid-wood panel, you can use hardwood cauls about 1 in. thick by 2 in. wide by up to 30 in. long. Use them in pairs to sandwich the boards together and keep them flush while other clamps apply the main pressure to the boards’ edges.
Some woodworkers recommend putting a slight convex curve on the clamping faces of the cauls. For this job, it may not be necessary. After all, no great force is being applied; you are only using the cauls to hold the boards flat, not bring them together. However, for panels wider than about 30 in., cauls are less effective. Splines, biscuits, or dowels will work better to align these boards, although they are more time-consuming.
Cover the cauls’ clamping surfaces with packing or duct tape to keep them from getting glued to the panel as squeeze-out oozes from the joints. Use a pair of cauls at each end of the panel, but if the panel is more than about 2 ft. long, use a third set of cauls in the center.
For the clamping cauls at either end, have the clamps come in from the ends of the panel to get even pressure across all the joints. For the center pair of cauls, the clamps have to come in from the edges of the panel.
Clamp on the cauls and then apply the edge clamps. You don’t need cauls to protect the edges from these clamps because you will clean them up later. The greater force of the edge clamps will easily overcome friction from the cauls and bring the boards together.
Parts of this article are excerpted from Hendrik Varju’s article The Secret to Great Glue-Ups in issue #218. Read the full article here.
More from FineWoodworking.com:
- Convenient Cauls for Panel Glue-Ups
- Curve Calls Precisely for Even Pressure
- Video: Avoiding Glue Squeeze-Out
- Tips on Gluing Joints
- Video: No-Stress Glue-Up


Comments
I can testify to this method as I've done it for my last couple of projects. Just last night I clamped up a panel of 3/8" cherry boards and they come out perfectly flat across the 16" span. Really great.
Why duct tape? It's sticky, sheds threads, and the surface is crosshatched.
Clear packing tape works perfectly. It's thin, uniform, and glue doesn't stick to it at all. Even better, it's cheap.
cbf123's suggestion to use packing tape is 100% right on. Plus there are handy dispensers to make it really easy to apply to your cauls.
This is a real time saver. Work smarter not harder.
even better than tape, wax the surfaces of the cauls. furniture polish or an old candle, then the glue won't stick and the tape won't fall off
I agree, I was trying to glue up a panel with a warp (yes on purpose) in it for a custom chair and without the cauls, and while I was doing something else, the boards suddenly blasted apart with such force that one of them hit the ceiling.... so not only is it a flatness issue, it might even be a safety issue :)
An alternative I've been using for 20+ years is pieces of 2 x 2 square aluminum extrusion that I get from the downfall area of local fabricators. They are also available from Metal Supermarkets around the country as scrap by the pound. They are practically indestructable, don't bend, don't warp, and don't require any taping or special treatment.
All too familiar - I use wax paper.
I find that if you put a slight crown on the cauls you will get better pressure towards the center.
The information in the article unfortunately is already well known techniques and equally well distributed info, just rewritten by yet another woodworker. There is nothing new.
..."crown on cauls you will get better pressure towards the center"
This is quite true, but more usefull when "face glueing" wider boards where you need as much pressure in the center as you will have at the outer edges.
Straight edged cauls are fine for the above purpose.
If glueing panals is a frequent operation you may want to send a few minutes to set screw some stips of polyproylene to the caul edge. I have aquired a certain amount of this material previously used on the boards in a hockey rink...works great.
Please excuse the typos, I have only had 1/2 cup of coffee this morning!
Cauls are a complete waste of time, unless you are using the cheesy "pony clamps" shown in the photos (a waste of money).
Properly mill and prepare the stock, use clamps that are not designed for water or air flow applications and your panels will come out flat-go figure...
Lighten up people!
It's great that you may have already glued a couple of boards together yourself, but understand that much of the FWW readership are newcomers who rely upon the magazine as a source of quality information.
There will always be more than one way to do a woodworking task. It is terribly arrogant to assume that one's method is the only way. Often it is all about problem solving a specific solution and/or making do with what you have. I'd wager an awful lot of woodworkers would be quite happy to have a large arsenal of Pony pipe clamps.
I recall reading something about how Sam Maloof used to very graciously show people his way of doing things without having to resort to putting others down.
Nice.
pboeckh is absolutely right on this one. Thanks also for the slight crown tip, makes a lot of sense.
"It's great that you may have already glued a couple of boards together yourself, but understand that much of the FWW readership are newcomers who rely upon the magazine as a source of quality information."
So Peter, my snarky comment obliviously put a bee in your bonnet. I will apologize for the snark, but stand by the comment. I will also agree with the second half of that statement. Regarding the first, you seem to presume to know a good deal about my experience- or was that a "put down"? With that said, many of us are passionate about the craft and tend to make strong statements about the same- I'll be the first to plead guilty on that count.
I also agree with some of your other thoughtful statements. There usually is more than one way to skin a cat, some are equal and some are inferior than others, in my opinion and experience this article falls into the second category. By the way, just for the record I have prepped and glued up countless panels in my career. I also vaguely remember trying cauls early in my career and quickly discarding them, as a self taught woodworker I have tried a lot of things. By the way the referenced article covers other uses for cauls which do have good value, it's to bad they were edited out in this case.
Regarding my comment on the use of cauls for panel glue up, let's analyze the Rube Goldberg assembly shown in the above photos of a relatively small panel. The three Pony clamps with pipe cost about $25.00 each, the six deep reach clamps $26.00 each on the low end for a total of $231.00, not to mention the cost in materials and labor for the cauls.. Three I-beam Jorgenson clamps are $40.00 each $120.00 total. Pipe clamps by their nature spring under tension taking the panel with it so the cauls and additional clamps are needed to negate the action of the pipes. So it makes no economic sense to me. Furthermore, consider the additional labor, particularly if one works alone, to manipulate all the pieces, parts into place- with the glue setting up. Not to mention dried glue that will have to be cleaned up that will be squeezed out under the cauls, without which it could be mopped up with a wet rag after clamping.
Stock that is properly prepared straight, flat and square edged will want to remain that way, even under pressure, that is with an I-beam type clamp that will remain straight under tension. If the individual boards are net thickness and need the faces to be aligned this is easily accomplished by tapping with a dead blow with the clamps under tension. For larger assemblies a few splines, biscuits, dominos, or dowels will work as well as cauls and will be much easier, it will also, more importantly, speed up assembly/glue up time verses extending it.
In short, the key to flat panels is the proper preparation of the stock and the use of quality clamps. With a good understanding of correct procedures and a little practice, milling out the stock and gluing up becomes an easy and quick task, a blessing considering the more challenging work sure to come later in the project. To take a simple task and make it overly complex may enhance one's reputation or better fill a few pages with print in a how to magazine, but I think it does a disservice to the novice.
This article sets up the use of cauls as the definitive way to glue up, it is not.
Best Regards
Rob
In my 40+ years as a cabinetmaker, I use cauls frequently and have found that "crowning" the edge slightly is a plus. It not only helps to concentrate pressure on the glue joint, but helps to minimize glue puddles under the cauls.
To prevent cauls from sticking to the surface, I have used the old school waxing method and it works to an extent, but if using a paste wax, use a thin coat. Excess wax may transfer to a surface and can be absorbed deep by some softer woods, especially from the heat of sanding. This problem can create extra work for you during the sanding and finishing stages. A cheap and efficient waxing method is to rub the caul surface with an old candle, or even a block of canning parafin. In any case, be sure to wipe away the excess wax.
I've also tried wax paper and even foil, but cutting and trimming is a pain, not to mention the expense of the product nowadays -- and it must be discarded after use. My material of choice is "clear packing tape." As some readers have highlighted, the material is cheap and is readily available. Just peel it off after use and store the cauls for the next job.
I think this article is excellent, especially for "new" woodworkers on board. Some readers indicated that this is tip is repetitive or re-written. Maybe so, but it never hurts us old-timers to get a refresher coarse once in awhile!
“[Deleted]”
Hi, there. I'm the author of the article and just now saw the comments posted on this site. So I thought I'd give a few thoughts on those comments.
Firstly, I have no problem milling my stock flat and square, but clamping cauls can help in a lot of situations to apply pressure where I need it, protect my workpiece, etc. In the case of edge-gluing, it is truly amazing how much the clamping cauls I use help keep the boards from sliding around, saving me a ton of hand planing in the end. I've tried the deadblow mallet idea many times, but have never taken to the idea. If it works for you, more power to you. I just find that cauls give me more control and a more predictable result.
The F-clamps I use are not long reach ones. They have a 5" reach and cost only about Cdn. $16 each. They go on sale all the time for half price, so you can't beat $8 a piece. The pipe clamps are also fairly economical and very useful to me in my workshop.
The cauls don't take long to make and once you've made a bunch they simply get used over and over again. So it isn't the kind of time commitment you might think. Make a few and use them on multiple projects over the years.
Also, while it may look like a complicated set-up to put on three sets of cauls, 6 F-clamps and 5 Pony clamps, you get very good at it after gluing hundreds of panels. In fact, I've demonstrated these techniques live at woodworking shows. I put the glue on my boards first and then ask the audience to time me to see how long it takes me to put all 6 cauls on, as well as all the F-clamps and Pony clamps. For a panel like the one you see pictured in this blog, I'll have the whole thing done in about 4 1/2 minutes. So that is plenty efficient for me, particularly given the slow set glue I like to use (about 12 minutes open time).
I used to use packing tape on my cauls too, like a lot of people said. One day I ran out of packing tape and used duct tape instead and now like it a lot better. It is easy to see what side the tape is on, the tape is very durable, doesn't leave any marks on my wood, etc. It's not as if I put new tape on the cauls every time I use them. The same strip of tape is used for dozens of glue-ups. So if duct tape costs more than packing tape, it's a minor issue for me. You might want to try it sometime if you've only used packing tape before. Both work, so it's up to you.
Anyhow, I know these caul methods aren't rocket science and they are definitely not a new idea. But a lot of beginners haven't tried them or used them in the right applications. I can't imagine doing many of my glue ups without them. Hopefully some of you found the article to be useful to you. I'm sure you will tweak your methods to your own liking.
All the best,
Hendrik Varju
Passion for Wood
My father has been building custom furniture for over 50 years and has acquired an array of cauls--steel, aluminum, and wood. I spend a good deal of time in the shop with him and can attest to the fact that using cauls leads to dramatically consistent results.
This is a little out of the ordinary, but my father has a "clamping table" that he built for the sole purpose of building large dining table tops. The "clamping table" has a perfectly flat slab of reclaimed granite as a top, with clamp cauls permanently mounted beneath it. It allows him--by himself--to assemble large dining table tops by only have to put cauls on the top side.
One thing that I would like to add, however, is that the author states that this clamping cauls only works effectively for edge glued widths up to 30 inches. That's a good rule of thumb, but for larger widths, you can simply repeat the process by clamping up two or more narrower widths with cauls. I usually use biscuits or a hidden spline in the center joint, but depending upon the type of table, you wouldn't always need to do so. It is a huge time (and headache) saver when compared to using biscuits or dowels.
For panel/small table top glue ups I have an array of cauls made from 1.5" square stock with an arch planed in to keep pressure even to the middle of the caul. The twist I added to mine, however, is that rather than using clamps to put them together, I join them into pairs with long hex bolts at the ends and tighten them down with a socket driver and wrench. They move around less than two independent pieces would, and they leave more space for applying clamps across the joint.
I know this an older article, but I just read all the comments and felt I had to chime in. This article is well written and good advise for gluing up panels. I was very put off by by the comments written by 27BStroke6. I've been a cabinet and furniture maker for 25 years and in my experience it doesn't matter how accurately your stock is milled when gluing up a panel. The sheer force of the edge clamps can and does often tend to cause the panel to warp. Using cauls does give more consistent results and is good advise to follow. It's obvious that 27bStroke 6 hasn't, in real life,glued up many panels !
I wouldn't consider myself a cabinet maker. Maybe a woodworker. I had a couple of chunks of lam beam left over from some framing work. I ripped them down to about two inches with no crown, pared them up and ran a couple of carriage bolts on either end, applied tape to keep the glue from sticking. I used them to glue up a coffee table top and a couple of end tables. The best glue up I've ever done. They work great
Log in or create an account to post a comment.
Sign up Log in