
I had to do it….. after attending the Williamsburg conference “Working Wood in the 18th Century”, I rushed to the computer to figure out that beautiful, interesting, complex, and strong 3-way miter joint. This was presented at the conference by an excellent craftsman, Andrew Hunter. Even after watching his careful layout and precision tool work, I was mystified about the joint details. I’m not sure that I’ve done this precisely per Andrew’s design, but I think it works.
Note: The steps shown are those used in SketchUp. The actual work in the shop would require a different procedure.
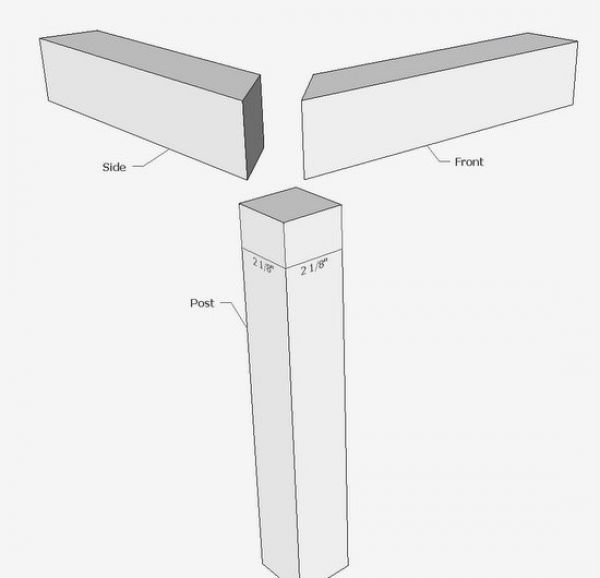
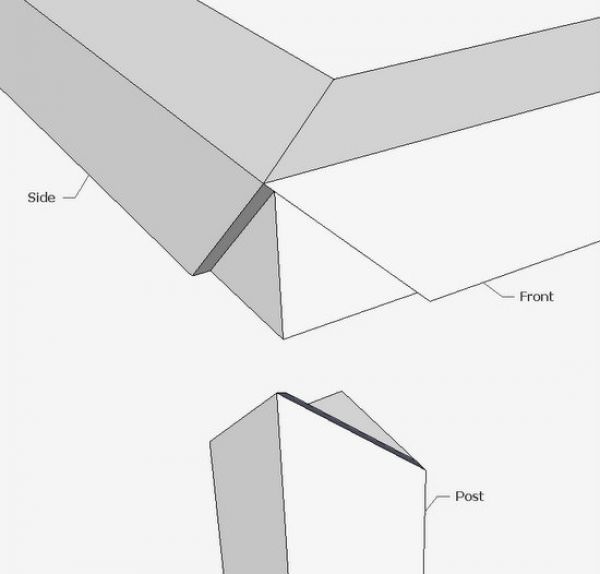
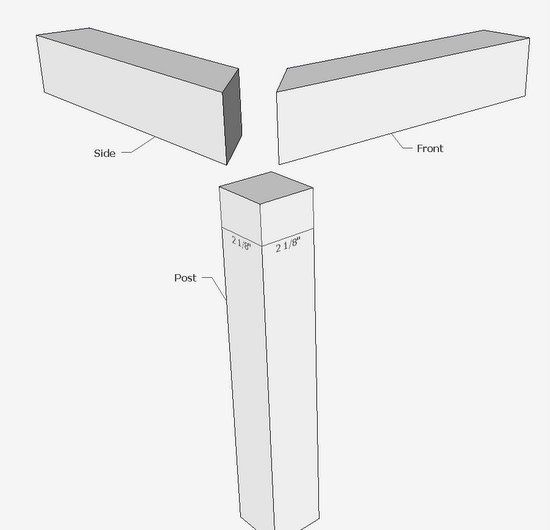
Step 1: Create the three pieces (components), Post, Front, and Side. These are all 2 1/8-in. square stock. The top pieces are mitered.
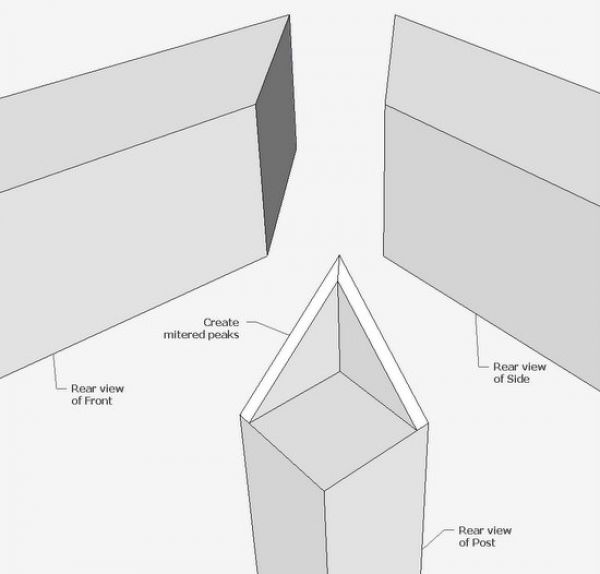
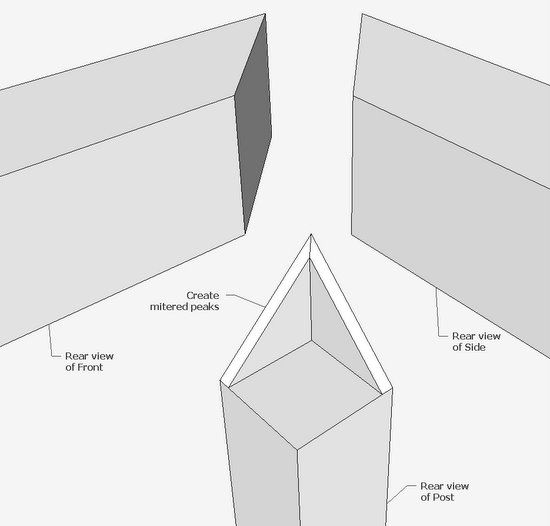
Step 2: Turn around to the rear view and create the mitered peak (1/4-in. thick) on the post. This will require the Line and Push/Pull Tools, and also the Intersect function.
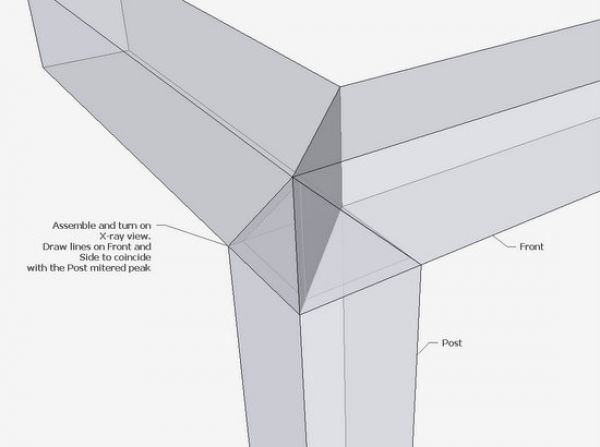
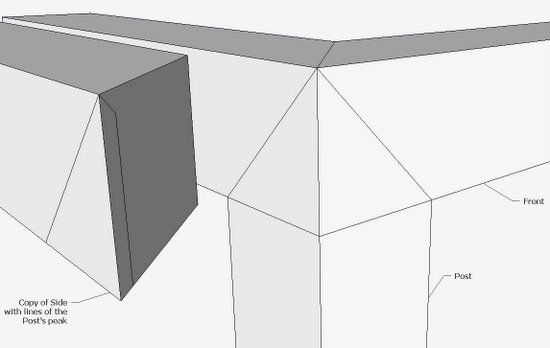
Step 3: Connect the three pieces and trace out the mitered peak lines on each of the Front and Side pieces. I use X-ray view to accomplish this.
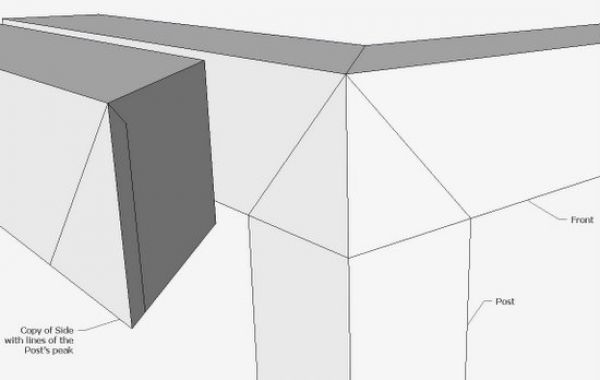
Step 4: After doing step 3, you should see the additional lines shown below on the copy of the Side component. With the Eraser Tool, remove the waste on the front face of the Side. Do the same operation on the Front piece.
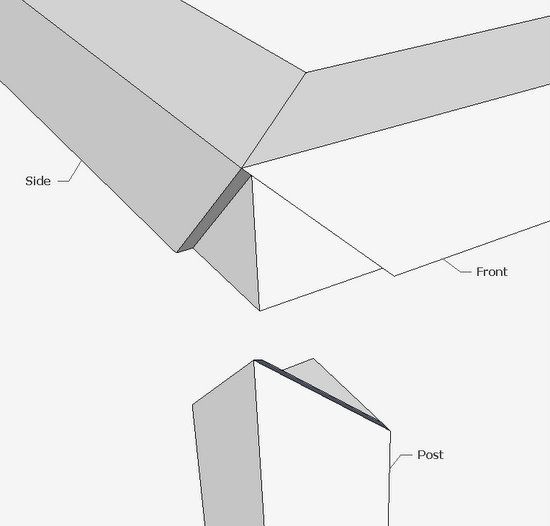
Step 5: After Step 4, you should have components that look like this…..
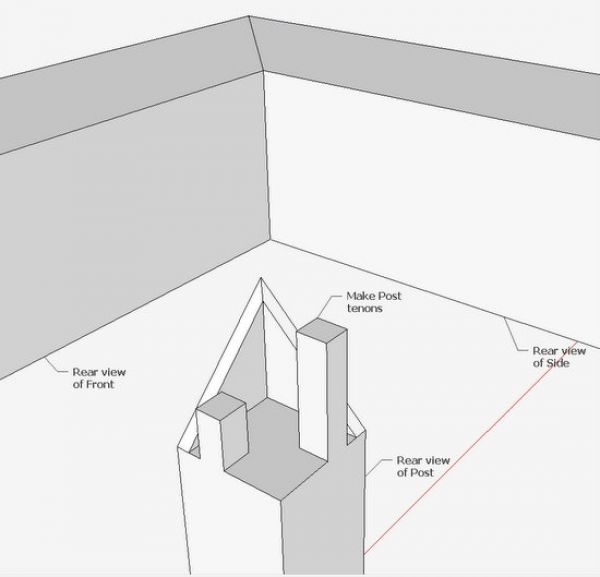
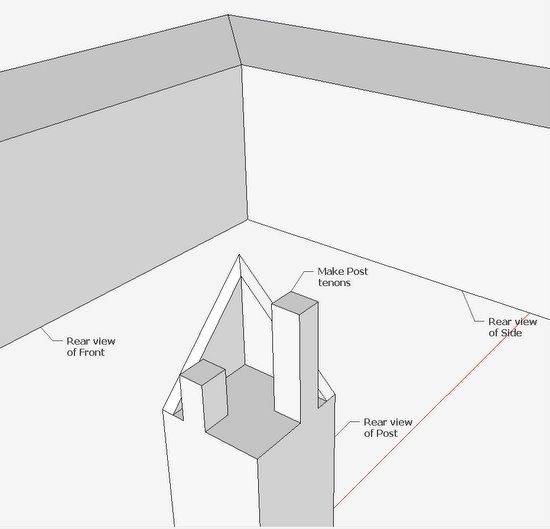
Step 6: Now orbit your view to a rear view of the joint. Then add the tenons to the Post. Dimensions are shown in a later view.
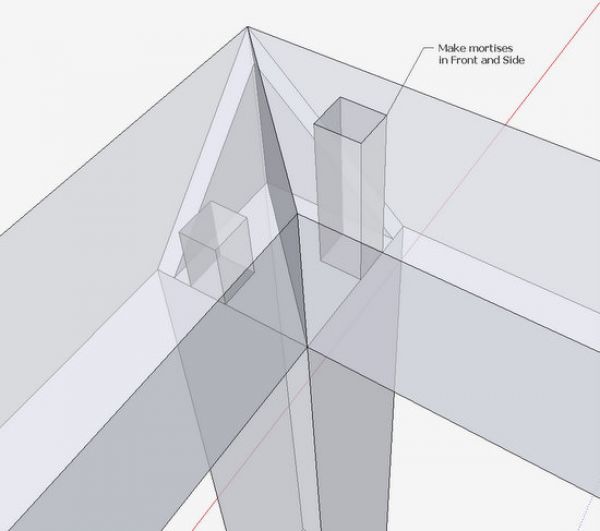
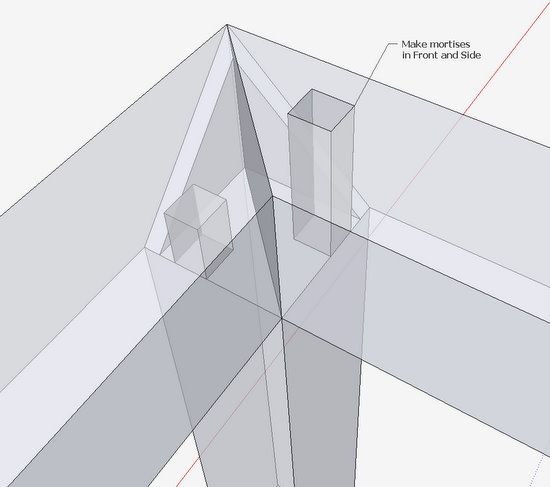
Step 7: Re-connect the three pieces, and trace over the tenons to make the mortises in the Front and Side pieces. Use X-ray view.
Step 8: Orbit around to the front of the joint. Review the X-ray view to see if everything fits properly and that there are no collisions of the joinery.
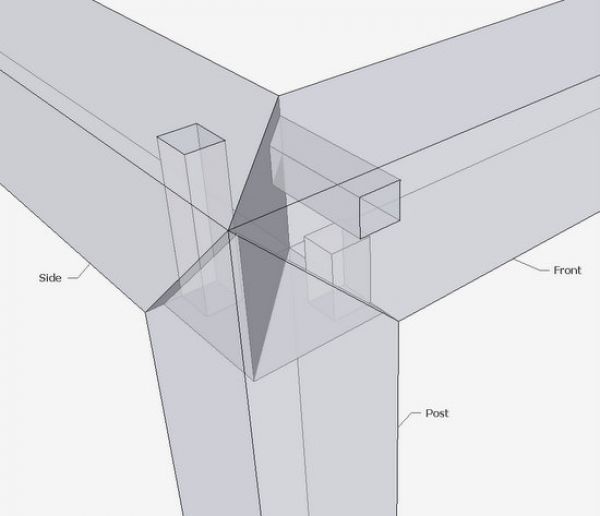
Step 9: Here’s the assembled joint using the Back Edges Style. Save as a Scene.
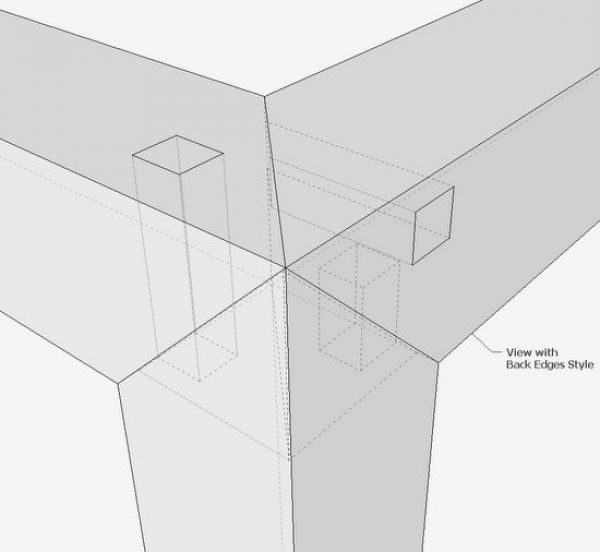
Step 10: Make an Exploded View with Back Edges and save as a Scene.

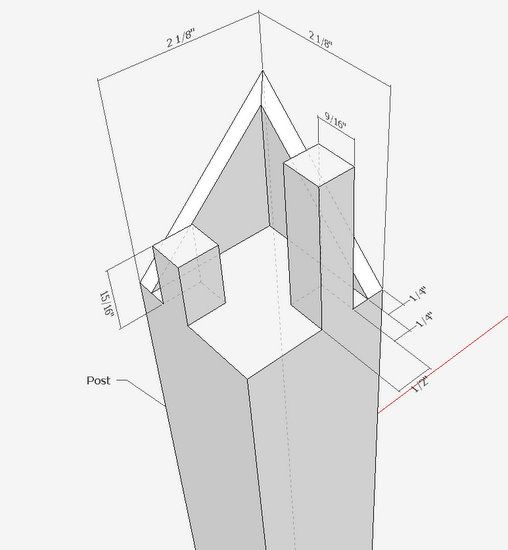
Step 11: This is a detail dimensioned perspective of the top of the Post.
Note: These are my dimensions and may not be exactly those used by Andrew.

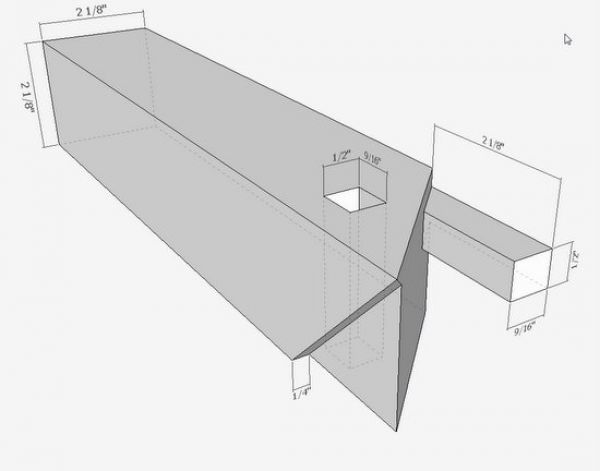
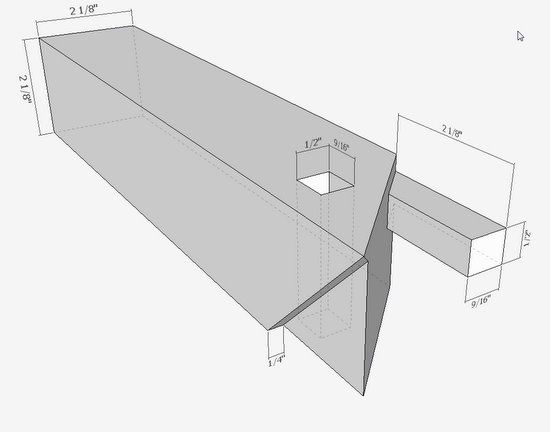
Step 12: This is a dimensioned perspective view of the Side.
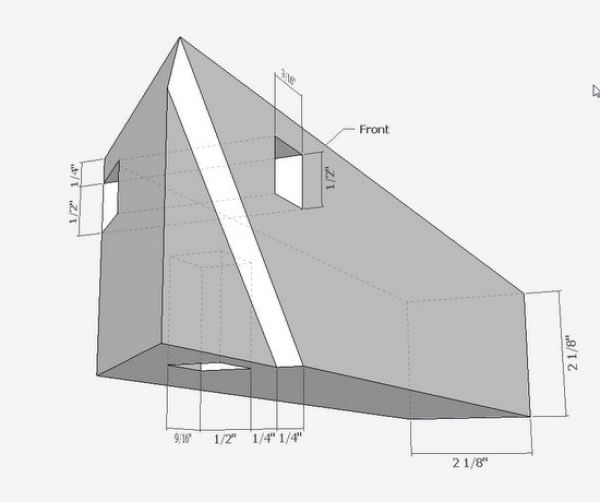
Step 13: This is a perspective dimensioned view of the Front piece.
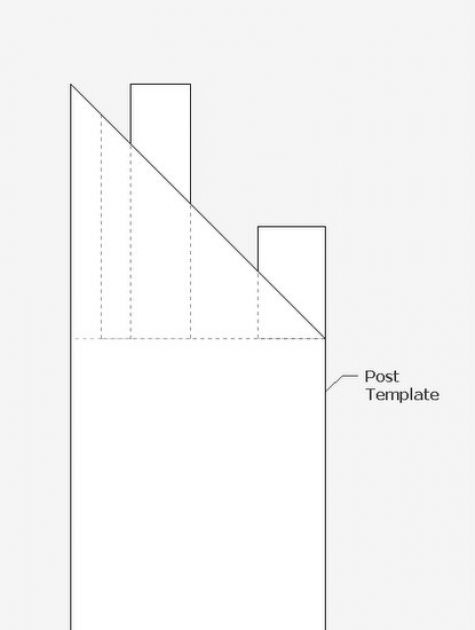
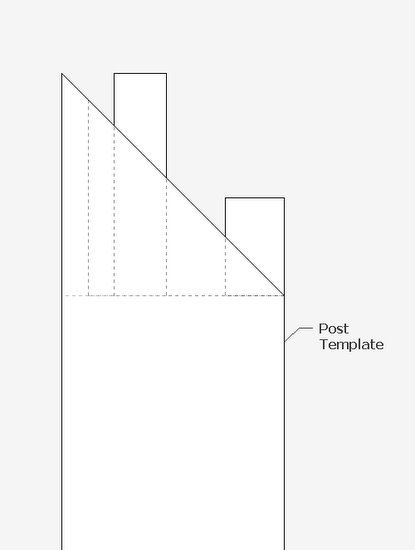
Step 14: Of course, I would make a bunch of orthographic templates in X-ray or Back Edges, and use these to help with the layout in the shop. I would have a top and side view templates for each of these complex pieces. I would not rely on the templates for accuracy of my knife joint lines, but they would help prevent me from making mistakes in the layout.
The above steps are an appropriate way to create these pieces in SketchUp. The procedure would be quite different in the shop. But now that I understand the joint, I can easily produce a step-wise procedure in SketchUp that would coincide with the actual wood.
Tim


Comments
Really nice explanations, thanks. As a brief hijack- Does anyone know of resources to help with a "How To..." to actually build this in the shop?
Great work on the digital model!
mrossk:
American Woodworker just published my article in their Dec/Jan 2011 issue (#151) on making three-way miters. It is a simplified version (the two apron pieces are identical, otherwise I never would have fit the article into 8 pages), but it should give you a good sense of a workable order to follow and adapt for these joint pieces. You can see a preview (only the first page, unfortunately) here: http://americanwoodworker.com/blogs/resources/archive/2010/11/09/preview-2-ways-to-cut-a-3-way-miter.aspx
Otherwise you might still find it in stores, even though the next issue is out.
Good luck!
being new to sketchup and woodworking, thank you very much for this write up. i learned a lot trying to reproduce this for myself and you did a great job! i never was able to make that horizontal mortise in the front rail though, what with the non-parallel sides. how did you pull that off?
To timmo: I made the horizontal tenon first, then assembled the 3 parts and traced over the boundary of the tenon within the upper horizontal component, thus making the mortise. You have to be in X-ray to perform this procedure.
Tim
i think i can picture that, thanks.
Well, after seeing this joint on the online Williamsburg segment I also had to experiment. Last weekend I completed my first attempt at fabricating this joint. Since I only worked from a hand sketch and didn't use SketchUp I won't be able to add much to this blog, but can offer some advice to those ready to build it in the shop. I found a 1/4" long straight bit in a router table and a 45 deg miter sled on my table saw were most helpful. And contrary to the customary sequence of making mortises first, then the mating tenons, I made the vertical member with the two tenons and mitered skirts first. This is because the spacing of the tenons can be affected by your router bit and they need to be flush with the sides of the member. If you're laying out the mortises in the horizontal members first you may not end up with them being flush. I found it wasn't that difficult to mark out the mortises based on the finished vertical tenons. Just carefully use an edge marking gauge to transfer the exact dimensions between the outboard faces (which you want to always use as your reference) and the tenon edges onto the horizontal members.
PVKen: Thanks for explaining your process for the actual build. Sounds a lot like what Andrew Hunter explained and showed. He also uses a router table with a 1/4-in. bit to make the cuts in the top of the vertical piece. He also uses a plane to pare the mitered skirts on the vertical post. He stressed the importance of starting with perfectly square stock, and careful accuracy in marking out the joints.
Tim
Yes, it wood be nice to be able to download the SketchUp you created. Thanks
Jim
It might be fun just to make one and not glue it, just to satisfy my woodworking skill ego. I will keep a copy and try it after work slows down, after I first handle all the little changes in my shop layout I need to make so the jobs flow smoother, things that I have been wanting to do for a couple of years now.
To Allencarl: it is my understanding that the Ming Dynasty cabinetmakers would not have used glue in joining their furniture. So you are right to skip the glue.
Tim
Thanks for this drawing, I realy appreciate
When spring will come in Montréal (wy workshop is not heated and the cold winter days are for my real job : writing... in french) it'll be the first test I will do.
Strange coincidence... For Xmas, my wife has recieved a book of photographies of chineese interiors and in a lot of those pictures I noticed tables and different pieces of furniture that I would like to reproduce. This fabulous miter joint will find it's utility in this future exercice.
Thanks again... and sorry for othographic mistakes, I'am used to write in "La langue de Molière" !!!
This illustration shows great detail. I've made at least 4 chess tables using the 3-way miter using walnut, maple and oak. Each displays outstanding grain detail. Try this technique...
Cut the post first. Set blade at height one third that of the wood.Make first 45 degree cut. Turn it 90 degrees and make 2nd 45 degree cut. This leaves a tenon.Trim it where it meets the 45.
Next cut the rails.. Cut the miter on each side of the stock. Hand chisel to cut a pocket for the tenon.
After the first attempt you'll be crafty.
Hi, guys. I'm brasilian and I live in Rio de Janeiro, the land of "samba and soccer". I love woodworking, too, and I was about crazy, looking for a sketch about three way miter. I'll try to do it, really, I'll do it.
Log in or create an account to post a comment.
Sign up Log in